
Lincoln Corsair: Transmission Cooling - 8-Speed Automatic Transmission – 8F35/8F40 / Removal and Installation - Transmission Fluid Warmer
Lincoln Corsair 2020-2026 Service Manual / Powertrain / Automatic Transmission / Transmission Cooling - 8-Speed Automatic Transmission – 8F35/8F40 / Removal and Installation - Transmission Fluid Warmer
Removal
NOTE: Removal steps in this procedure may contain installation details.
-
With the vehicle in N , position it on a hoist.
Refer to: Jacking and Lifting (100-02 Jacking and Lifting - 8-Speed Automatic Transmission – 8F35) .
-
Remove the LH front fender splash shield.
Refer to: Fender Splash Shield (501-02 Front End Body Panels - 8-Speed Automatic Transmission – 8F35) .
-
NOTE: Be prepared to collect escaping fluid.
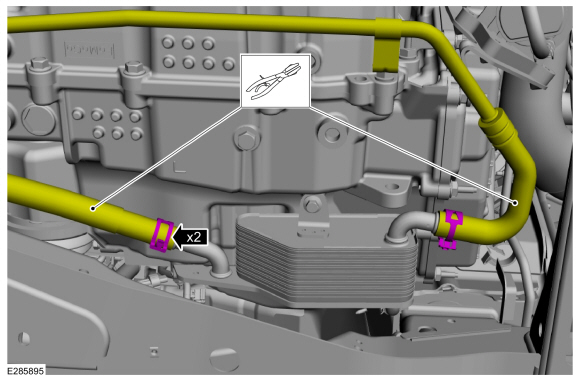
Clamp the coolant hoses, release the hose clamps and disconnect the transmission fluid warmer coolant hoses.
 |
-
NOTE: Be prepared to collect escaping fluid.
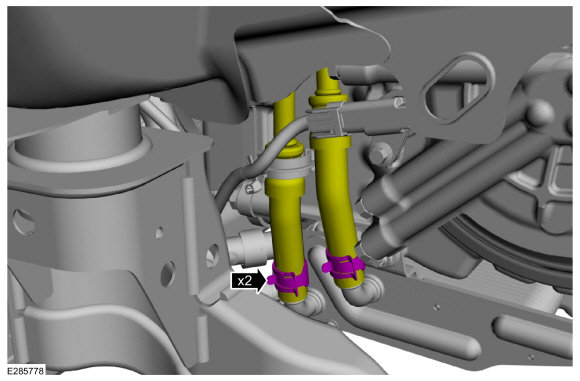
Release the clamps and disconnect the transmission fluid cooler tubes from the transmission fluid warmer.
 |
-
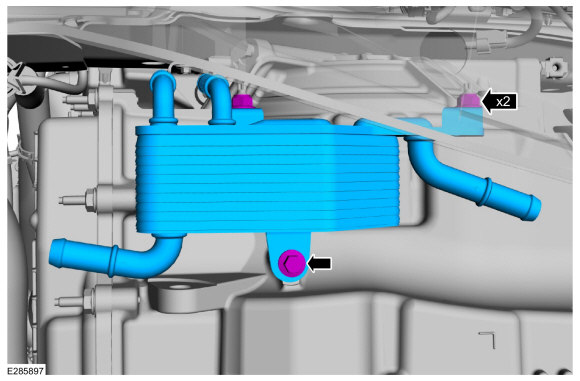
Remove the nuts, the bolt and the transmission fluid warmer.
Torque: 119 lb.in (13.5 Nm)
 |
Installation
-
To install, reverse the removal procedure.
-
Check the engine coolant level and adjust as necessary.
Refer to: Engine Cooling System Draining, Vacuum Filling and Bleeding (303-03 Engine Cooling - 8-Speed Automatic Transmission – 8F35) .
-
Check the transmission fluid level and adjust as necessary.
Refer to: Transmission Fluid Level Check (307-01 Automatic Transmission - 8-Speed Automatic Transmission – 8F35) .
 Removal and Installation - Transmission Fluid Cooler Tubes
Materials
Name
Specification
Motorcraft® MERCON® ULV Automatic Transmission FluidXT-12-QULV
WSS-M2C949-A, MERCON® ULV
Removal
With the vehicle in N , position it on a hoist...

Other information:
Lincoln Corsair 2020-2026 Owners Manual: Emergency Call Requirements. Emergency Call Limitations
Emergency Call Requirements WARNING: Do not wait for 911 Assist to make an emergency call if you can do it yourself. Dial emergency services immediately to avoid delayed response time which could increase the risk of serious injury or death after a crash. If you do not hear 911 Assist within five seconds of the crash, the system or phone may be damaged or non-functional. WARNING: Always pl..
Lincoln Corsair 2020-2026 Service Manual: Description and Operation - Steering Column - Overview
Steering Column Overview The steering column system consists of the following components: Steering wheel SCCM Telescopic and tilt motors (power adjustable steering column) Steering column control switches (power adjustable steering column) The steering column is the mechanical linkage between the steering wheel and the steering gear. The steering wheel is mounted t..
Categories
- Manuals Home
- 1st Generation Lincoln Corsair Owners Manual
- 1st Generation Lincoln Corsair Service Manual
- Capacities and Specifications - 2.0L
- Automatic Transmission - 8-Speed Automatic Transmission – 8F35/8F40
- Technical Specifications
- New on site
- Most important about car
Audio Unit
WARNING: Driving while distracted can result in loss of vehicle control, crash and injury. We strongly recommend that you use extreme caution when using any device that may take your focus off the road. Your primary responsibility is the safe operation of your vehicle. We recommend against the use of any hand-held device while driving and encourage the use of voice-operated systems when possible. Make sure you are aware of all applicable local laws that may affect the use of electronic devices while driving.

Copyright © 2026 www.licorsair.com