Lincoln Corsair: Transmission Cooling - 8-Speed Automatic Transmission – 8F35/8F40 / Removal and Installation - Transmission Fluid Cooler Tubes
Lincoln Corsair 2020-2026 Service Manual / Powertrain / Automatic Transmission / Transmission Cooling - 8-Speed Automatic Transmission – 8F35/8F40 / Removal and Installation - Transmission Fluid Cooler Tubes
Materials
| Name | Specification |
|---|---|
| Motorcraft® MERCON® ULV Automatic Transmission Fluid XT-12-QULV |
WSS-M2C949-A, MERCON® ULV |
Removal
-
With the vehicle in N , position it on a hoist.
Refer to: Jacking and Lifting - Overview (100-02 Jacking and Lifting, Description and Operation).
-
Remove the air cleaner assembly.
Refer to: Air Cleaner (303-12A Intake Air Distribution and Filtering - 2.0L EcoBoost (177kW/240PS) – MI4, Removal and Installation).
-
Remove the LH front fender splash shield.
Refer to: Fender Splash Shield (501-02 Front End Body Panels, Removal and Installation).
-
Remove the bolts and the engine undershield.
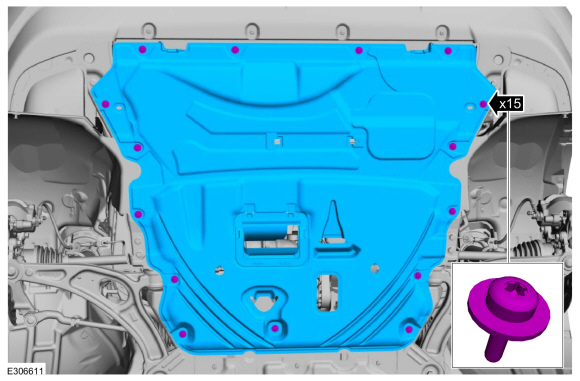 |
-
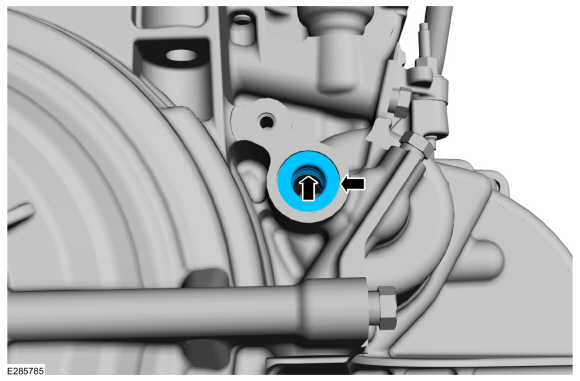
Disconnect the TSS sensor electrical connector.
 |
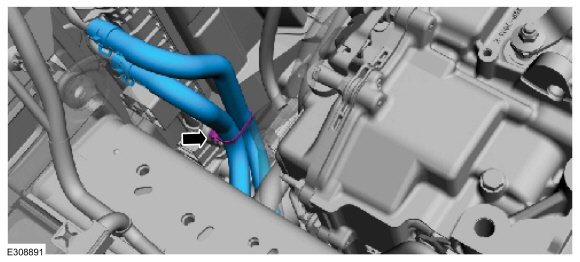
-
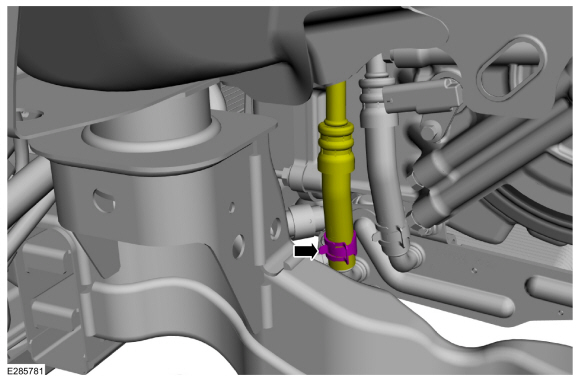
NOTE: Be prepared to collect escaping fluid.
Release the clamp and disconnect the transmission fluid warmer-to-transmission tube from the transmission fluid warmer.
 |
-
NOTE: Be prepared to collect escaping fluid.
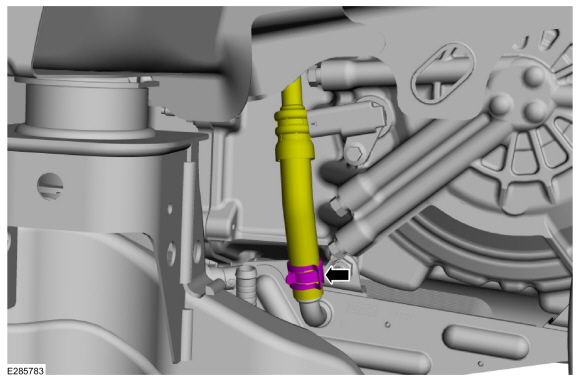
Remove the bolt and the transmission fluid warmer-to-transmission tube.
 |
-
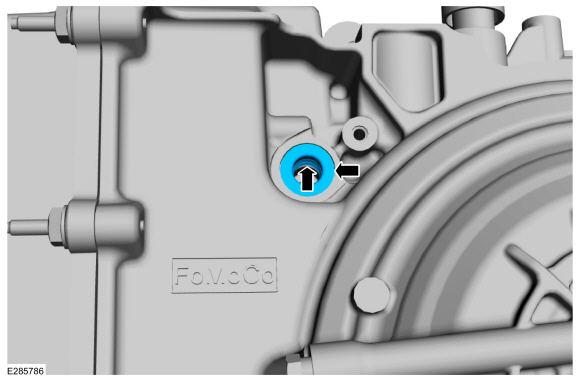
Inspect the transmission to be sure the transmission
fluid tube seal and backing ring were removed with the transmission
fluid tube and are not stuck in the transmission. If the transmission
fluid tube seal or backing ring is stuck in the transmission, remove the
seal and backing ring.
 |
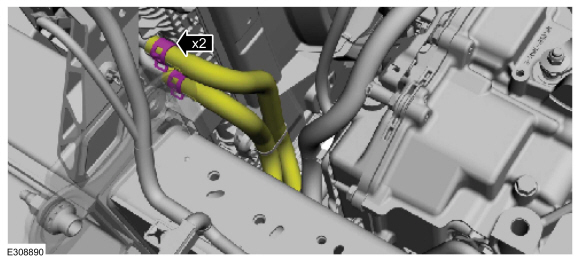
-
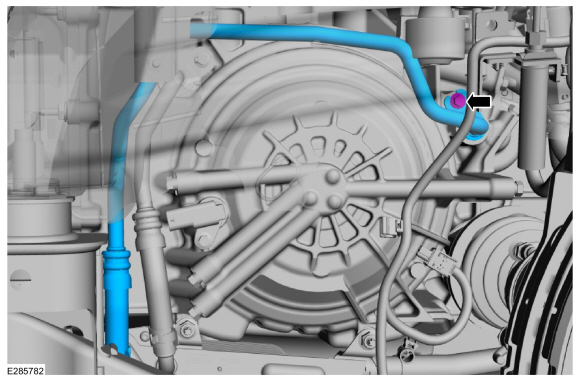
NOTE: Be prepared to collect escaping fluid.
Release the clamp and disconnect the transmission-to-transmission fluid warmer tube from the transmission fluid warmer.
 |
-
NOTE: Be prepared to collect escaping fluid.
Remove the bolt and the transmission-to-transmission fluid warmer tube.
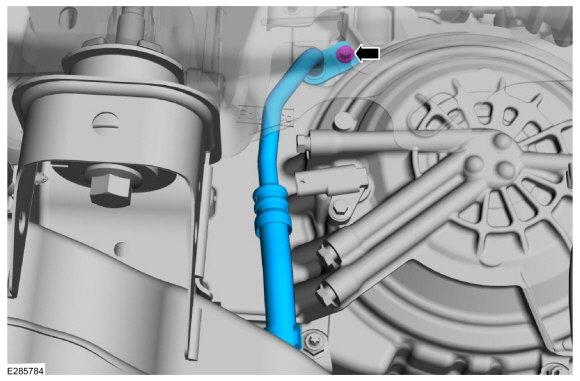 |
-
Inspect the transmission to be sure the transmission
fluid tube seal and backing ring were removed with the transmission
fluid tube and are not stuck in the transmission. If the transmission
fluid tube seal or backing ring is stuck in the transmission, remove the
seal and backing ring.
 |
-
NOTE: If equipped.
NOTE: Be prepared to collect escaping fluid.
Release the clamps and disconnect the transmission fluid cooler bypass valve hoses.
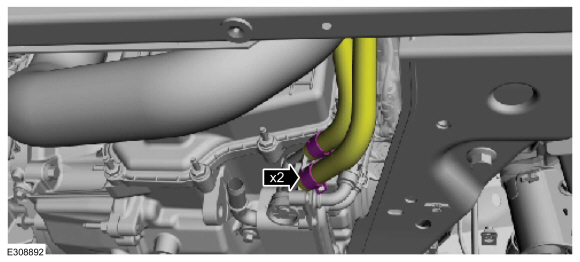 |
-
NOTE: If equipped.
NOTE: Be prepared to collect escaping fluid.
Release the clamps and disconnect the transmission fluid cooler hoses.
 |
-
NOTE: If equipped.
Release the retainer and remove the transmission fluid cooler hoses.
 |
Installation
-
NOTE: If equipped.
Install the transmission fluid cooler hoses and the retainer.
|
-
NOTE: If equipped.
Connect the transmission fluid cooler hoses and the clamps.
|
-
NOTE: If equipped.
Connect the transmission fluid cooler bypass valve hoses and the clamps.
|
-
Inspect and lubricate the seal and backing ring.
-
Seal (7D285)
-
Backing ring (7J324)
Material: Motorcraft® MERCON® ULV Automatic Transmission Fluid / XT-12-QULV (WSS-M2C949-A, ) (MERCON® ULV)
-
Seal (7D285)
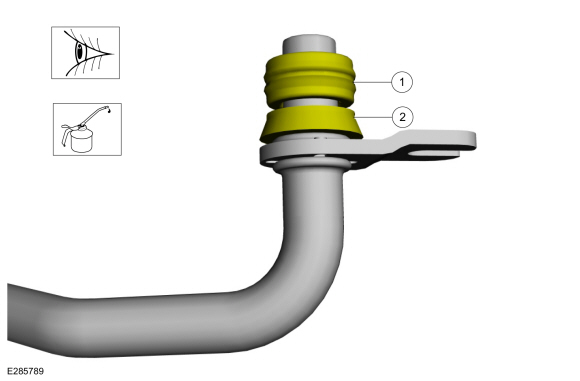 |
-
Install the transmission-to-transmission fluid warmer tube and the bolt.
Torque: 124 lb.in (14 Nm)
|
-
Connect the transmission-to-transmission fluid warmer
tube to the transmission fluid warmer and position the clamp.
|
-
Inspect and lubricate the seal and backing ring.
-
Seal (7D285)
-
Backing ring (7J324)
Material: Motorcraft® MERCON® ULV Automatic Transmission Fluid / XT-12-QULV (WSS-M2C949-A, ) (MERCON® ULV)
-
Seal (7D285)
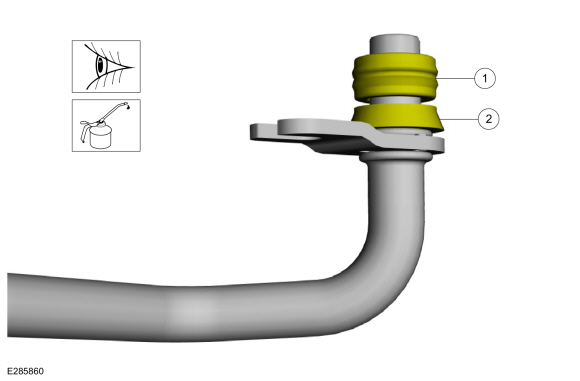 |
-
Install the transmission fluid warmer-to-transmission tube and the bolt.
Torque: 124 lb.in (14 Nm)
|
-
Connect the transmission fluid warmer-to-transmission
tube from the transmission fluid warmer and position the clamp.
|
-
Connect the TSS sensor electrical connector.
|
-
Install the engine undershield and the bolts.
|
-
Install the LH front fender splash shield.
Refer to: Fender Splash Shield (501-02 Front End Body Panels, Removal and Installation).
-
Install the air cleaner assembly.
Refer to: Air Cleaner (303-12A Intake Air Distribution and Filtering - 2.0L EcoBoost (177kW/240PS) – MI4, Removal and Installation).
-
Check the transmission fluid level and adjust as necessary.
Refer to: Transmission Fluid Level Check (307-01A Automatic Transmission - 8-Speed Automatic Transmission – 8F35/8F40, General Procedures).
 Removal and Installation - Transmission Fluid Auxiliary Cooler
Removal
Remove the A/C condenser.
Refer to: Condenser - 2.0L EcoBoost (177kW/240PS) – MI4 (412-00 Climate
Control System - General Information, Removal and Installation)...
 Removal and Installation - Transmission Fluid Warmer
Removal
NOTE:
Removal steps in this procedure may contain installation details.
With the vehicle in N , position it on a hoist.
Refer to: Jacking and Lifting (100-02 Jacking and Lifting - 8-Speed Automatic Transmission – 8F35)
...
Other information:
Lincoln Corsair 2020-2026 Owners Manual: Adaptive Headlamps (IF EQUIPPED)
About Adaptive Headlamps The headlamps are designed to adapt when you are steering around a curve, or if the camera detects lane markings indicating a curve or traffic signs indicating an intersection. The system is designed to operate if all of the following occur: You switch the system on through your vehicle settings...
Lincoln Corsair 2020-2026 Service Manual: Description and Operation - Wipers and Washers - Overview
Overview The windshield wiper/washer system is activated by the wiper/washer switch. The wiper/washer switch is mounted to the right side of the SCCM . The following functions/ features of the windshield wiper/washer system are: Mist wipe Windshield wash (includes front camera wash, if equipped) Courtesy wipe Windshield wipers (low/high speed) Intermittent wipers ..
Categories
- Manuals Home
- 1st Generation Lincoln Corsair Owners Manual
- 1st Generation Lincoln Corsair Service Manual
- Auto-Start-Stop
- Warning Lamps and Indicators
- Memory Function
- New on site
- Most important about car
Creating a Vehicle Wi-Fi Hotspot
You can create a Wi-Fi hotspot in your vehicle and allow devices to connect to it for access to the Internet.
 Select the settings option on
the
feature bar.
Select the settings option on
the
feature bar.
Copyright © 2026 www.licorsair.com