Lincoln Corsair: Automatic Transmission - 8-Speed Automatic Transmission – 8F35/8F40 / Overhaul - Main Control Valve Body
Special Tool(s) /
General Equipment
Materials
| Name |
Specification |
Motorcraft® MERCON® ULV Automatic Transmission Fluid
XT-12-QULV |
WSS-M2C949-A,
MERCON® ULV
|
Main Control Valve Body and Solenoid Body
-
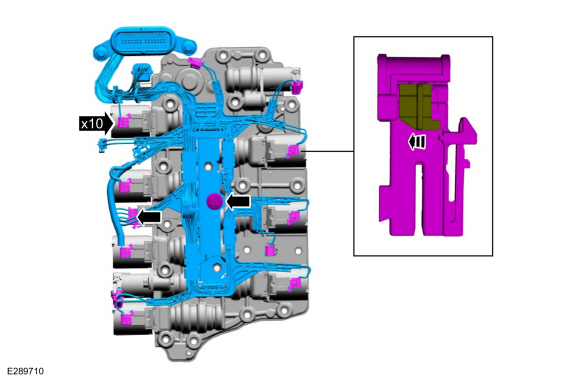
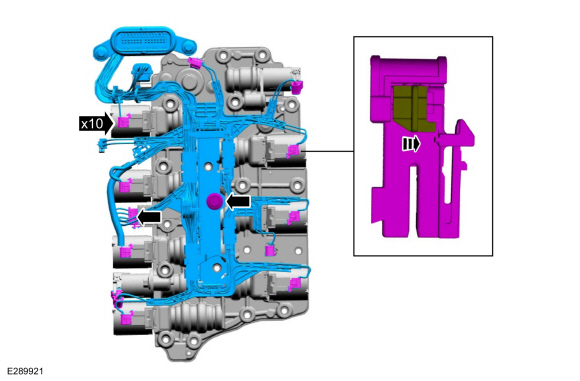
Unlock and disconnect the transmission shift solenoid electrical connectors and the TFT
sensor electrical connector. Unlock and disconnect the transmission
pressure sensor and the park lock solenoid electrical connector. Remove
the bolt and the wiring harness assembly.
-
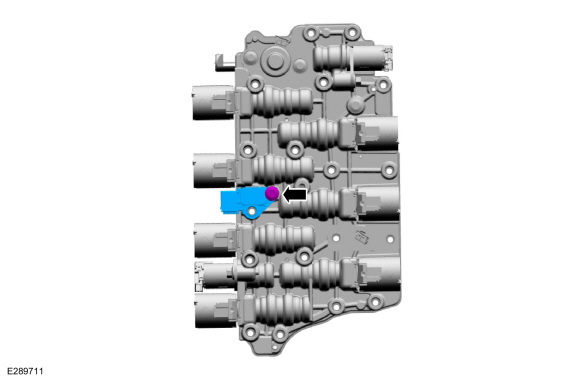
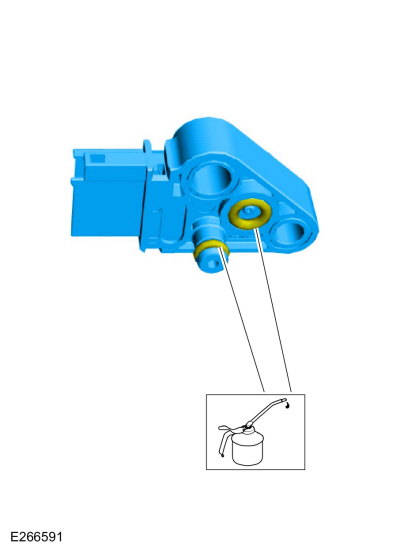
Remove the bolt and the transmission fluid pressure sensor.
-
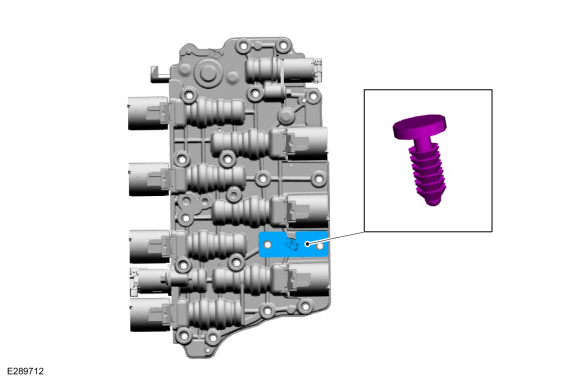
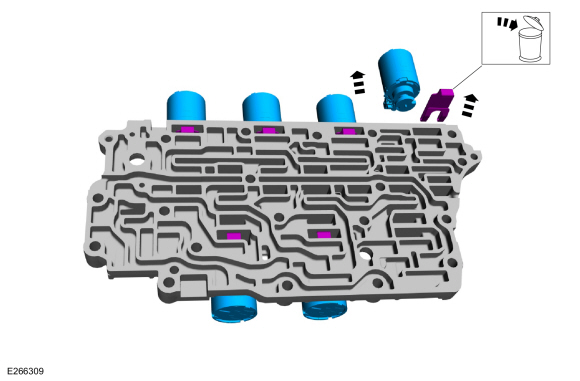
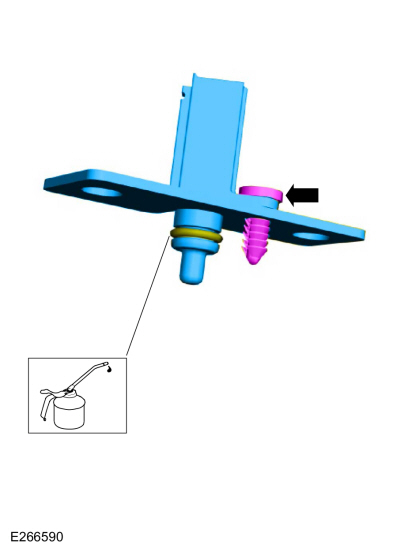
Remove the push pin retainer and the TFT sensor.
-
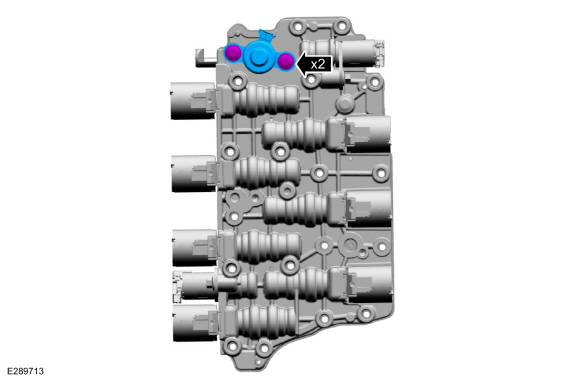
Remove the bolts and the park lock pawl solenoid.
-
Remove the solenoid body-to-main control bolt.
-
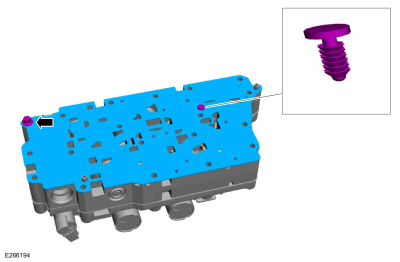
Remove the bolt, the push pin retainer and the seperator plate.
-
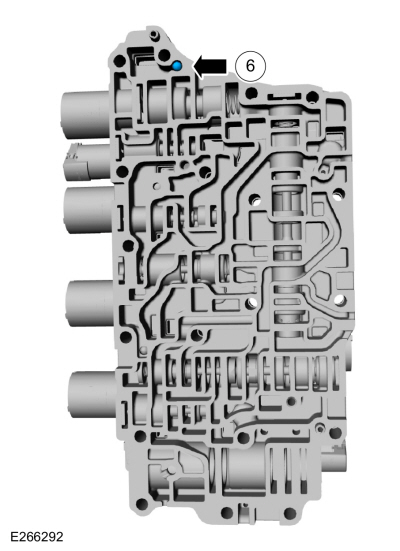
Remove the No. 6 check ball.
-
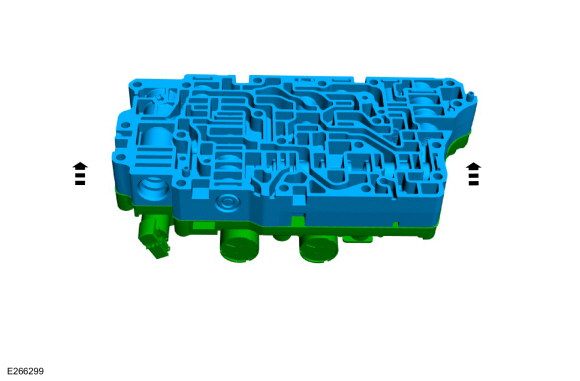
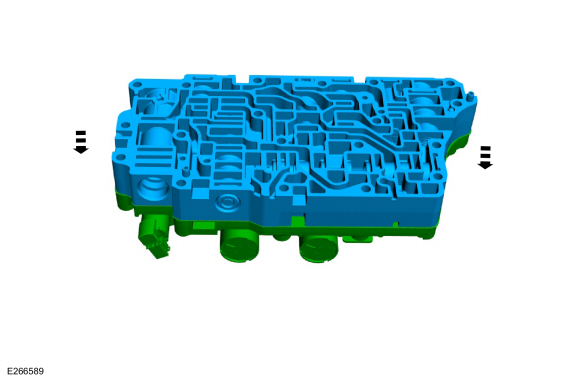
Seperate the main control from the solenoid body.
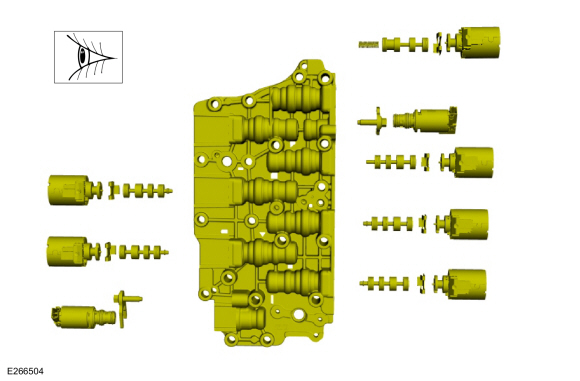
Main Control Valve Body and Solenoid Body
-
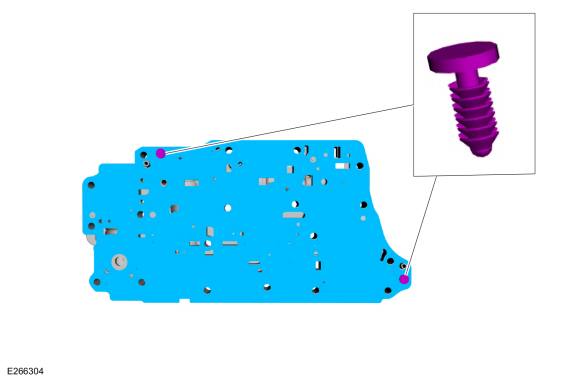
Remove the push pin retainers and the seperator plate.
-
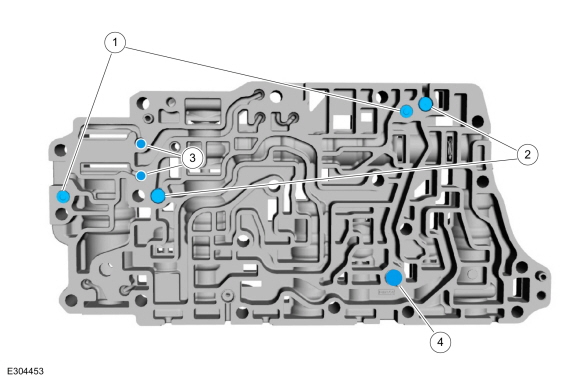
Remove the following items.
-
Solenoid damper (If equipped)
-
Bypass valve
-
Check ball (Park-by-wire vehicles)
-
Check ball
-
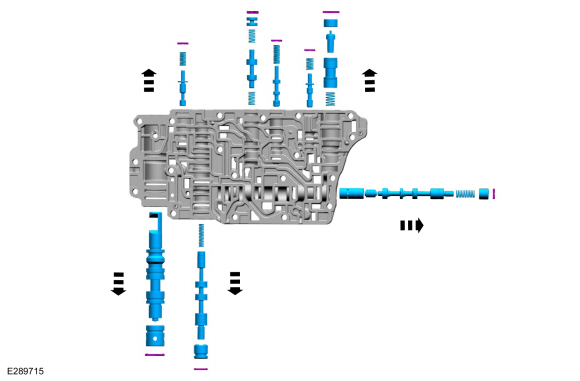
NOTICE:
Remove the valves by tapping the valve body on the
palm of the hand to slide the valves out of the bores or by threading a
4-mm bolt into the valves and pulling them out. If it is necessary to
use a pick, use extreme caution to prevent damaging the valves or valve
bores. If necessary, disassemble parts of the main control valve body in
small groups. Arrange the parts as they are removed to avoid mixing
similar pieces.
Compress the valve springs with a screwdriver and remove
the retainers with a magnet. Use a pick to remove the bypass valve
retainer. Remove the individual valves and springs from the main control
valve body by tapping the valve body on the palm of the hand to slide
the valves out of the bores.
Use the General Equipment: Flat Headed Screw Driver
-
NOTICE:
Do not stone or polish any valves or damage to the
valves can occur. If the valves do not move freely, install a new
assembly.
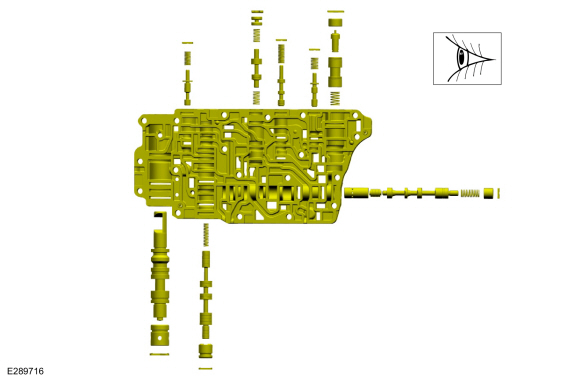
Clean the valves, springs and main control valve body.
-
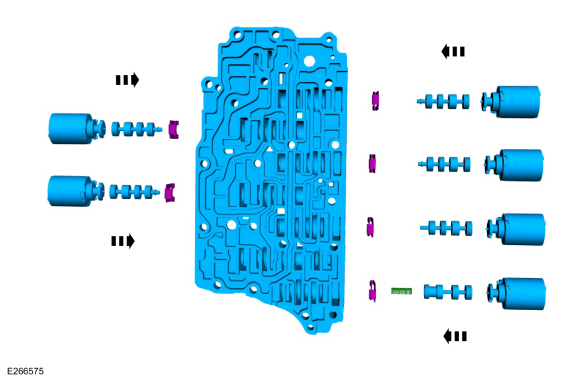
Install the valve body valves, springs and retaining
clips in the main control valve body. For valve and spring locations.
Refer to: Main Control Valve Body (307-01A Automatic Transmission -
8-Speed Automatic Transmission – 8F35/8F40, Description and Operation).
-
Install the following items.
-
Solenoid damper (If equipped)
-
Bypass valve
-
Check ball (Park-by-wire vehicles)
-
Check ball
-
Install the seperator plate and the push pin retainers.
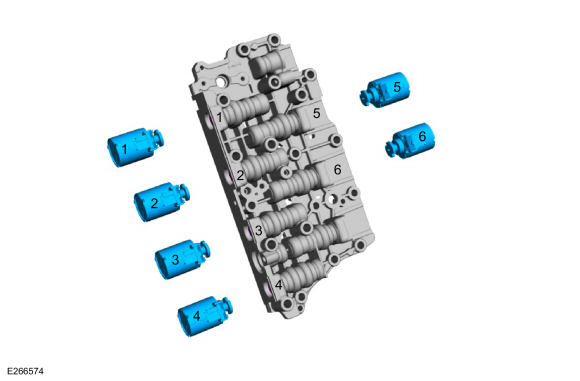
Solenoid Body
-
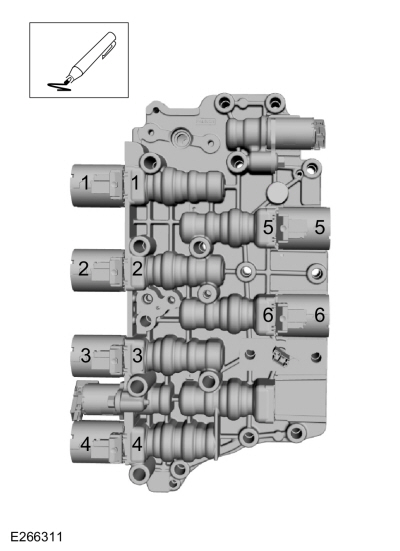
Using a paint marker, number the solenoids and the
solenoid body to correspond with the ports from which the solenoids are
located in the solenoid body.
-
Remove and discard the transmission shift solenoid clip and remove the transmission shift solenoid.
-
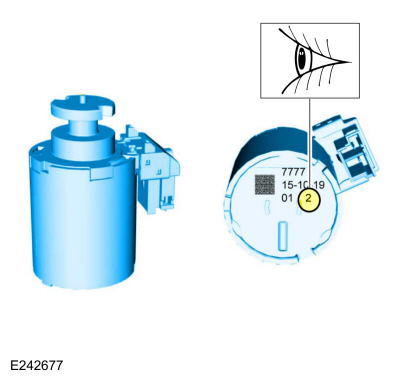
NOTE:
Failure to install the components in the correct
location will result in harsh/soft or no shifts or damage to the
transmission.
If new solenoids are needed, identify the solenoid band number.
-
Remove and discard the transmission solenoid hold down
clamp bolts, remove the clamps and transmission solenoids.
-
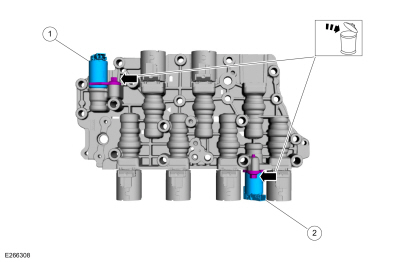
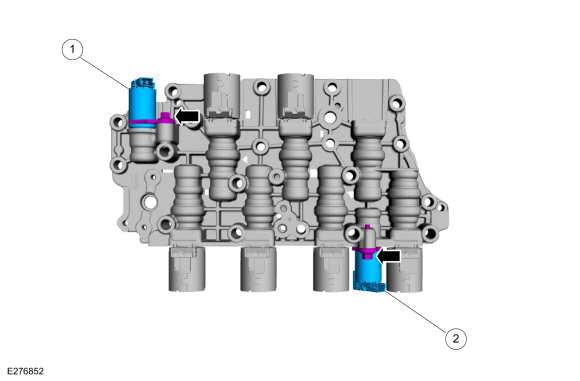
The TCC solenoid is identified by the green electrical connector.
-
The LPC solenoid is identified by the blue electrical connector.
-
Inspect the solenoid screens for debris that may restrict transmission fluid flow through the screen.
-
NOTICE:
Be careful not to wash the numbers from the
solenoids or the solenoid body. Failure to install the solenoids in the
ports they were originally in can result in damage to the transmission
or a harsh shift.
NOTICE:
Do not stone or polish any valves or damage to the
valves can occur. If the valves do not move freely during assembly,
install a new solenoid body.
Clean and inspect the solenoid body, solenoids and valve assemblies for damage.
-
Install the transmission shift control valves and the transmission shift control solenoids and new clips.
-
NOTE:
The A-F clutches use linear force solenoids, the CIDAS are all normally low solenoids.
-
SSA (CB12345) solenoid part number 7J136
-
SSF (CB28) solenoid part number 7J136
-
SSB (C46R) solenoid part number 7J136
-
SSD (SOWC) solenoid part number 7J136
-
SSE (C5678) solenoid part number 7J136
-
SSC (CB37) solenoid part number 7J136
-
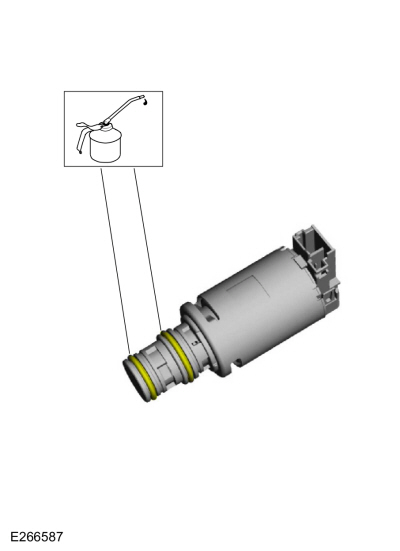
Lubricate the transmission solenoid O-rings with clean transmission fluid.
Material: Motorcraft® MERCON® ULV Automatic Transmission Fluid
/ XT-12-QULV
(WSS-M2C949-A, )
(MERCON® ULV)
-
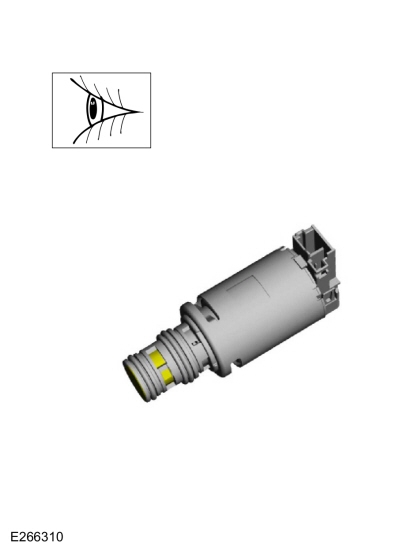
NOTE:
If installing a new Variable Force Solenoid (VFS), determine the base
part number of the solenoid(s). The TCC solenoid is a normally low
pressure solenoid. The LPC solenoid is a normally high pressure
solenoid.
Install the transmission solenoids, hold down clamps and new bolts.
-
The TCC solenoid is identified by the green electrical connector. The TCC solenoid part number 7G136.
-
The LPC solenoid is identified by the blue electrical connector. The LPC solenoid part number 7G383.
Torque:
89 lb.in (10 Nm)
Main Control Valve Body and Solenoid Body
-
Install the main control body to the solenoid body.
-
Install the No. 6 check ball.
-
Install the seperator plate, the push pin retainer and the bolt.
Torque:
62 lb.in (7 Nm)
-
Install the solenoid body-to-main control bolt.
Torque:
89 lb.in (10 Nm)
-
Install the park lock pawl solenoid and the bolts.
Torque:
53 lb.in (6 Nm)
-
Lubricate the TFT sensor O-ring with clean transmission fluid.
Material: Motorcraft® MERCON® ULV Automatic Transmission Fluid
/ XT-12-QULV
(WSS-M2C949-A, )
(MERCON® ULV)
-
Install the TFT sensor and push pin retainer.
-
Lubricate the transmission fluid pressure sensor O-rings with clean transmission fluid.
Material: Motorcraft® MERCON® ULV Automatic Transmission Fluid
/ XT-12-QULV
(WSS-M2C949-A, )
(MERCON® ULV)
-
Install the transmission fluid pressure sensor and the bolt.
Torque:
89 lb.in (10 Nm)
-
Install the transmission wiring harness assembly and
install the bolt. Connect the transmission shift solenoid electrical
connectors and the TFT
sensor electrical connector and lock the connectors. Connect the
transmission fluid pressure sensor, the park lock solenoid electrical
connector and lock the connectors.
Torque:
89 lb.in (10 Nm)
To remove the transmission assembly.
Refer to: Transmission (307-01A Automatic Transmission - 8-Speed Automatic Transmission – 8F35/8F40, Removal and Installation)...
Special Tool(s) /
General Equipment
100-002
(TOOL-4201-C)
Holding Fixture with Dial Indicator Gauge
205-153
(T80T-4000-W)
Handle
205-199
(T83T-3132-A1)
Installer, Spindle/Axle ShaftT83-4000-ATKIT-1983-FTKIT-1983-FLMTKIT-1983-FX
307-003
(T57L-500-B)
Holding Fixture, Transmission
307-091Handle, Torque ConverterTKIT-2009TC-F
307-300Gauge Bar, Shim Sel..
Other information:
What Is the Modem
The modem allows you to connect your
vehicle to the Internet to use when you are
on the road.
If you enable the modem using the Lincoln
Way app, you can access the following
services:
Locating and remotely starting, locking
and unlocking your vehicle. See the
information in the Lincoln Way app.
Automatic system updates.
Note: We may need to update operating
system so..
Special Tool(s) /
General Equipment
Interior Trim Remover
Removal
NOTE:
LH (left-hand) side shown, RH (right-hand) side similar.
Remove the rear door window control switch bezel assembly.
Release the locking tabs from the rear door window control switch bezel assembly.
Use the General Equipment: Interior Trim Remover
Disconnect the rear door window con..


 Removal - Transmission
 Overhaul - Transmission