Lincoln Corsair: Wheels and Tires / Technical Specifications
Wheel Lug Nut Torque Specifications
WARNING: When you install a wheel, always remove any corrosion, dirt or foreign materials present on the mounting surfaces of the wheel or the surface of the wheel hub, brake drum or brake disc that contacts the wheel. Make sure to secure any fasteners that attach the rotor to the hub so they do not interfere with the mounting surfaces of the wheel. Installing wheels without correct metal-to-metal contact at the wheel mounting surfaces can cause the wheel nuts to loosen and the wheel to come off while your vehicle is in motion, resulting in loss of vehicle control, personal injury or death.

* Torque specifications are for nut and bolt threads free of oil, dirt and rust. Use only Ford recommended replacement fasteners.
Retighten the lug nuts to the specified torque within 100 mi (160 km) after any wheel disturbance (such as tire rotation, changing a flat tire, wheel removal).
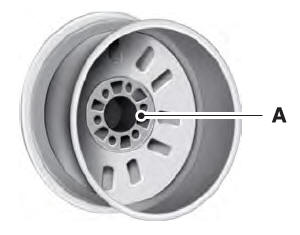
- Wheel pilot bore.
Inspect the wheel pilot bore and mounting surface prior to installation. Remove any visible corrosion or loose particles.
 Changing a Road Wheel
WARNING: The tire pressure
monitoring system is not a substitute for
manually checking tire pressures. You
should periodically check tire pressures
using a pressure gauge...

Other information:
Lincoln Corsair 2020-2026 Service Manual: Description and Operation - Airbag and Seatbelt Pretensioner Supplemental Restraint System (SRS) - Overview
Overview The RCM continually receives and monitors inputs from the OCSM and various other hard-wired switches and sensors. If the RCM detects a sudden vehicle deceleration and/or lateral deceleration based on the information received from the various sensors and determines that deployment is necessary, it applies voltage and current to deploy the appropriate SRS components. The SRS utilizes..
Lincoln Corsair 2020-2026 Service Manual: Removal and Installation - Intake Manifold
Removal NOTICE: The turbocharger compressor vanes can be damaged by even the smallest particles. When removing any turbocharger or engine air intake system component, ensure that no debris enters the system. Failure to do so may result in damage to the turbocharger. With the vehicle in NEUTRAL, position it on a hoist. Refer to: Jacking and Lifting - Overview (100-02 Jacking and ..
Categories
- Manuals Home
- 1st Generation Lincoln Corsair Owners Manual
- 1st Generation Lincoln Corsair Service Manual
- Interior Lamps
- Memory Function
- Normal Scheduled Maintenance
- New on site
- Most important about car
Second Stage: Checking Tire Pressure
WARNING: If the tire does not inflate to the recommended tire pressure within 15 minutes, stop and call roadside assistance.
WARNING: The power plug may get hot after use and should be handled carefully when unplugging.
Check the air pressure of your tires as follows: