Lincoln Corsair: Engine Emission Control - 2.0L EcoBoost (177kW/240PS) – MI4 / Removal and Installation - Exhaust Gas Recirculation (EGR) Cooler
Lincoln Corsair 2020-2024 Service Manual / Powertrain / Engine / Engine Emission Control - 2.0L EcoBoost (177kW/240PS) – MI4 / Removal and Installation - Exhaust Gas Recirculation (EGR) Cooler
Removal
NOTE: Removal steps in this procedure may contain installation details.
-
Remove the air cleaner.
Refer to: Air Cleaner (303-12A Intake Air Distribution and Filtering - 2.0L EcoBoost (177kW/240PS) – MI4, Removal and Installation).
-
Remove the air cleaner outlet pipe.
Refer to: Air Cleaner Outlet Pipe (303-12A Intake Air Distribution and Filtering - 2.0L EcoBoost (177kW/240PS) – MI4, Removal and Installation).
-
Remove the battery tray.
Refer to: Battery Tray - 2.0L EcoBoost (177kW/240PS) – MI4/2.3L EcoBoost (199kW/270PS) (414-01 Battery, Mounting and Cables, Removal and Installation).
-
Drain the cooling system.
Refer to: Engine Cooling System Draining, Vacuum Filling and Bleeding (303-03A Engine Cooling - 2.0L EcoBoost (177kW/240PS) – MI4, General Procedures).
-
-
Disconnect the quick release coupling and position aside the transmission oil cooler outlet hose.
Refer to: Quick Release Coupling (310-00A Fuel System - General Information - 2.0L EcoBoost (177kW/240PS) – MI4, General Procedures).
-
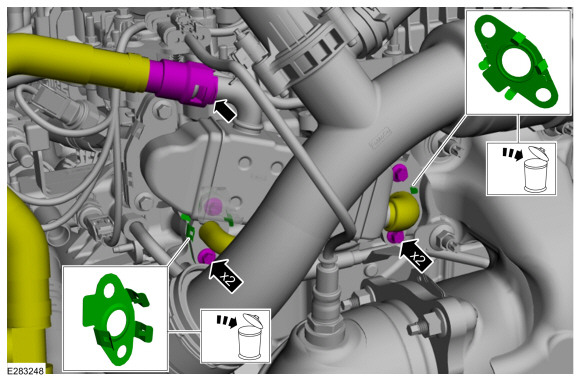
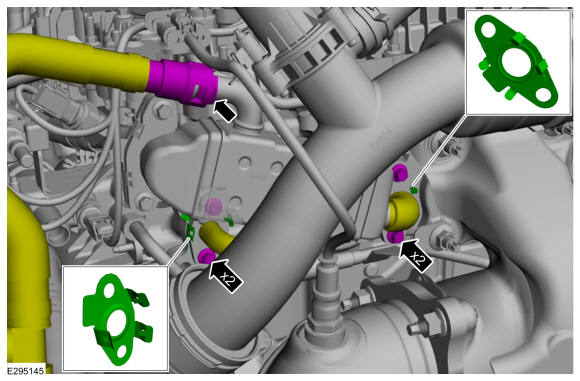
Remove the EGR hot side fasteners. Remove and discard the gasket.
-
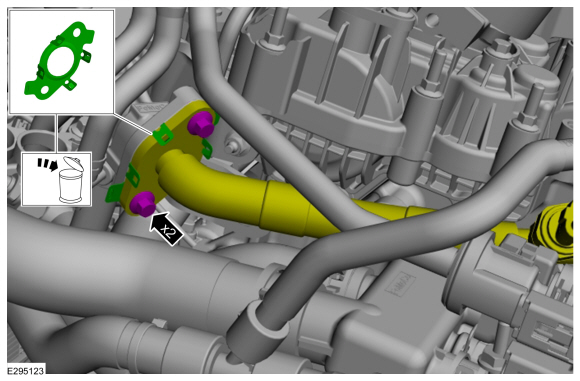
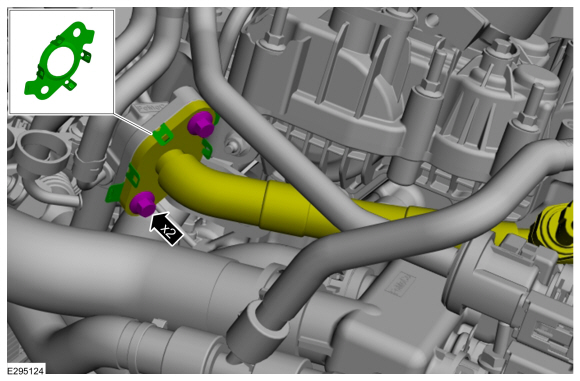
Remove the EGR coolant tube fasteners. Remove and discard the gasket
-
Disconnect the quick release coupling and position aside the transmission oil cooler outlet hose.
 |
-
-
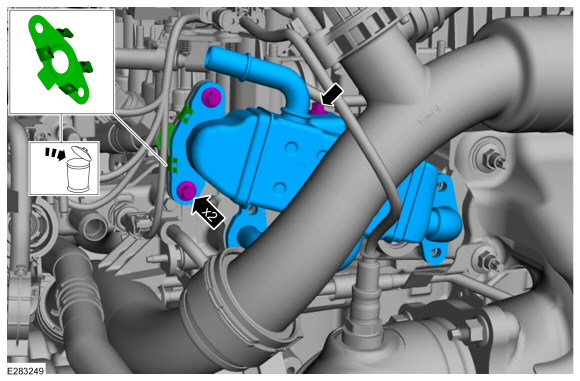
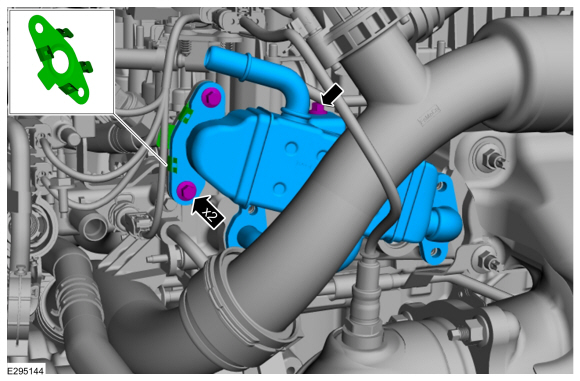
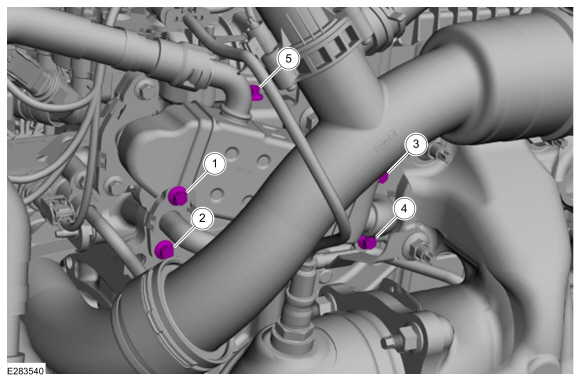
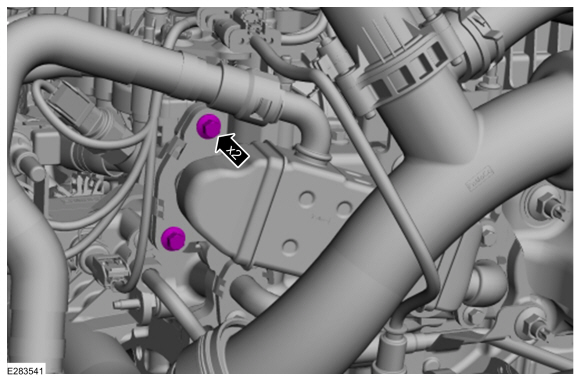
Remove the EGR cold side fasteners. Remove and discard the gasket.
-
Remove the EGR cooler mounting bracket fastener and EGR cooler.
-
Remove the EGR cold side fasteners. Remove and discard the gasket.
 |
Installation
-
-
Loosen the fasteners.
-
Install the new gasket.
-
Loosen the fasteners.
 |
-
-
Install the new gasket.
-
Install the EGR cooler and mounting bracket fasteners and hand tighten at this stage.
-
Install the EGR cold side fasteners and hand tighten at this stage.
-
Install the new gasket.
 |
-
-
Install the new gasket.
-
Install the EGR coolant tube fasteners and hand tighten at this stage.
-
Install the new gasket.
-
Install the EGR hot side fasteners and hand tighten at this stage.
-
Connect the quick release coupling.
Refer to: Quick Release Coupling (310-00A Fuel System - General Information - 2.0L EcoBoost (177kW/240PS) – MI4, General Procedures).
-
Install the new gasket.
 |
-
Tighten in the sequence shown.
Torque: 97 lb.in (11 Nm)
 |
- Torque: 97 lb.in (11 Nm)
 |
-
-
Install the new gasket.
-
Tighten the fasteners.
Torque: 97 lb.in (11 Nm)
-
Install the new gasket.
 |
-
To install, reverse the removal procedure.
 Removal and Installation - Exhaust Gas Recirculation (EGR) Coolant Outlet Temperature Sensor
Materials
Name
Specification
Motorcraft® Silicone Brake Caliper Grease and Dielectric CompoundXG-3-A
ESA-M1C200-AESE-M1C171-A
Removal
NOTE:
Removal steps in this procedure may contain installation details...
 Removal and Installation - Exhaust Gas Recirculation (EGR) Cooler to EGR Valve Tube
Removal
NOTE:
Removal steps in this procedure may contain installation details.
Remove the air cleaner outlet pipe.
Refer to: Air Cleaner Outlet Pipe (303-12A Intake Air Distribution and
Filtering - 2...
Other information:
Lincoln Corsair 2020-2024 Service Manual: Removal and Installation - Toe Link
Special Tool(s) / General Equipment Vehicle/Axle Stands Removal Remove the wheel and tire. Refer to: Wheel and Tire (204-04A Wheels and Tires, Removal and Installation). NOTICE: Make sure that the insulator pads are correctly positioned to prevent direct contact with other components...
Lincoln Corsair 2020-2024 Owners Manual: Switching Adaptive Cruise Control On and Off
The cruise controls are on the steering wheel. Switching Adaptive Cruise Control On Press the button to set the system in standby mode. The indicator, current gap setting and set speed appear in the information display. Switching Adaptive Cruise Control Off Press the button when the system is in standby mode, or switch the ignition off...
Categories
- Manuals Home
- 1st Generation Lincoln Corsair Owners Manual
- 1st Generation Lincoln Corsair Service Manual
- Selecting a Drive Mode. DRIVE MODES
- Auto-Start-Stop
- Exterior Mirrors
- New on site
- Most important about car
Keyless Starting
Note: The keyless starting system may not function if the key is close to metal objects or electronic devices such as cellular phones.
Note: A valid key must be located inside your vehicle to switch the ignition on and start the engine.
Ignition Modes

Copyright © 2024 www.licorsair.com