Lincoln Corsair: Rear Suspension / Removal and Installation - Wheel Knuckle - AWD
Lincoln Corsair 2020-2026 Service Manual / Chassis / Suspension / Rear Suspension / Removal and Installation - Wheel Knuckle - AWD
Special Tool(s) / General Equipment
| Transmission Jack | |
| Vehicle/Axle Stands |
Removal
-
Remove the rear wheel bearing and wheel hub.
Refer to: Wheel Bearing and Wheel Hub - AWD (204-02 Rear Suspension, Removal and Installation).
-
Remove the rear toe link.
Refer to: Toe Link (204-02 Rear Suspension, Removal and Installation).
-
Raise the suspension to curb height.
Use the General Equipment: Vehicle/Axle Stands
 |
-
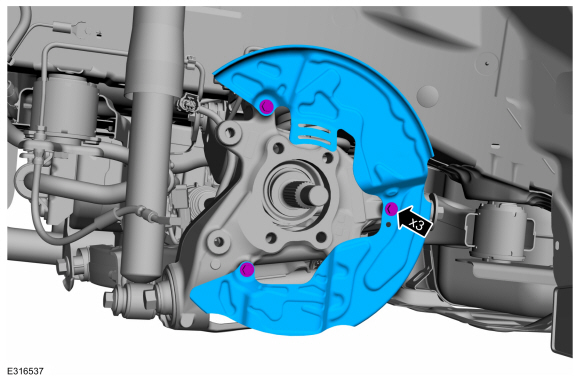
Remove the bolts and the brake shield.
 |
-
-
Remove the rear wheel speed sensor bolt.
-
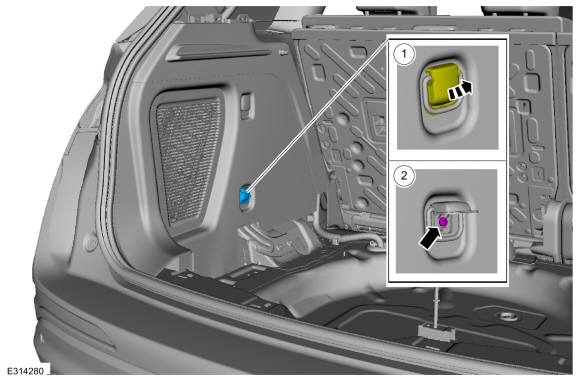
Detach the electrical connector and position the rear wheel speed sensor aside.
-
Remove the rear wheel speed sensor bolt.
 |
-
-
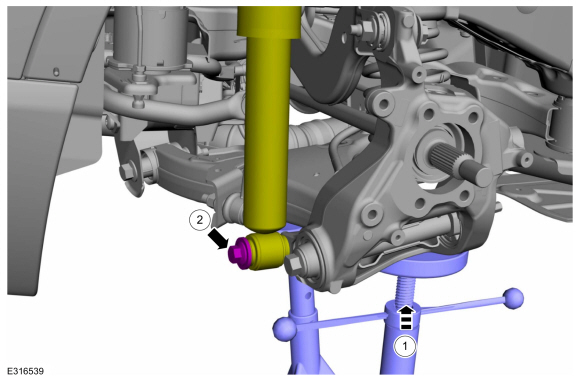
Support the rear suspension.
Use the General Equipment: Transmission Jack
-
Remove the rear shock absorber lower bolt and position the rear shock absorber aside.
-
Support the rear suspension.
 |
-
Remove the rear wheel knuckle.
-
Remove and discard the lower arm-to-wheel knuckle bolt and nut.
-
Remove and discard the upper arm-to-wheel knuckle bolt and remove the wheel knuckle.
-
Lower the suspension to release the spring compression.
Use the General Equipment: Vehicle/Axle Stands
-
Remove the spring by lowering the lower arm and position aside.
-
Remove and discard the lower arm-to-wheel knuckle bolt and nut.
 |
Installation
-
NOTICE: Tighten the suspension bushing fasteners with the suspension loaded or with the weight of the vehicle resting on the wheels and tires, otherwise incorrect clamp load and bushing damage may occur.
NOTE: Make sure that the new bolts and nut are installed.
-
Position the wheel knuckle and spring and install
the new lower arm-to-wheel knuckle bolt and nut. Tighten the nut.
Torque: 203 lb.ft (275 Nm)
-
Raise the suspension and install the new upper arm-to-wheel knuckle bolt.
Torque:
Stage 1: 98 lb.ft (133 Nm)
Stage 2: 120°
-
Position the wheel knuckle and spring and install
the new lower arm-to-wheel knuckle bolt and nut. Tighten the nut.
 |
-
-
Position the rear shock absorber and install the shock absorber lower bolt.
Torque: 129 lb.ft (175 Nm)
-
Lower and remove the transmission jack.
Use the General Equipment: Transmission Jack
-
Position the rear shock absorber and install the shock absorber lower bolt.
 |
-
-
Position the rear wheel speed sensor and install the bolt.
Torque: 71 lb.in (8 Nm)
-
Attach the rear wheel speed sensor electrical connector.
-
Position the rear wheel speed sensor and install the bolt.
|
-
Install the rear brake shield and the bolts.
Torque: 80 lb.in (9 Nm)
|
-
Remove the axle stand.
Use the General Equipment: Vehicle/Axle Stands
|
-
Install the rear toe link.
Refer to: Toe Link (204-02 Rear Suspension, Removal and Installation).
-
Install the rear wheel bearing and wheel hub.
Refer to: Wheel Bearing and Wheel Hub - AWD (204-02 Rear Suspension, Removal and Installation).
 Removal and Installation - Wheel Bearing and Wheel Hub - FWD
Removal
Remove the brake disc.
Refer to: Brake Disc (206-04 Rear Disc Brake, Removal and Installation).
Remove the retainer and bolt and position the wheel speed sensor aside...
 Removal and Installation - Wheel Knuckle - FWD
Special Tool(s) /
General Equipment
Vehicle/Axle Stands
Removal
Remove the rear wheel bearing and wheel hub.
Refer to: Wheel Bearing and Wheel Hub - FWD (204-02 Rear Suspension, Removal and Installation)...
Other information:
Lincoln Corsair 2020-2026 Service Manual: Removal and Installation - Driver Knee Airbag
Removal WARNING: The following procedure prescribes critical repair steps required for correct restraint system operation during a crash. Follow all notes and steps carefully. Failure to follow step instructions may result in incorrect operation of the restraint system and increases the risk of serious personal injury or death in a crash...
Lincoln Corsair 2020-2026 Service Manual: Removal and Installation - Power Transfer Unit Actuator Motor
Removal NOTE: Removal steps in this procedure may contain installation details. With the vehicle in NEUTRAL, position it on a hoist. Refer to: Jacking and Lifting - Overview (100-02 Jacking and Lifting, Description and Operation). Remove the PTU...
Categories
- Manuals Home
- 1st Generation Lincoln Corsair Owners Manual
- 1st Generation Lincoln Corsair Service Manual
- Auto Hold (IF EQUIPPED)
- Exterior Mirrors
- Interior Lamps
- New on site
- Most important about car
360 Degree Camera Cameras
Locating the Rear View Camera

The rear view camera is on the tailgate.
Locating the Front View Camera
Copyright © 2026 www.licorsair.com