Lincoln Corsair: Engine - 2.0L EcoBoost (177kW/240PS) – MI4 / Removal and Installation - Crankshaft Rear Seal
Lincoln Corsair 2020-2026 Service Manual / Powertrain / Engine / Engine - 2.0L EcoBoost (177kW/240PS) – MI4 / Removal and Installation - Crankshaft Rear Seal
Special Tool(s) / General Equipment
 |
303-328
(T88P-6701-B1)
Replacer, Rear Seal TKIT-1988-FLM TKIT-1988-F TKIT-1988-LM |
| Oil Drain Equipment | |
Materials
| Name | Specification |
|---|---|
| Motorcraft® High Performance Engine RTV Silicone TA-357 |
WSE-M4G323-A6 |
Removal
-
Remove the flexplate.
Refer to: Flexplate (303-01A Engine - 2.0L EcoBoost (177kW/240PS) – MI4, Removal and Installation).
-
-
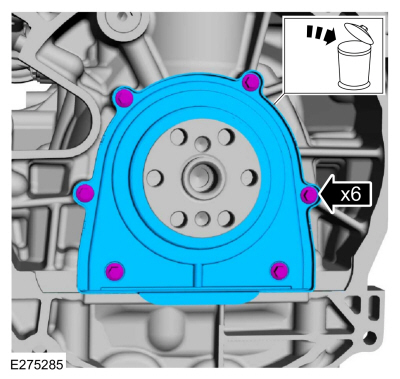
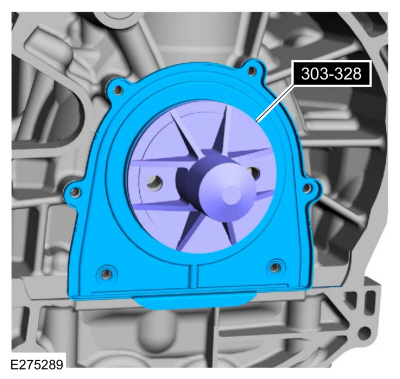
Remove the bolts and the crankshaft rear seal.
-
Discard the crankshaft rear seal.
-
Remove the bolts and the crankshaft rear seal.
 |
-
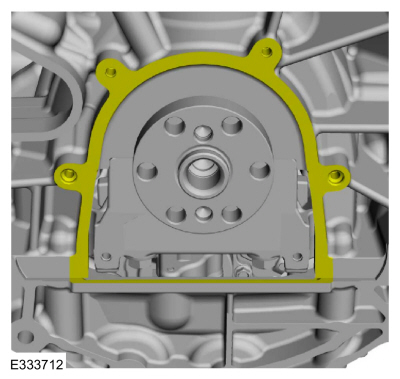
Clean and prepare the RTV sealing surface.
Refer to: RTV Sealing Surface Cleaning and Preparation (303-00 Engine System - General Information, General Procedures).
 |
Installation
-
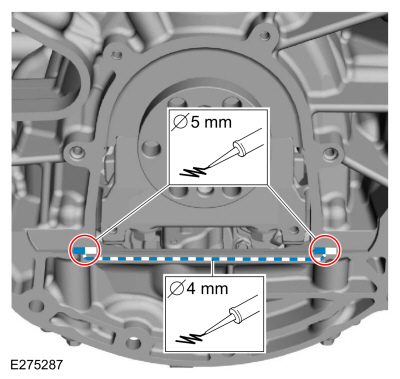
NOTE: If the crankshaft rear seal is not secured within 10 minutes of sealant application, the sealant must be removed and the sealing area cleaned. Failure to follow this procedure can cause future oil leakage.
Apply a 4 mm (0.157 in) bead of silicone to the oil pan surface and a 5 mm (0.196 in) bead at the T-joints.
Material: Motorcraft® High Performance Engine RTV Silicone / TA-357 (WSE-M4G323-A6)
 |
-
-
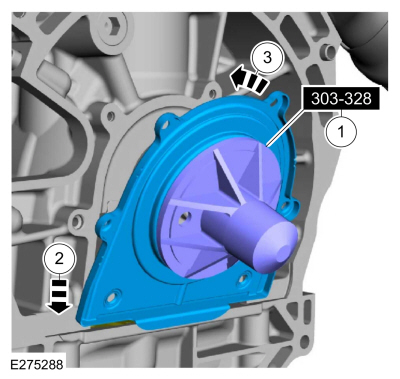
Install the crankshaft rear main oil seal installer.
Use Special Service Tool: 303-328 (T88P-6701-B1) Replacer, Rear Seal.
-
Install the crankshaft rear seal retainer at an
angle above the oil pan flange to avoid scraping off the sealer.
-
Tilt the seal retainer up and onto the rear of the cylinder block.
-
Install the crankshaft rear main oil seal installer.
 |
-
Using the special tool, seat the crankshaft rear seal.
Use Special Service Tool: 303-328 (T88P-6701-B1) Replacer, Rear Seal.
 |
-
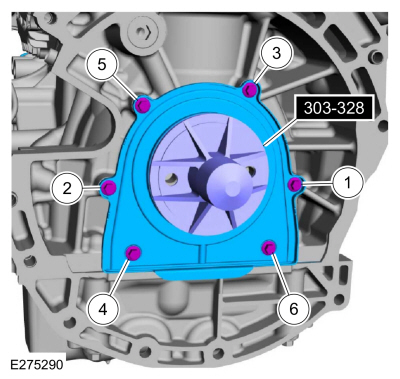
Install the bolts and tighten in sequence shown.
Remove Special Service Tool: 303-328 (T88P-6701-B1) Replacer, Rear Seal.
Torque: 97 lb.in (11 Nm)
 |
-
-
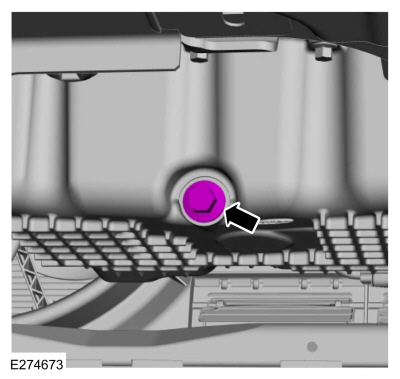
Remove the oil pan drain bolt and drain the engine oil.
Use the General Equipment: Oil Drain Equipment
-
Install the oil pan drain bolt.
Torque: 20 lb.ft (27 Nm)
-
Remove the oil pan drain bolt and drain the engine oil.
 |
-
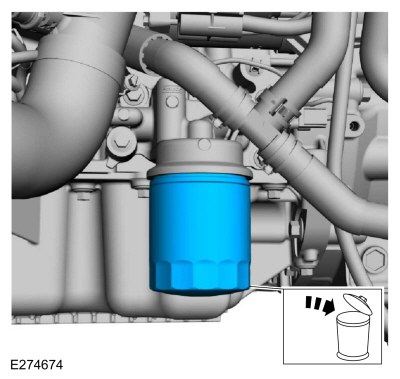
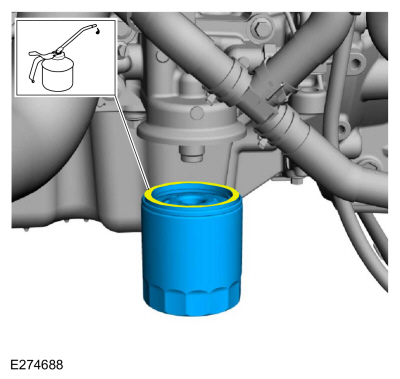
Remove and discard the engine oil filter.
Use the General Equipment: Oil Drain Equipment
 |
-
Lubricate the oil filter seal with clean engine oil and install.
Torque:
Stage 1: 71 lb.in (8 Nm)
Stage 2: 180°
 |
-
Fill the engine with clean engine oil.
Refer to: Specifications (303-01A Engine - 2.0L EcoBoost (177kW/240PS) – MI4, Specifications).
 |
-
Install the flexplate.
Refer to: Flexplate (303-01A Engine - 2.0L EcoBoost (177kW/240PS) – MI4, Removal and Installation).
-
Road test the vehicle.

 Removal and Installation - Cylinder Head
Special Tool(s) /
General Equipment
Oil Drain Equipment
Hose Clamp Remover/Installer
Materials
Name
Specification
Motorcraft® High Performance Engine RTV SiliconeTA-357
WSE-M4G323-A6
Removal
NOTICE:
Do not loosen or remove the crankshaft pulley bolt without
first installing the special tools as instructed in this procedure...
Other information:
Lincoln Corsair 2020-2026 Service Manual: Description and Operation - A Clutch
A Clutch Exploded View Item Description 1 Snap ring 2 A (1, 2, 3, 4, 5) clutch pressure plate 3 A (1, 2, 3, 4, 5) clutch friction plates 4 A (1, 2, 3, 4, 5) clutch steel plates 5 A (1, 2, 3, 4, 5) clutch apply plate 6 Snap ring 7 A (1, 2, 3, 4, 5) clutch pis..
Lincoln Corsair 2020-2026 Service Manual: Removal and Installation - Steering Column Control Module (SCCM)
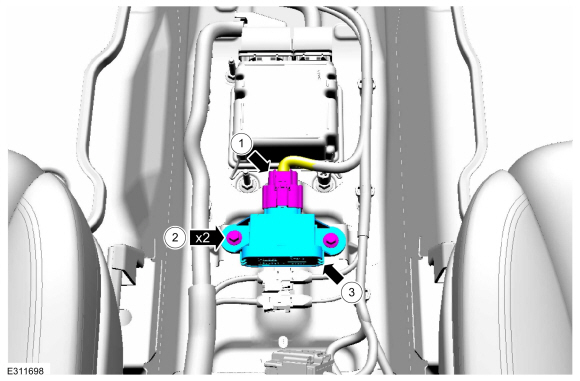
Removal NOTE: Removal steps in this procedure may contain installation details. NOTE: This step is only necessary when installing a new component. NOTE: The PMI process must begin with the current SCCM installed. If the current SCCM does not respond to the diagnostic scan tool, the tool may prompt for As-Built Data as part of the repair. Using a diagnostic scan tool, begin..
Categories
- Manuals Home
- 1st Generation Lincoln Corsair Owners Manual
- 1st Generation Lincoln Corsair Service Manual
- Opening and Closing the Hood
- Capacities and Specifications - 2.0L
- Selecting a Drive Mode. DRIVE MODES
- New on site
- Most important about car
Information on P Type Tires
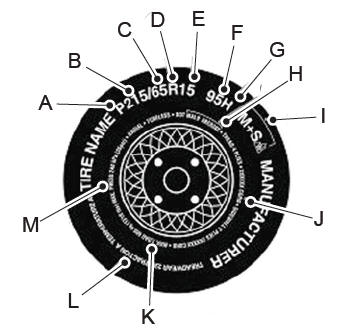
P215/65R15 95H is an example of a tire size, load index and speed rating. The definitions of these items are listed below. (Note that the tire size, load index and speed rating for your vehicle may be different from this example.)
P: Indicates a tire, designated by the Tire and Rim Association, that may be used for service on cars, sport utility vehicles, minivans and light trucks. Note: If your tire size does not begin with a letter this may mean it is designated by either the European Tire and Rim Technical Organization or the Japan Tire Manufacturing Association. 215: Indicates the nominal width of the tire in millimeters from sidewall edge to sidewall edge. In general, the larger the number, the wider the tire. 65: Indicates the aspect ratio which gives the tire's ratio of height to width. R: Indicates a radial type tire. 15: Indicates the wheel or rim diameter in inches. If you change your wheel size, you will have to purchase new tires to match the new wheel diameter. 95: Indicates the tire's load index. It is an index that relates to how much weight a tire can carry. You may find this information in your owner’s manual. If not, contact a local tire dealer.Copyright © 2026 www.licorsair.com