Lincoln Corsair: Engine System - General Information / General Procedures - Oil Pressure Test
Oil Pressure Test 2.7L EcoBoost & 3.3L Duratec & 5.0L Ti-VCT
-
NOTE: It is necessary to disconnect the battery to avoid setting any DTCs that could cause the PCM to command the oil pressure to other than what should be observed from a correctly operating system during the oil pressure test.
Disconnect the battery ground cable.
For additional information, refer to: Battery Disconnect and Connect (414-01 Battery, Mounting and Cables, General Procedures).
-
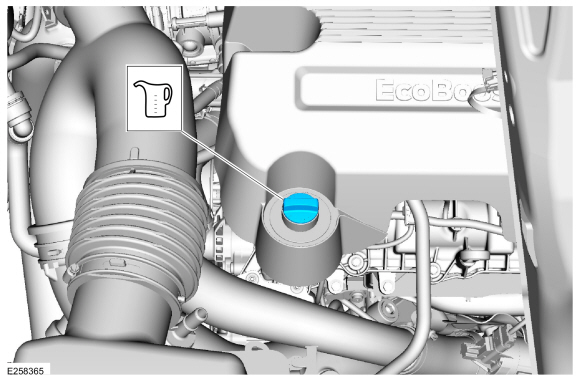
Remove the EOP sensor. Refer to the appropriate 303-14 Electronic Engine Controls section.
-
NOTE: The VDOP (variable displacement oil pump) solenoid and the EOP sensor must be connected and functional during the oil pressure test.
Assemble the oil pressure adaptors as needed to the oil gallery port. Install the commercially available oil pressure gauge.- 1. M12x1.5 Male to 1/8 NPT Female adaptor
- 2. 1/8 NPT Male to two 1/8 NPT Female T-fitting
- 3. Commercially available oil pressure gauge
- 4. 1/8 NPT Male to M12x1.5 Female adaptor
- 5. Oil pressure sensor
 |
-
Connect the EOP sensor electrical connector.
-
Connect the battery ground cable.
For additional information, refer to: Battery Disconnect and Connect (414-01 Battery, Mounting and Cables, General Procedures).
Oil Pressure Test 3.5L EcoBoost & 3.5L PowerBoost
-
With the vehicle in NEUTRAL, position it on a hoist.
For additional information, refer to: Jacking and Lifting - Overview (100-02 Jacking and Lifting, Description and Operation).
-
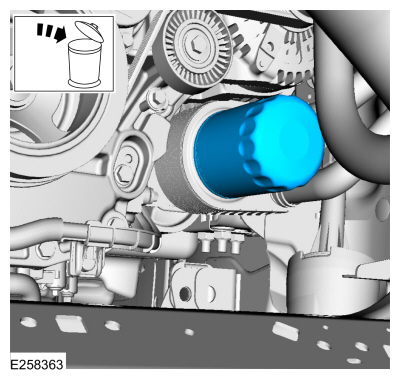
Remove and discard the oil filter.
 |
-
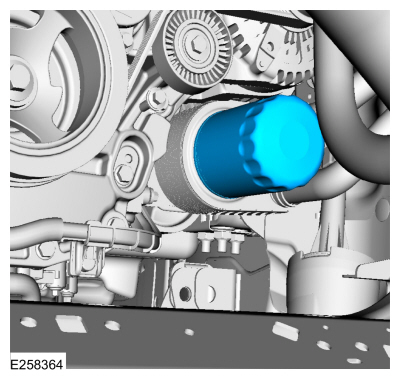
Connect a GearWrench 3289 Oil Pressure Tester Kit or equivalent oil pressure gauge to the oil filter housing.
All vehicles
-
Run the engine until normal operating temperature is reached.
-
Run the engine at the specified rpm and record the gauge reading.
-
The oil pressure should be within specifications. Refer
to the 303-01 specifications procedure for each engine for the
acceptable oil pressure range and specific vehicle requirements.
-
If the pressure is not within specification, check the following possible sources:
Visual Inspection Chart
Mechanical - Insufficient oil
- Oil leakage
- Worn or damaged oil pump
- Oil pump screen cover and tube
- Excessive main bearing clearance
- Excessive connecting rod bearing clearance
- Chain tensioner leak
Oil Pressure Test 3.5L EcoBoost & 3.5L PowerBoost
-
Remove the commercially available oil pressure gauge.
-
Install a new manufacturer-specified oil filter.
 |
-
Check and refill the oil as needed, using new
manufacturer-specified oil. Refer to the Specifications in the
appropriate 303-01 section.
 |
Oil Pressure Test 2.7L EcoBoost & 3.3L Duratec & 5.0L Ti-VCT
-
Disconnect the battery ground cable.
For additional information, refer to: Battery Disconnect and Connect (414-01 Battery, Mounting and Cables, General Procedures).
-
Disconnect the EOP sensor electrical connector.
-
Remove the commercially available oil pressure gauge. Remove the oil pressure adaptors.
-
Install the EOP sensor. Refer to the appropriate 303-14 Electronic Engine Controls section.
-
Connect the battery ground cable.
For additional information, refer to: Battery Disconnect and Connect (414-01 Battery, Mounting and Cables, General Procedures).
 General Procedures - Oil Leak Inspection
NOTE:
If an overnight drive is done, the fan air or road air blast can cause erroneous readings.
NOTE:
When diagnosing engine oil leaks, the source and location of the leak must be positively identified prior to repair...
 General Procedures - Piston Diameter
Check
NOTE:
Refer to the appropriate Section 303-01 for the specification.
Measure the piston diameter 90 degrees from the piston
pin and 41 mm (1...
Other information:
Lincoln Corsair 2020-2026 Service Manual: General Procedures - Cylinder Head Distortion
Special Tool(s) / General Equipment Feeler Gauge Check NOTE: Refer to the appropriate Section 303-01 for the specification. NOTE: Make sure all cylinder head surfaces are clear of any gasket material, silicone sealant, oil and coolant...
Lincoln Corsair 2020-2026 Owners Manual: Engine Oil Dipstick. Engine Oil Check. Oil Change Indicator Reset
Engine Oil Dipstick Minimum. Nominal. Maximum. Engine Oil Check WARNING: Do not work on a hot engine. To check the engine oil level consistently and accurately, do the following: Make sure the parking brake is on. Make sure the transmission is in park (P) or neutral (N)...
Categories
- Manuals Home
- 1st Generation Lincoln Corsair Owners Manual
- 1st Generation Lincoln Corsair Service Manual
- Normal Scheduled Maintenance
- Interior Lamps
- Programming the Garage Door Opener to Your Hand-Held Transmitter
- New on site
- Most important about car
Autowipers (IF EQUIPPED)
Wet or winter driving conditions with ice, snow or salty road mist can cause inconsistent and unexpected wiping or smearing.