Lincoln Corsair: Glass, Frames and Mechanisms / Removal and Installation - Rear Door Window Regulator Motor
Lincoln Corsair 2020-2024 Service Manual / Body and Paint / Body and Paint / Glass, Frames and Mechanisms / Removal and Installation - Rear Door Window Regulator Motor
Removal
NOTE: Left hand (LH) shown, right hand (RH) similar.
NOTE: For rear door window regulator motors that are non-functional it may be necessary to remove the rear door window regulator motor prior to securing the rear door window glass.
-
Remove the rear door trim panel.
Refer to: Rear Door Trim Panel (501-05 Interior Trim and Ornamentation, Removal and Installation).
-
NOTICE: Damage to the rear door window glass may occur if not secured.
Secure the rear door window glass with tape.
.jpg) |
-
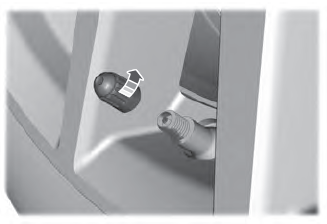
Remove the rear door window regulator motor.
-
Disconnect the rear door window regulator motor electrical connector.
-
Remove the bolts and the rear door window regulator motor.
-
Disconnect the rear door window regulator motor electrical connector.
.jpg) |
Installation
-
To install, reverse the removal procedure.
-
Carry out the power door window initialization.
Refer to: Power Door Window Initialization (501-11 Glass, Frames and Mechanisms, General Procedures).
 Removal and Installation - Rear Door Window Regulator and Motor
Special Tool(s) /
General Equipment
Punch
Removal
NOTE:
Left hand (LH) shown, right hand (RH) similar.
NOTE:
For rear door window regulator motors that are
non-functional it will be necessary to remove the rear door window
regulator motor prior to removing the rear door window regulator...

Other information:
Lincoln Corsair 2020-2024 Service Manual: Removal and Installation - Crankshaft Front Seal
Special Tool(s) / General Equipment 303-096 (T74P-6150-A) Installer, Camshaft Front Oil SealTKIT-2009TC-F 303-409 (T92C-6700-CH) Remover, Crankshaft SealTKIT-1992-FH/FMH/FLMHTKIT-1993-LMH/MH Removal NOTICE: During engine repair procedures, cleanliness is extremely important. All parts must be thoroughly cleaned and any foreign material, including any material create..
Lincoln Corsair 2020-2024 Service Manual: Description and Operation - Transmission Cooling - Plug-In Hybrid Electric Vehicle (PHEV) - Overview
Overview The transmission fluid cooling system consists of the following: Transmission fluid cooler tubes Transmission fluid cooler Transmission fluid auxiliary pump Transmission fluid auxiliary pump inlet tube This vehicle is equipped with an external transmission fluid cooler. Transmission fluid flows from the transmission through the transmission fluid cooler tu..
Categories
- Manuals Home
- 1st Generation Lincoln Corsair Owners Manual
- 1st Generation Lincoln Corsair Service Manual
- Programming the Garage Door Opener to Your Hand-Held Transmitter
- Memory Function
- Auto-Start-Stop
- New on site
- Most important about car
Second Stage: Checking Tire Pressure
WARNING: If the tire does not inflate to the recommended tire pressure within 15 minutes, stop and call roadside assistance.
WARNING: The power plug may get hot after use and should be handled carefully when unplugging.
Check the air pressure of your tires as follows:
Copyright © 2024 www.licorsair.com