Lincoln Corsair: Glass, Frames and Mechanisms / Removal and Installation - Rear Door Window Regulator and Motor
Special Tool(s) / General Equipment
| Punch |
Removal
NOTE: Left hand (LH) shown, right hand (RH) similar.
NOTE: For rear door window regulator motors that are non-functional it will be necessary to remove the rear door window regulator motor prior to removing the rear door window regulator.
NOTE: Removal steps in this procedure may contain installation details.
-
Remove the rear door trim panel.
Refer to: Rear Door Trim Panel (501-05 Interior Trim and Ornamentation, Removal and Installation).
-
Remove the rear door window glass release access covers.
.jpg) |
-
Lower the rear door window glass to the three quarters down position.
-
Connect the window control switch.
-
Lower the rear door window glass to the three quarters down position.
-
Disconnect the window control switch.
-
Connect the window control switch.
.jpg) |
-
Release the rear door window glass and tape in the full up position.
-
Release the rear door window glass retaining clips.
Use the General Equipment: Punch
-
Raise the rear door window glass in the full up position.
-
Tape the rear door window glass in the full up position.
-
Release the rear door window glass retaining clips.
.jpg) |
-
Position the rear door wiring harness aside.
-
Disconnect the rear door speaker electrical connector.
-
Disconnect the rear door window regulator motor electrical connector.
-
Release the rear door wiring harness routing clips and position the rear door wiring harness aside.
-
Disconnect the rear door speaker electrical connector.
.jpg) |
-
Remove the rear door window regulator nut adhesive cover.
.jpg) |
-
NOTE: Follow the unique instructions or graphic for this step in installation
Loosen the rear door window regulator nut.
Torque: 71 lb.in (8 Nm)
.jpg) |
-
NOTE: Follow the unique instructions or graphic for this step in installation.
Remove rear door window regulator and motor.
-
Release the rear door window regulator retaining clips.
Torque: 42 lb.in (4.8 Nm)
-
Position the rear door window regulator retaining clips into the service position.
-
Release the rear door window regulator retaining clips.
.jpg) |
-
NOTE: This step is only necessary when installing a new component.
Remove the rear door woofer speaker.
-
Remove the screws.
Torque: 22 lb.in (2.5 Nm)
-
Remove the rear door woofer speaker.
-
Remove the screws.
.jpg) |
-
NOTE: This step is only necessary when installing a new component.
Remove the rear door window regulator motor.
-
Remove the rear door window regulator bolts.
-
Remove the rear door window regulator motor.
-
Remove the rear door window regulator bolts.
.jpg) |
Installation
-
To install, reverse the removal procedure.
-
Torque the retainers and nuts in the sequence shown.
-
Torque the retainers in the sequence shown.
Torque: 42 lb.in (4.8 Nm)
-
Torque the nut in the sequence shown.
Torque: 71 lb.in (8 Nm)
-
Torque the retainers in the sequence shown.
.jpg) |
-
Carry out the power door window initialization.
Refer to: Power Door Window Initialization (501-11 Glass, Frames and Mechanisms, General Procedures).
 Removal and Installation - Rear Door Window Glass
Special Tool(s) /
General Equipment
Punch
Removal
NOTE:
LH (left-hand) side shown, RH (right-hand) side similar.
NOTE:
Removal steps in this procedure may contain installation details...
 Removal and Installation - Rear Door Window Regulator Motor
Removal
NOTE:
Left hand (LH) shown, right hand (RH) similar.
NOTE:
For rear door window regulator motors that are
non-functional it may be necessary to remove the rear door window
regulator motor prior to securing the rear door window glass...
Other information:
Lincoln Corsair 2020-2024 Service Manual: Description and Operation - Transmission Description - System Operation and Component Description
System Diagram E357528 *.sttxt { visibility: hidden; } *.stcallout { visibility: visible; } 1 ABS 2 BECM 3 DC/DC 4 GWM 5 PCM 6 ISC 7 Transmission 8 Motor/Generator Speed Sensors 9 Motor/..
Lincoln Corsair 2020-2024 Service Manual: General Procedures - Exhaust Manifold Cleaning and Inspection
Special Tool(s) / General Equipment Feeler Gauge Cleaning Clean the exhaust manifold using a suitable solvent. Use a plastic scraping tool to clean the gasket sealing surfaces. Inspection NOTE: New exhaust manifold gaskets, studs, nuts and/or bolts must be installed when an exhaust manifold is serviced. NOTE: Use a Straightedge that is calibrated by the ..
Categories
- Manuals Home
- 1st Generation Lincoln Corsair Owners Manual
- 1st Generation Lincoln Corsair Service Manual
- Keyless Entry Settings
- Exterior Mirrors
- Opening and Closing the Hood
- New on site
- Most important about car
Information on P Type Tires
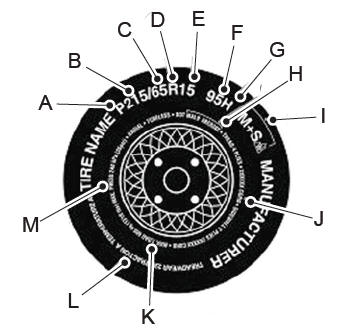
P215/65R15 95H is an example of a tire size, load index and speed rating. The definitions of these items are listed below. (Note that the tire size, load index and speed rating for your vehicle may be different from this example.)
P: Indicates a tire, designated by the Tire and Rim Association, that may be used for service on cars, sport utility vehicles, minivans and light trucks. Note: If your tire size does not begin with a letter this may mean it is designated by either the European Tire and Rim Technical Organization or the Japan Tire Manufacturing Association. 215: Indicates the nominal width of the tire in millimeters from sidewall edge to sidewall edge. In general, the larger the number, the wider the tire. 65: Indicates the aspect ratio which gives the tire's ratio of height to width. R: Indicates a radial type tire. 15: Indicates the wheel or rim diameter in inches. If you change your wheel size, you will have to purchase new tires to match the new wheel diameter. 95: Indicates the tire's load index. It is an index that relates to how much weight a tire can carry. You may find this information in your owner’s manual. If not, contact a local tire dealer.