Lincoln Corsair: Interior Trim and Ornamentation / Removal and Installation - Headliner
Special Tool(s) / General Equipment
| Pick Hook | |
| Interior Trim Remover |
Materials
| Name | Specification |
|---|---|
| 3M™ Super-Fast Repair Adhesive 04747 |
- |
Removal
-
Remove the following items:
-
On both sides.
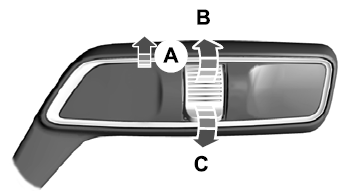
Remove the A-pillar trim panel.
Refer to: A-Pillar Trim Panel (501-05 Interior Trim and Ornamentation, Removal and Installation).
-
On both sides.
Remove the upper B-pillar trim panel.
Refer to: B-Pillar Trim Panel (501-05 Interior Trim and Ornamentation, Removal and Installation).
-
On both the sides.
Remove the C-pillar trim panel.
Refer to: C-Pillar Trim Panel (501-05 Interior Trim and Ornamentation, Removal and Installation).
-
On both sides.
-
On LH side.
Position the headliner wiring harness aside.
-
Disconnect the headliner wiring harness electrical connector.
-
Release the headliner wiring harness retainers.
-
Disconnect the headliner wiring harness electrical connector.
.jpg) |
-
On RH side.
Position the headliner wiring harness aside.
-
Disconnect the headliner wiring harness electrical connectors.
-
Release the headliner wiring harness retainers.
-
Disconnect the headliner wiring harness electrical connectors.
.jpg) |
-
On RH side.
Position the rear washer hose aside.
-
Disconnect the rear washer hose.
Refer to: Washer Hose Coupling (501-16 Wipers and Washers, General Procedures).
-
Release the rear washer hose from the retainers.
-
Disconnect the rear washer hose.
.jpg) |
-
NOTE: LH (left hand) shown, RH (right hand) similar.
On both sides.
Remove the sun visor.
-
Position the sun visor screw cover aside.
-
Remove the sun visor screw.
-
Rotate the sun visor downward.
-
Disconnect the sun visor electrical connector.
-
Position the sun visor screw cover aside.
.jpg) |
-
NOTE: LH (left hand) shown, RH (right hand) similar.
On both sides.
Remove the screw and the sun visor clip.
.jpg) |
-
NOTE: Interior rear view mirror removed for clarity.
If equipped.
Remove the IPMA cover.
-
Release the IPMA clips and the tether clip from the IPMA cover.
Use the General Equipment: Interior Trim Remover
-
Rotate the tether clip line to align the end with the opening in the IPMA cover.
-
Slide the tether clip end out of the IPMA cover.
-
Release the IPMA clips and the tether clip from the IPMA cover.
.jpg) |
-
NOTE: Interior rear view mirror removed for clarity.
NOTE: Follow the unique instructions or graphic for this step in the installation.
If equipped.
Remove and discard the IPMA cover tether clip.
-
Release the IPMA cover tether clip front tabs.
Use the General Equipment: Interior Trim Remover
-
Release the IPMA cover tether clip rear tabs.
Use the General Equipment: Interior Trim Remover
-
Release the IPMA cover tether clip front tabs.
.jpg) |
-
If equipped.
Disconnect the interior rear view mirror electrical connector.
.jpg) |
-
On RH side.
Remove the front assist handle.
-
Position the front assist handle down.
-
Remove the front assist hand retainers.
Use the General Equipment: Pick Hook
-
Release the front assist handle retainers.
-
Position the front assist handle down.
.jpg) |
-
NOTE: LH (left hand) shown, RH (right hand) similar.
On both sides.
Remove the rear assist handle.
-
Position the rear assist handle down.
-
Remove the rear assist hand retainers.
Use the General Equipment: Pick Hook
-
Release the rear assist handle retainers.
-
Position the rear assist handle down.
.jpg) |
-
Disconnect the rear washer hose.
Refer to: Washer Hose Coupling (501-16 Wipers and Washers, General Procedures).
.jpg) |
-
Position front seats in the full reclined position.
.jpg) |
-
Fold the rear seat backrests in the fold flat position.
.jpg) |
Vehicles with roof opening panel
-
Lower the headliner.
-
Release the headliner retainers and magnets.
-
Release the headliner retainers and magnets.
.jpg) |
Vehicles without roof opening panel
-
Lower the headliner.
-
Release the headliner retainers and magnet.
-
Release the headliner retainers and magnet.
.jpg) |
All vehicles
-
Remove the headliner through the liftgate opening.
.jpg) |
Installation
-
NOTE: These steps are only necessary when installing a new component.
NOTE: When transferring the headliner harness to a new headliner note the location of each electrical connector during removal and maintain those locations when transferring the harness. If equipped with noise cancellation the microphone connectors are the same but are not interchangeable and must maintain their original locations for the system to operate correctly.
NOTE: Obtain the specified adhesive commercially. Depending on the headliner and optional wiring harness(es), the purchase of multiple tubes is suggested.
-
Using tape, mark the wire at the exit points for proper length from headliner-to-body / roof connectors.
-
Carefully remove the wiring harness from the original headliner.
-
Using a marking tool, mark the new headliner with
the routing and exit points of the wiring harness from the original
headliner.
-
NOTICE: Make sure not to damage the wiring harness when cutting the excess adhesive from the wiring harness.
Cut and remove any excess adhesive from the wiring harness.
-
Position the wiring harness onto the new headliner,
making sure the harness has enough length to be connected to the body /
roof connectors at the tape location(s) applied earlier. Apply tape to
temporarily hold the wiring harness in position on the headliner.
-
Apply the adhesive in the same location as the
factory installed adhesive along the full length of the wiring
harness-to-headliner to avoid any NVH concern(s).
Material: 3M™ Super-Fast Repair Adhesive / 04747
-
Using tape, mark the wire at the exit points for proper length from headliner-to-body / roof connectors.
-
NOTE: Transfer parts as necessary.
To install, reverse the removal procedure.
-
Connect the tether clip to the interior rear view mirror cover.
-
Install the tether clip onto the interior rear view mirror cover.
-
Rotate the tether clip line to align the end with the opening in the interior rear view mirror cover.
-
Slide the tether clip end into the interior rear view mirror cover.
-
Install the tether clip onto the interior rear view mirror cover.
.jpg) |
 Removal and Installation - Front Scuff Plate Trim Panel
Special Tool(s) /
General Equipment
Interior Trim Remover
Removal
NOTE:
LH (left hand) shown, RH (right hand) similar.
Release the clips and remove the instrument panel side trim panel...
 Removal and Installation - Headliner - Lowering
Special Tool(s) /
General Equipment
Pick Hook
Interior Trim Remover
Remove the following items:
On both sides.
Remove the A-pillar trim panel...
Other information:
Lincoln Corsair 2020-2026 Owners Manual: Steering
Electric Power Steering WARNING: The electric power steering system has diagnostic checks that continuously monitor the system. If a fault is detected, a message displays in the information display. Stop your vehicle as soon as it is safe to do so...
Lincoln Corsair 2020-2026 Owners Manual: 360 Degree Camera Cameras
Locating the Rear View Camera The rear view camera is on the tailgate. Locating the Front View Camera The front video camera, located in the grille, provides a video image of the area in front of your vehicle. It adds assistance to the drive while driving at low speeds...
Categories
- Manuals Home
- 1st Generation Lincoln Corsair Owners Manual
- 1st Generation Lincoln Corsair Service Manual
- General Procedures - Brake Service Mode Activation and Deactivation
- Programming the Garage Door Opener to Your Hand-Held Transmitter
- Normal Scheduled Maintenance
- New on site
- Most important about car
Autowipers (IF EQUIPPED)
Wet or winter driving conditions with ice, snow or salty road mist can cause inconsistent and unexpected wiping or smearing.