Lincoln Corsair: Body Closures / Removal and Installation - Front Door Check Arm
Lincoln Corsair 2020-2024 Service Manual / Body and Paint / Body and Paint / Body Closures / Removal and Installation - Front Door Check Arm
Removal
NOTE: Removal steps in this procedure may contain installation details.
NOTE: LH shown, RH similar.
-
Open the door.
.jpg) |
-
Remove the check arm bolt.
Torque: 18 lb.ft (25 Nm)
.jpg) |
-
Remove the front door trim panel.
Refer to: Front Door Trim Panel (501-05 Interior Trim and Ornamentation, Removal and Installation).
-
Remove the front door speaker.
Refer to: Front Door Speaker (415-00 Information and Entertainment System - General Information, Removal and Installation).
-
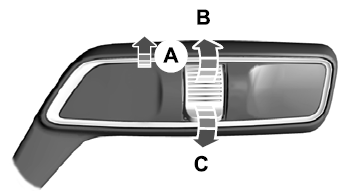
Remove the front door check arm cover.
.jpg) |
-
Remove the front door check arm nuts.
Torque: 80 lb.in (9 Nm)
.jpg) |
-
Remove the front door check arm assembly.
.jpg) |
Installation
-
To install, reverse the removal procedure.
 Removal and Installation - Front Door
Special Tool(s) /
General Equipment
Door Lift
Removal
NOTE:
Removal steps in this procedure may contain installation details.
NOTE:
LH shown, RH similar...
 Removal and Installation - Fuel Filler Door
Special Tool(s) /
General Equipment
Flat Headed Screw Driver
Removal
NOTE:
Removal steps in this procedure may contain installation details...
Other information:
Lincoln Corsair 2020-2024 Owners Manual: Programming the Garage Door Opener to Your Hand-Held Transmitter
This process is to program your in-vehicle HomeLink function button with your hand-held transmitter. Note: The programming steps below assume you will be programming HomeLink that was not previously programmed. If your HomeLink was previously programmed, you may need to erase your HomeLink buttons...
Lincoln Corsair 2020-2024 Service Manual: Specifications
Lubricants, Fluids, Sealers and Adhesives Specifications DOT 4 LV brake fluid Material: Motorcraft® DOT 4 LV High Performance Motor Vehicle Brake Fluid / PM-20 (WSS-M6C65-A2) Torque Specifications Item Nm lb-ft lb-in Front caliper bleeder scre..
Categories
- Manuals Home
- 1st Generation Lincoln Corsair Owners Manual
- 1st Generation Lincoln Corsair Service Manual
- Warning Lamps and Indicators
- Remote Start Settings
- Programming the Garage Door Opener to Your Hand-Held Transmitter
- New on site
- Most important about car
Autowipers (IF EQUIPPED)
Wet or winter driving conditions with ice, snow or salty road mist can cause inconsistent and unexpected wiping or smearing.
Copyright © 2024 www.licorsair.com