Lincoln Corsair: Handles, Locks, Latches and Entry Systems / Removal and Installation - Exterior Rear Door Handle
Lincoln Corsair 2020-2024 Service Manual / Body and Paint / Body and Paint / Handles, Locks, Latches and Entry Systems / Removal and Installation - Exterior Rear Door Handle
Removal
NOTE: LH (left-hand) side shown, RH (right-hand) side similar.
NOTE: Removal steps in this procedure may contain installation details.
-
Remove the rear door window regulator and motor.
Refer to: Rear Door Window Regulator and Motor (501-11 Glass, Frames and Mechanisms, Removal and Installation).
-
NOTE: The rear door is shown transparent for clarity.
Disconnect the exterior rear door handle electrical connector.
.jpg) |
-
Position the rear door weatherstrip aside.
-
Release the rear door weatherstrip pin-type retainers.
-
Position the rear door weatherstrip aside.
-
Release the rear door weatherstrip pin-type retainers.
.jpg) |
-
Remove the exterior rear door handle access plug.
.jpg) |
-
Remove the exterior rear door handle.
-
Hold the exterior rear door handle open.
-
Turn the release screw enough to release the
exterior rear door handle and remove the exterior rear door handle.
Torque: 36 lb.in (4.1 Nm)
-
Hold the exterior rear door handle open.
.jpg) |
-
Remove the exterior rear door handle plug.
-
Turn the release screw enough to release the exterior rear door handle plug.
-
Remove the exterior rear door handle plug.
-
Turn the release screw enough to release the exterior rear door handle plug.
.jpg) |
-
Remove the exterior rear door handle plug gasket.
.jpg) |
Installation
-
NOTE: Transfer parts as necessary.
To install, reverse the removal procedure.
-
NOTE: This step is only necessary when installing a new component.
Using the diagnostic scan tool, carry out the remote function actuator (RFA) module self test.
-
Carry out the power door window initialization.
Refer to: Power Door Window Initialization (501-11 Glass, Frames and Mechanisms, General Procedures).
 Removal and Installation - Exterior Front Door Handle Reinforcement
Removal
NOTE:
LH (left-hand) side shown, RH (right-hand) side similar.
Remove the front door latch.
Refer to: Front Door Latch (501-14 Handles, Locks, Latches and Entry Systems, Removal and Installation)...
 Removal and Installation - Exterior Rear Door Handle Reinforcement
Removal
NOTE:
LH (left-hand) side shown, RH (right-hand) side similar.
Remove the rear door latch.
Refer to: Rear Door Latch (501-14 Handles, Locks, Latches and Entry Systems, Removal and Installation)...
Other information:
Lincoln Corsair 2020-2024 Service Manual: Removal and Installation - Wiper Linkage Assembly
Removal NOTE: Removal steps in this procedure may contain installation details. Remove the cowl panel grille. Refer to: Cowl Panel Grille (501-02) . Remove the wiper linkage assembly retainers. Torque: 80 lb.in (9 Nm) NOTICE: Make sure that the rubber grommet is installed on the wiper linkage assembly prior to installation...
Lincoln Corsair 2020-2024 Owners Manual: Apps
The system allows you interact with select mobile apps while keeping your eyes on the road. Voice commands, your steering wheel buttons, or a quick tap on your touchscreen give you advanced control of compatible mobile apps. You can also stream your favorite music or podcasts, share your time of arrival with friends, and keep connected safely...
Categories
- Manuals Home
- 1st Generation Lincoln Corsair Owners Manual
- 1st Generation Lincoln Corsair Service Manual
- Normal Scheduled Maintenance
- Auto Hold (IF EQUIPPED)
- Interior Lamps
- New on site
- Most important about car
Information on P Type Tires
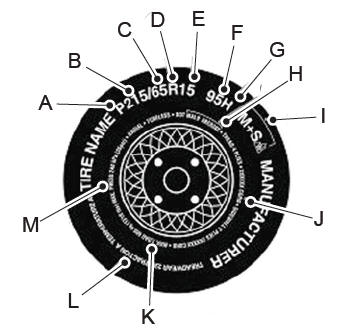
P215/65R15 95H is an example of a tire size, load index and speed rating. The definitions of these items are listed below. (Note that the tire size, load index and speed rating for your vehicle may be different from this example.)
P: Indicates a tire, designated by the Tire and Rim Association, that may be used for service on cars, sport utility vehicles, minivans and light trucks. Note: If your tire size does not begin with a letter this may mean it is designated by either the European Tire and Rim Technical Organization or the Japan Tire Manufacturing Association. 215: Indicates the nominal width of the tire in millimeters from sidewall edge to sidewall edge. In general, the larger the number, the wider the tire. 65: Indicates the aspect ratio which gives the tire's ratio of height to width. R: Indicates a radial type tire. 15: Indicates the wheel or rim diameter in inches. If you change your wheel size, you will have to purchase new tires to match the new wheel diameter. 95: Indicates the tire's load index. It is an index that relates to how much weight a tire can carry. You may find this information in your owner’s manual. If not, contact a local tire dealer.Copyright © 2024 www.licorsair.com