Lincoln Corsair: Automatic Transmission - 8-Speed Automatic Transmission – 8F35/8F40 / Diagnosis and Testing - Leakage Inspection
Lincoln Corsair 2020-2026 Service Manual / Powertrain / Automatic Transmission / Automatic Transmission - 8-Speed Automatic Transmission – 8F35/8F40 / Diagnosis and Testing - Leakage Inspection
Leak Check Test
-
With the vehicle in NEUTRAL, position it on a hoist.
REFER to: Jacking and Lifting - Overview (100-02 Jacking and Lifting, Description and Operation).
-
Inspect the gasket and sealing areas for evidence of leakage.
-
Trace the transmission fluid leak to the highest point.
-
Clean the area of the suspected leak.
-
Lower the vehicle.
-
Remove the transmission fluid fill plug.
-
Add leak detection dye to the transmission fluid. Use 1 fl oz
(30 ml) of dye solution for every 4 qt (3.8 L) of transmission fluid.
-
Road test the vehicle for at least 1 mile with at least 1 application of the TCC .
-
With the vehicle in NEUTRAL, position it on a hoist.
REFER to: Jacking and Lifting - Overview (100-02 Jacking and Lifting, Description and Operation).
-
If the source of the leak is obvious, repair as required.
-
After the repair, clean the affected area.
Leakage From Torque Converter Housing
-
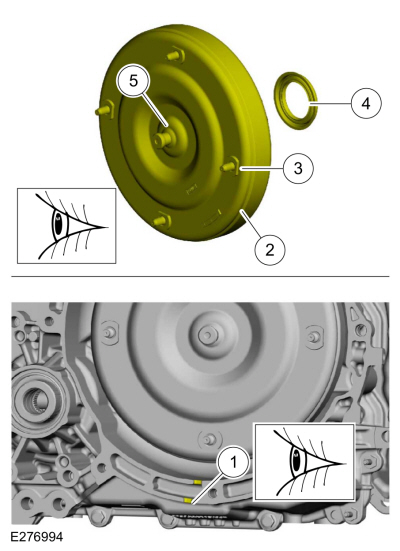
Leaks from the torque converter housing can originate from
several locations. There is a drain hole at the bottom of the
transmission case (torque converter housing) that allows transmission
fluid to exit the transmission case. See illustration. The following
locations correspond with the possible causes of fluid leaks.
-
Drain hole
-
Torque converter weld, outside edge
-
Stud welds
-
Torque converter seal
-
Torque coverter pilot hub weld
-
Drain hole
-
Remove the torque converter.
-
Using a black light, observe the torque converter housing.
Inspect for evidence of dye from the pump bolts, pump seal, and torque
converter hub seal. Repair as required.
-
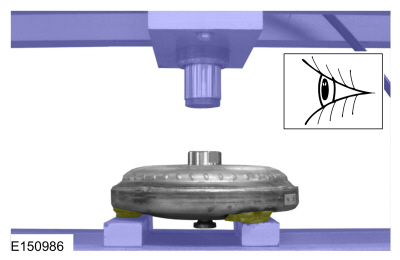
If the source of the leak is not evident, continue with this procedure to leak test the torque converter.
-
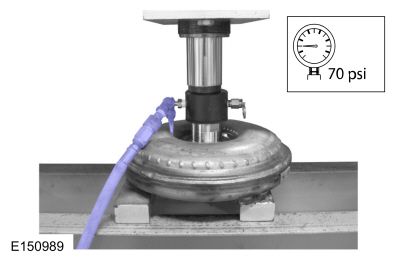
Place the torque converter in an arbor press. Support the torque converter on the mounting pads.
-
Install the torque converter leak tester (307-421) into the torque converter hub.
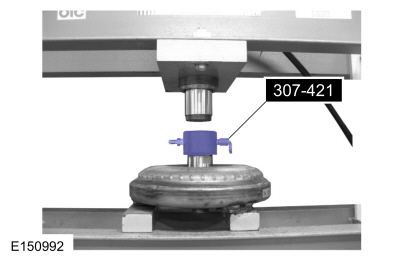
-
Secure the press. Apply enough force from the press to seal the
torque converter leak tester (307-421) into the torque converter hub.
-
Connect a compressed air supply to the torque converter leak tester (307-421).
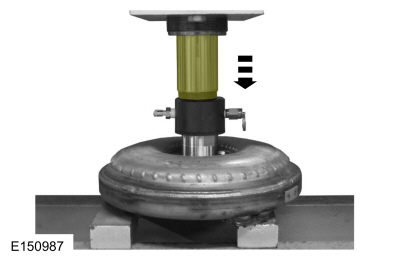
-
Apply air pressure to the valve and inspect for leaks at the
torque converter hub welds and seams. Use a soap bubble solution around
those areas to aid in diagnosis. If any leaks are present, install a new
torque converter.
-
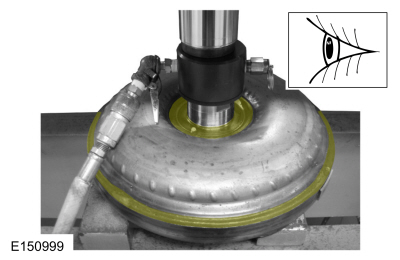
Inspect for leaks at the stud or mounting pad and balance weight
welds. Use a soap bubble solution around those areas to aid in
diagnosis. If any leaks are present, install a new torque converter.

-
After leaks are repaired, clean the remaining transmission fluid dye from serviced areas.
 Diagnosis and Testing - Road Testing Vehicle
Shift Point Road Test
NOTE:
Always drive the vehicle in a safe manner according to driving conditions and obey all traffic laws.
Upshift Gear Sequence
At times the 8-speed transmission may skip gears when the vehicle starts from a complete stop...
 Diagnosis and Testing - Parameter Identification (PID) Chart
Diagnostic PID Chart
PID Acronym
PID Name
Description
APP
APP sensor
APP
APP1
APP sensor 1
APP 1
APP2
APP sensor 2
APP 2
AST
Time Since Start
Time (in seconds) since the vehicle was started
CLRDIST
Distance since DTC cleared
Distance dr..
Other information:
Lincoln Corsair 2020-2026 Service Manual: Assembly - Engine
Special Tool(s) / General Equipment 100-002 (TOOL-4201-C) Holding Fixture with Dial Indicator Gauge 205-153 (T80T-4000-W) Handle 303-096 (T74P-6150-A) Installer, Camshaft Front Oil SealTKIT-2009TC-F 303-103 (T74P-6375-A) Holding Tool, FlywheelT74P-77000-ATKIT-2009TC-F 303-1252Stretchy Belt Remover/ Installer ToolTKIT-2006UF-FLMTKIT-2006UF-ROW 303-1..
Lincoln Corsair 2020-2026 Service Manual: Removal and Installation - Rear Wheel Speed Sensor - LHD FWD
Materials Name Specification Motorcraft® Metal Brake Parts CleanerPM-4-A, PM-4-B, APM-4-C - Removal NOTE: Removal steps in this procedure may contain installation details. Remove the wheel and tire. Refer to: Wheel and Tire (204-04A Wheels and Tires, Removal and Installation). Disconnect the electrical connector. ..
Categories
- Manuals Home
- 1st Generation Lincoln Corsair Owners Manual
- 1st Generation Lincoln Corsair Service Manual
- Selecting a Drive Mode. DRIVE MODES
- Automatic Transmission - 8-Speed Automatic Transmission – 8F35/8F40
- Memory Function
- New on site
- Most important about car
USB Port
WARNING: Driving while distracted can result in loss of vehicle control, crash and injury. We strongly recommend that you use extreme caution when using any device that may take your focus off the road. Your primary responsibility is the safe operation of your vehicle. We recommend against the use of any hand-held device while driving and encourage the use of voice-operated systems when possible. Make sure you are aware of all applicable local laws that may affect the use of electronic devices while driving.
USB A
Copyright © 2026 www.licorsair.com