Lincoln Corsair: Rear Suspension / Removal and Installation - Rear Stabilizer Bar Link
Lincoln Corsair 2020-2026 Service Manual / Chassis / Suspension / Rear Suspension / Removal and Installation - Rear Stabilizer Bar Link
Removal
NOTE: Removal steps in this procedure may contain installation details.
-
With the vehicle in NEUTRAL, position it on a hoist.
Refer to: Jacking and Lifting (100-02 Jacking and Lifting) .
-
NOTICE: Do not use power tools to remove or install the stabilizer bar link nuts. Damage to the stabilizer bar link ball joints and boots may occur.
NOTE: Use the TORX PLUS® holding feature to prevent the ball stud from turning while removing or installing the lower arm outboard nut. Torx® and TORX PLUS® is a reg. tm of Acument Intellectual Properties, LLC.
NOTE: The stabilizer bar links are designed with low friction ball joints that have a low breakaway torque.
NOTE: Make sure that the new nuts are used.
-
Remove and discard the rear stabilizer link nuts and remove the rear stabilizer link.
Torque: 85 lb.ft (115 Nm)
-
Remove and discard the rear stabilizer link nuts and remove the rear stabilizer link.
 |
Installation
-
To install, reverse the removal procedure.
 Removal and Installation - Rear Stabilizer Bar
Removal
With the vehicle in NEUTRAL, position it on a hoist.
Refer to: Jacking and Lifting (100-02 Jacking and Lifting)
.
NOTICE:
Do not use power tools to remove or install the
stabilizer bar link nuts...
 Removal and Installation - Spring
Removal
Remove the rear wheel knuckle.
Refer to: Wheel Knuckle - AWD (204-02 Rear Suspension, Removal and Installation).
Refer to: Wheel Knuckle - FWD (204-02 Rear Suspension, Removal and Installation)...
Other information:
Lincoln Corsair 2020-2026 Owners Manual: Apps
The system allows you interact with select mobile apps while keeping your eyes on the road. Voice commands, your steering wheel buttons, or a quick tap on your touchscreen give you advanced control of compatible mobile apps. You can also stream your favorite music or podcasts, share your time of arrival with friends, and keep connected safely...
Lincoln Corsair 2020-2026 Owners Manual: Fuel Quality - Gasoline
Choosing the Right Fuel Your vehicle is designed to operate on regular unleaded gasoline with a minimum pump (R+M)/2 octane rating of 87. Some fuel stations, particularly those in high altitude areas, offer fuels posted as regular unleaded gasoline with an octane rating below 87...
Categories
- Manuals Home
- 1st Generation Lincoln Corsair Owners Manual
- 1st Generation Lincoln Corsair Service Manual
- Child Safety Locks
- Capacities and Specifications - 2.0L
- Memory Function
- New on site
- Most important about car
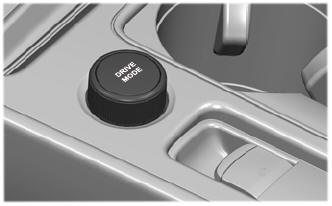
Selecting a Drive Mode. DRIVE MODES
Selecting a Drive Mode
Note: Drive mode changes may not be available when the ignition is off.
Copyright © 2026 www.licorsair.com