Lincoln Corsair: Body Closures / Removal and Installation - Rear Gate Trunk Module (RGTM)
Lincoln Corsair 2020-2024 Service Manual / Body and Paint / Body and Paint / Body Closures / Removal and Installation - Rear Gate Trunk Module (RGTM)
Removal
NOTE: Removal steps in this procedure may contain installation details.
-
NOTE: This step is only necessary when installing a new component.
The PMI process must begin with the current RGTM installed. If the current RGTM does not respond to the diagnostic scan tool, the tool may prompt for As-Built Data as part of the repair. Using a diagnostic scan tool, begin the PMI process for the RGTM following the on-screen instructions.
-
Remove the liftgate trim panel.
Refer to: Liftgate Trim Panel (501-05 Interior Trim and Ornamentation, Removal and Installation).
-
Disconnect the electrical connectors.
.jpg) |
-
Remove the fasteners and the RGTM .
.jpg) |
Installation
-
To install, reverse the removal procedure.
-
Using a diagnostic scan tool, complete the PMI process for the RGTM following the on-screen instructions.
 Removal and Installation - Rear Door Check Arm
Removal
NOTE:
Removal steps in this procedure may contain installation details.
NOTE:
LH shown, RH similar.
Open the door.
Remove the check arm bolt...

Other information:
Lincoln Corsair 2020-2024 Service Manual: Disassembly - Transmission - Plug-In Hybrid Electric Vehicle (PHEV)
Special Tool(s) / General Equipment 307-163 (T86P-70043-A) Remover, Stator Case BearingTKIT-1986-LMTKIT-1986-F 307-586Differential bearing cup removerTKIT-2006UF-FLMTKIT-2006UF-ROW 307-741Spring Compressor, F Clutch 307-821Motor Rotor Remover Installer 308-001 (T58L-101-B) Remover, Pilot Bearing Hydraulic Press Puller Punch Wooden Block ..
Lincoln Corsair 2020-2024 Service Manual: Removal and Installation - Front Wheel Bearing and Wheel Hub
Special Tool(s) / General Equipment 204-023 (T73T-1217-A) Installer, Wheel Hub Bearing Cup 204-180 (T93P-5493-A) Remover/Installer, BushingTKIT-1993-FLMTKIT-1993-LMTKIT-1993-FM 205-138 (T80T-4000-D) Installer, Drive Pinion Bearing Cup 205-140 (T80T-4000-F) Installer, Drive Pinion Bearing Cup 205-153 (T80T-4000-W) Handle 205-480Installer, Drive Pi..
Categories
- Manuals Home
- 1st Generation Lincoln Corsair Owners Manual
- 1st Generation Lincoln Corsair Service Manual
- Capacities and Specifications - 2.0L
- Memory Function
- Warning Lamps and Indicators
- New on site
- Most important about car
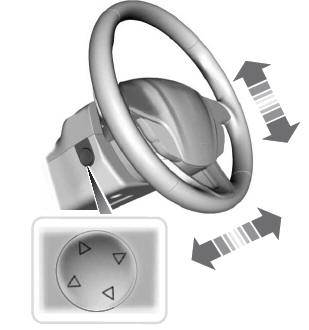
Adjusting the Steering Wheel - Vehicles With: Power Adjustable Steering Column
WARNING: Do not adjust the steering wheel when your vehicle is moving.
Note: Make sure that you are sitting in the correct position.
Copyright © 2024 www.licorsair.com