Lincoln Corsair: Automatic Transmission - 8-Speed Automatic Transmission – 8F35/8F40 / Removal and Installation - Halfshaft Seal LH
Lincoln Corsair 2020-2026 Service Manual / Powertrain / Automatic Transmission / Automatic Transmission - 8-Speed Automatic Transmission – 8F35/8F40 / Removal and Installation - Halfshaft Seal LH
Special Tool(s) / General Equipment
 |
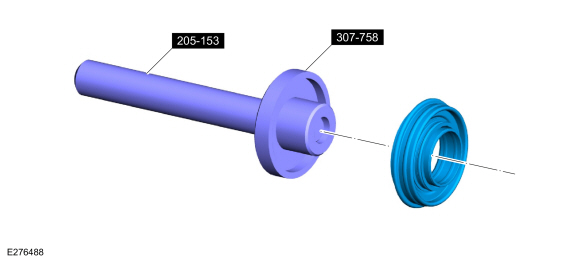
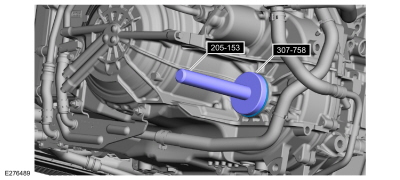
205-153
(T80T-4000-W)
Handle |
 |
307-758 Installer, Axle Seal -FWD |
| Flat Headed Screw Driver | |
Removal
-
With the vehicle in NEUTRAL, position it on a hoist.
Refer to: Jacking and Lifting - Overview (100-02 Jacking and Lifting, Description and Operation).
-
Remove the front LH halfshaft.
Refer to: Front Halfshaft LH (205-04 Front Drive Halfshafts, Removal and Installation).
-
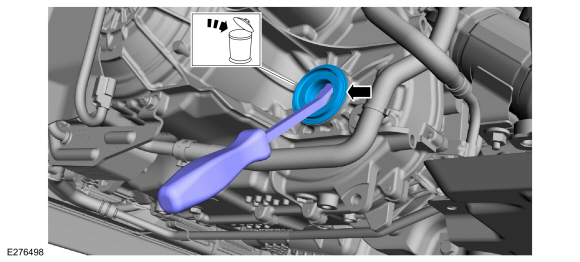
Remove and discard halfshaft seal.
Use the General Equipment: Flat Headed Screw Driver
 |
Installation
-
Install a new halfshaft seal on the special tool.
Use Special Service Tool: 307-758 Installer, Axle Seal -FWD. , 205-153 (T80T-4000-W) Handle.
 |
-
Using the special tool, install the LH halfshaft seal.
Use Special Service Tool: 307-758 Installer, Axle Seal -FWD. , 205-153 (T80T-4000-W) Handle.
 |
-
Install the front LH halfshaft.
Refer to: Front Halfshaft LH (205-04 Front Drive Halfshafts, Removal and Installation).
-
Check the transmission fluid level.
Refer to: Transmission Fluid Level Check (307-01A Automatic Transmission - 8-Speed Automatic Transmission – 8F35/8F40, General Procedures).
 Removal and Installation - Auto-Start-Stop Accumulator Solenoid
Materials
Name
Specification
Petroleum Jelly
-
Removal
Remove the auto-start-stop accumulator.
Refer to: Auto-Start-Stop Accumulator (307-01A Automatic Transmission -
8-Speed Automatic Transmission – 8F35/8F40, Removal and Installation)...
 Removal and Installation - Halfshaft Seal RH
Special Tool(s) /
General Equipment
205-153
(T80T-4000-W)
Handle
307-758Installer, Axle Seal -FWD
Flat Headed Screw Driver
Removal
With the vehicle in NEUTRAL, position it on a hoist...
Other information:
Lincoln Corsair 2020-2026 Service Manual: Diagnosis and Testing - Noise, Vibration and Harshness (NVH)
Special Tool(s) Vehicle Communication & Measurement Module (VCMM™) Base Kit 164-R9822 / 164-R9823 EngineEAR107-R2100Chassis EarsJSP97170 Squeak And Rattle Kit164-R4900 Ultrasonic Diagnostic ToolTRATP-9367 Diagnostic Theory The shortest route to an accurate diagnosis results from: System knowledge, including comparison with a..
Lincoln Corsair 2020-2026 Owners Manual: Keys and Remote Controls
Argentina Brazil Djibouti Ghana Jamaica Mauritania Moldova Morocco Paraguay NR: 2016-9-I-000222 Serbia Singapore South Africa South Korea MSIP-CRM-TAL-A2C97102000 Ukraine United Arab Emirates (U.A.E.) United States and Canada WARNING: Changes or modifications not expressively approved by the party responsible for compliance could void the user's authority to operate the equipmen..
Categories
- Manuals Home
- 1st Generation Lincoln Corsair Owners Manual
- 1st Generation Lincoln Corsair Service Manual
- Opening and Closing the Hood
- Interior Lamps
- Refueling - Gasoline
- New on site
- Most important about car
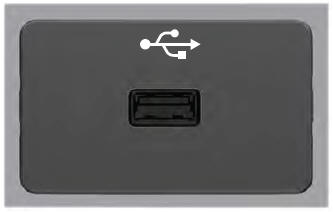
USB Port
WARNING: Driving while distracted can result in loss of vehicle control, crash and injury. We strongly recommend that you use extreme caution when using any device that may take your focus off the road. Your primary responsibility is the safe operation of your vehicle. We recommend against the use of any hand-held device while driving and encourage the use of voice-operated systems when possible. Make sure you are aware of all applicable local laws that may affect the use of electronic devices while driving.
USB A
Copyright © 2026 www.licorsair.com