Lincoln Corsair: Body Closures / Removal and Installation - Fuel Filler Door Assembly
Lincoln Corsair 2020-2024 Service Manual / Body and Paint / Body and Paint / Body Closures / Removal and Installation - Fuel Filler Door Assembly
Special Tool(s) / General Equipment
| Flat Headed Screw Driver | |
| Knife |
Removal
NOTE: Removal steps in this procedure may contain installation details.
NOTE: The fuel filler door assembly is damaged during the removal process and requires a new fuel filler door assembly installed.
-
Disconnect the battery.
Refer to: Battery Disconnect and Connect (414-01) .
-
Remove the LHR wheel and tire.
Refer to: Wheel and Tire (204-04A Wheels and Tires, Removal and Installation).
-
Remove the retainers, bolts and the rear wheel arch liners.
Torque: 17 lb.in (1.9 Nm)
.jpg) |
-
Remove the fuel filler door.
Refer to: Fuel Filler Door (501-03 Body Closures, Removal and Installation).
-
-
Disconnect the electrical connector.
-
Disconnect the drain hose.
-
Disconnect the electrical connector.
.jpg) |
-
Remove the capless fuel filler pipe cover.
Use the General Equipment: Flat Headed Screw Driver
.jpg) |
-
Using a knife, slice the holes in the indicated areas.
Use the General Equipment: Knife
.jpg) |
-
Insert the screwdriver and release the clips while pulling the fuel filler door housing away from the vehicle.
Use the General Equipment: Flat Headed Screw Driver
.jpg) |
-
Pull the fuel filler door housing away from the vehicle.
.jpg) |
Installation
-
To install, reverse the removal procedure.
-
NOTICE: Make sure that the fuel information labels are installed at the noted removal position.
NOTE: This step is only necessary if the component needs to be replaced.
Install the fuel labels on the fuel filler door hinge arm and rear panel.
 Removal and Installation - Fuel Filler Door
Special Tool(s) /
General Equipment
Flat Headed Screw Driver
Removal
NOTE:
Removal steps in this procedure may contain installation details...
 Removal and Installation - Hands-Free Liftgate Actuation Lower Sensor
Removal
NOTE:
Removal steps in this procedure may contain installation details.
With the vehicle in NEUTRAL, position it on a hoist.
Refer to: Jacking and Lifting (100-02)
...
Other information:
Lincoln Corsair 2020-2024 Owners Manual: Side Airbags
WARNING: Do not place objects or mount equipment on or near the airbag cover, on the side of the front or rear seatbacks, or in areas that may come into contact with a deploying airbag. Failure to follow these instructions may increase the risk of personal injury in the event of a crash...
Lincoln Corsair 2020-2024 Service Manual: Removal and Installation - Rear Bumper Cover
Special Tool(s) / General Equipment Interior Trim Remover Removal NOTE: Removal steps in this procedure may contain installation details. With the vehicle in NEUTRAL, position it on a hoist. Refer to: Jacking and Lifting - Overview (100-02 Jacking and Lifting, Description and Operation)...
Categories
- Manuals Home
- 1st Generation Lincoln Corsair Owners Manual
- 1st Generation Lincoln Corsair Service Manual
- Automatic Transmission - 8-Speed Automatic Transmission – 8F35/8F40
- Head Up Display
- Programming the Garage Door Opener to Your Hand-Held Transmitter
- New on site
- Most important about car
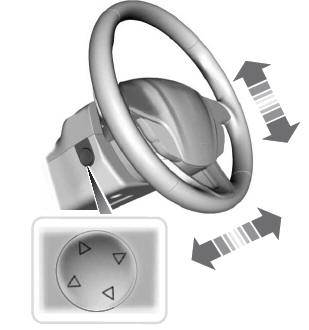
Adjusting the Steering Wheel - Vehicles With: Power Adjustable Steering Column
WARNING: Do not adjust the steering wheel when your vehicle is moving.
Note: Make sure that you are sitting in the correct position.
Copyright © 2024 www.licorsair.com