Lincoln Corsair: Bumpers / Removal and Installation - Front Bumper
Special Tool(s) /
General Equipment
Removal
NOTE:
Removal steps in this procedure may contain installation details.
-
Remove the front bumper cover.
Refer to: Front Bumper Cover (501-19 Bumpers, Removal and Installation).
-
On both sides.
Remove the push pins and the cowl filler panel.
-
On both sides.
Disconnect the headlamp assembly electrical connector.
-
On both sides.
Remove the screws and the headlamp assembly.
Torque:
35 lb.in (4 Nm)
-
On both sides.
Disconnect the electrical connector and remove the bolts. Remove the horn and bracket assembly.
Torque:
97 lb.in (11 Nm)
-
Separate the wiring harness guides and position aside the wiring harness.
-
Separate the wiring harness guides and position aside the wiring harness.
-
On both sides.
Remove the screw.
Torque:
97 lb.in (11 Nm)
-
On both sides.
Remove the screw.
Torque:
97 lb.in (11 Nm)
-
Remove the bolts and the nuts.
Torque:
46 lb.ft (63 Nm)
-
Remove the push pins, release the tabs and remove the upper radiator air deflector.
Use the General Equipment: Interior Trim Remover
-
Support the lower radiator support.
-
Remove the bolts and position forward the active grille shutter assembly.
Torque:
22 lb.ft (30 Nm)
-
With the help of an assistant.
Remove the front bumper.
Installation
-
To install, reverse the removal procedure.
Special Tool(s) /
General Equipment
Interior Trim Remover
Removal
NOTE:
Removal steps in this procedure may contain installation details...
Special Tool(s) /
General Equipment
Interior Trim Remover
Removal
NOTE:
Removal steps in this procedure may contain installation details...
Other information:
Removal
NOTE:
Removal steps in this procedure may contain installation details.
Remove the front seat.
Refer to: Front Seat (501-10A Front Seats, Removal and Installation).
Remove the front seat side shield screws.
Remove the LH front seat side shield...
General Specifications
Item
Specification
Tire Inflation
Tires
See Safety Certification Label on driver door jamb
Wheel Weights
Wheel weight type
Use a wheel weight manufacturer's rim gauge to determine the correct wheel weight application
Torque Specifications
..
Categories

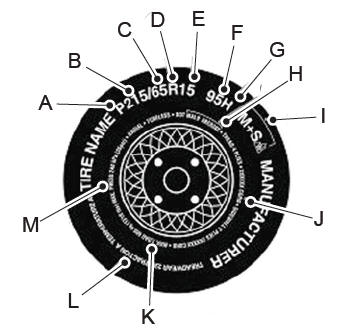
P215/65R15 95H is an example of a tire
size, load index and speed rating. The
definitions of these items are listed
below. (Note that the tire size, load index
and speed rating for your vehicle may
be different from this example.)
P: Indicates a tire, designated by the
Tire and Rim Association, that may be
used for service on cars, sport utility
vehicles, minivans and light trucks. Note:
If your tire size does not begin with a
letter this may mean it is designated by
either the European Tire and Rim
Technical Organization or the Japan Tire
Manufacturing Association.
215: Indicates the nominal width of
the tire in millimeters from sidewall edge
to sidewall edge. In general, the larger
the number, the wider the tire.
65: Indicates the aspect ratio which
gives the tire's ratio of height to width.
R: Indicates a radial type tire.
15: Indicates the wheel or rim
diameter in inches. If you change your
wheel size, you will have to purchase
new tires to match the new wheel
diameter.
95: Indicates the tire's load index. It
is an index that relates to how much
weight a tire can carry. You may find this
information in your owner’s manual. If
not, contact a local tire dealer.
read more
.jpg)
.jpg)
.jpg)
.jpg)
.jpg)
.jpg)
.jpg)
.jpg)
.jpg)
.jpg)
.jpg)
.jpg)
 Removal and Installation - Front Bumper Cover
 Removal and Installation - Rear Bumper Cover
