Lincoln Corsair: Engine - 2.0L EcoBoost (177kW/240PS) – MI4 / Removal and Installation - Engine Mount
Special Tool(s) /
General Equipment
| Trolley Jack |
| Wooden Block |
Removal
-
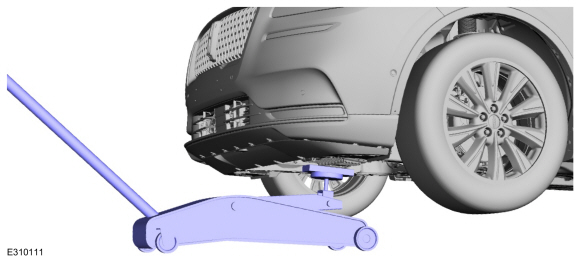
With the vehicle in NEUTRAL, position it on a hoist.
Refer to: Jacking and Lifting - Overview (100-02 Jacking and Lifting, Description and Operation).
-
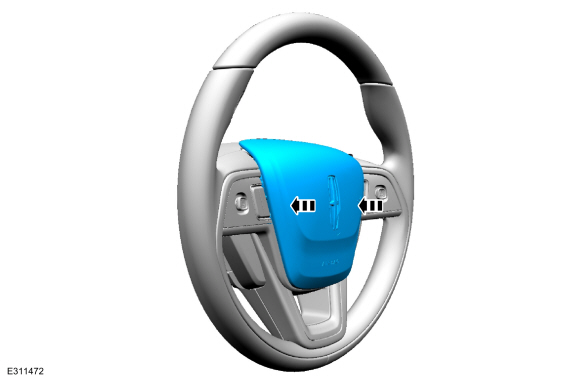
NOTICE:
Do not pull the engine appearance cover forward or
sideways to remove. Failure to press straight upward on the underside of
the cover at the attachment points may result in damage to the cover or
engine components.
-
Remove the engine appearance cover nut.
-
Place your hand under the engine appearance cover at
each grommet location and push straight up to release each grommet from
the studs.
-
After all of the grommets have been released from the studs, remove the appearance cover from the engine.
-
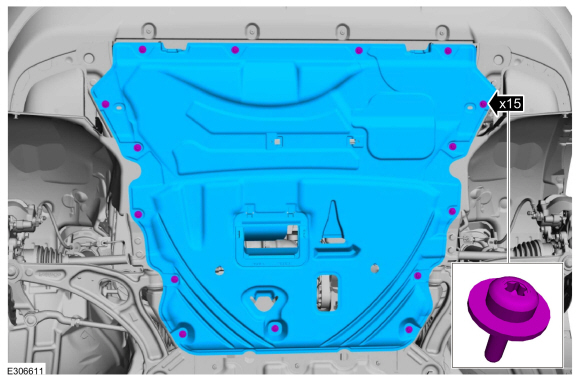
Remove the retainers and the underbody shield.
-
-
Detach the coolant hose retainer.
-
Remove the bolts and the degas bottle support bracket.
-
-
Detach the coolant hose retainers.
-
Release the tabs and position the degas bottle aside.
-
Remove the bolt and position the A/C line bracket aside.
-
Position the jack and wooden block under the front of the oil pan to support the engine.
Use the General Equipment: Trolley Jack
Use the General Equipment: Wooden Block
-
-
Remove and discard the nuts and bolts.
Installation
-
Tighten the engine mount studs.
Torque:
106 lb.in (12 Nm)
-
-
Install the engine mount and the new nuts.
Torque:
81 lb.ft (110 Nm)
-
Install the new bolts finger tight.
-
Remove the jack and wooden block.
Use the General Equipment: Trolley Jack
Use the General Equipment: Wooden Block
-
Tighten the engine mount bolts.
Torque:
129 lb.ft (175 Nm)
-
Position the A/C line bracket and install the bolt.
Torque:
80 lb.in (9 Nm)
-
-
Position the degas bottle on the tabs.
-
Attach the coolant hose retainers.
-
-
Install the degas bottle support bracket and the bolts.
Torque:
35 lb.ft (48 Nm)
-
Attach the coolant hose retainer.
-
NOTE:
Lubricating the grommets with silicone grease aids
in the installation of the engine appearance cover, and any future
removal and installation of the cover.
-
Lubricate each grommet with silicone grease.
-
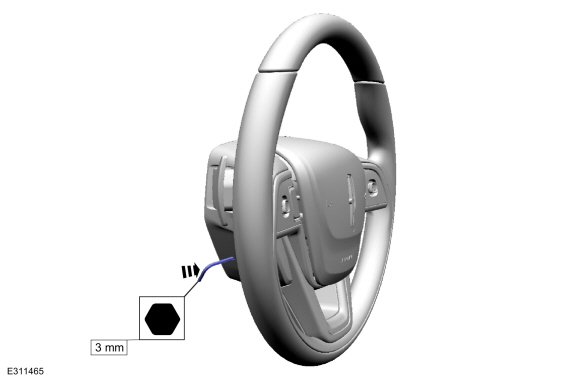
If the engine appearance cover stud bolt is loosened
or removed, it must be installed/tightened into the valve cover.
Torque:
62 lb.in (7 Nm)
-
Position the engine appearance cover onto the engine with the grommets aligned with the studs.
-
Press down on the engine appearance cover at each grommet location to attach the grommets onto the studs.
-
Install the engine appearance cover nut
Torque:
44 lb.in (5 Nm)
-
Install the underbody shield and the retainers.
Torque:
13 lb.in (1.5 Nm)
Special Tool(s) /
General Equipment
303-103
(T74P-6375-A)
Holding Tool, FlywheelT74P-77000-ATKIT-2009TC-F
Removal
With the vehicle in NEUTRAL, position it on a hoist...
Other information:
WARNING: Normal cruise control will
not brake when your vehicle is
approaching slower vehicles. Always be
aware of which mode you have selected
and apply the brakes when necessary.
Use the touchscreen to select the following:
Select Settings.
Select Driver Assist...
Use the touchscreen to select the following:
Select the settings option on
the
feature bar.
Select ambient lighting.
Switching Ambient Lighting On
Touch a color once.
Changing the Color
Touch any color once.
Adjusting the Brightness
Drag the selected color up or down...


 Removal and Installation - Flexplate