Lincoln Corsair: Automatic Transmission - Automatic Transmission – HF45 / General Procedures - Transmission Fluid Level Check
Lincoln Corsair 2020-2026 Service Manual / Powertrain / Automatic Transmission / Automatic Transmission - Automatic Transmission – HF45 / General Procedures - Transmission Fluid Level Check
Materials
| Name | Specification |
|---|---|
| Motorcraft® MERCON® ULV Automatic Transmission Fluid XT-12-QULV |
WSS-M2C949-A, MERCON® ULV |
Check
-
Start the engine and allow to run for 1 minute. Turn engine off and wait 5 minutes.
-
With the vehicle in NEUTRAL, position it on a hoist.
Refer to: Jacking and Lifting - Overview (100-02 Jacking and Lifting, Description and Operation).
-
Remove the screws and the engine front undershield.
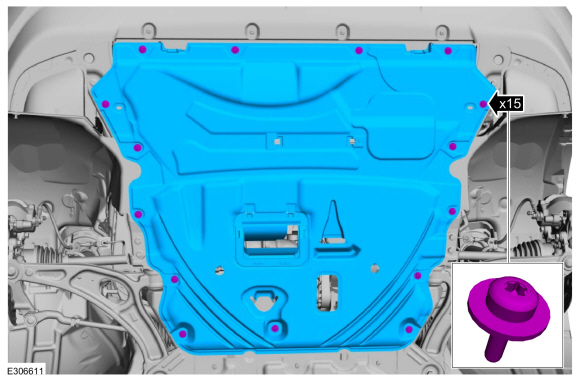 |
-
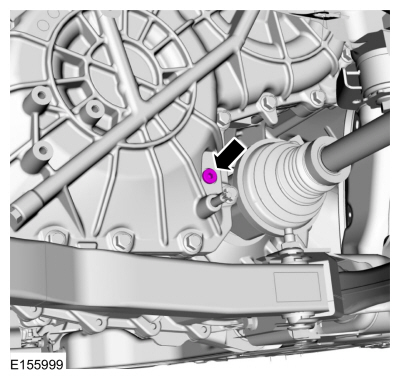
Rotate the steering wheel counter clockwise to access the transmission fluid leveling plug.
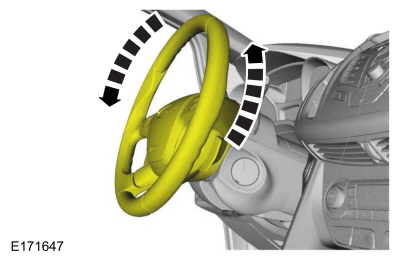 |
-
NOTE: The transmission fluid should be even with the bottom of the transmission fluid leveling plug hole.
Remove the transmission fluid leveling plug and check the transmission fluid level.
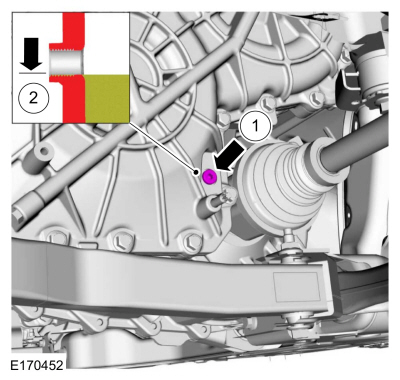 |
Adding Additional Transmission Fluid
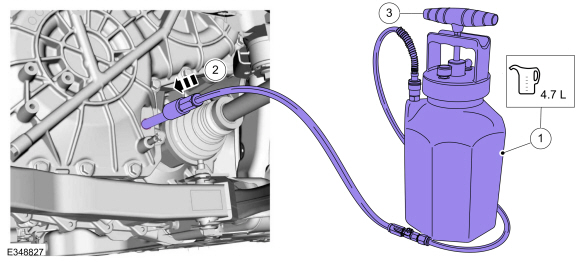
NOTE: The following procedure uses the Mityvac MVA7212 ATF Refill System.
-
Install the adapter into transmission fluid leveling plug hole hand tight.
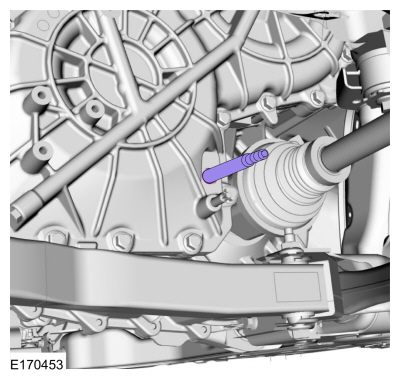 |
-
Fill the transmission with transmission fluid.
-
Fill the Mityvac MVA7212 with transmission fluid.
Material: Motorcraft® MERCON® ULV Automatic Transmission Fluid / XT-12-QULV (WSS-M2C949-A, ) (MERCON® ULV)
-
Connect the Mityvac MVA7212.
-
Follow the manufacturer instructions to dispense the fluid into the transmission.
-
Fill the Mityvac MVA7212 with transmission fluid.
 |
-
Release the pressure and remove the Mityvac MVA7212. Allow all excess fluid to drain into a pan.
-
Install the transmission fluid leveling plug.
Torque: 26 lb.ft (35 Nm)
 |
-
Install the engine front undershield and the screws.
|
 General Procedures - Transmission Fluid Drain and Refill
Materials
Name
Specification
Motorcraft® MERCON® ULV Automatic Transmission FluidXT-12-QULV
WSS-M2C949-A, MERCON® ULV
Draining
With the vehicle in NEUTRAL, position it on a hoist...
 General Procedures - Transmission Strategy Download
Configuration
NOTE:
The inverter system controller (ISC) is called the SOBDMC
(secondary on-board diagnostic control module C) in the scan tool.
Using the scan tool, enter the transmission 11-digit
identification and 13-digit strategy recorded from the transmission tag...
Other information:
Lincoln Corsair 2020-2026 Service Manual: Description and Operation - Roof Opening Panel - Overview
Panoramic Roof Opening Panel The roof opening panel consists of the following: Air deflector Front sliding glass panel (sunroof) Front sliding glass panel motor (sunroof motor) Shield (sunshade) assembly Shield (sunshade) motor Blinds (concertina blinds) Roof panel fixed glass (panoramic) Roof opening panel frame assembly Roof opening panel control ..
Lincoln Corsair 2020-2026 Service Manual: General Procedures - Door Latch Lubrication
Special Tool(s) / General Equipment Flat-Bladed Screwdriver Materials Name Specification Motorcraft® Multi-Purpose Grease SprayXL-5-A ESB-M1C93-B Activation NOTE: Typical left front door shown, others similar. Open the door. Using a flat blade screwdriver, fully close the latch (2 clicks). Use the General Equipment: Fla..
Categories
- Manuals Home
- 1st Generation Lincoln Corsair Owners Manual
- 1st Generation Lincoln Corsair Service Manual
- Normal Scheduled Maintenance
- Interior Lamps
- Memory Function
- New on site
- Most important about car
Information on P Type Tires
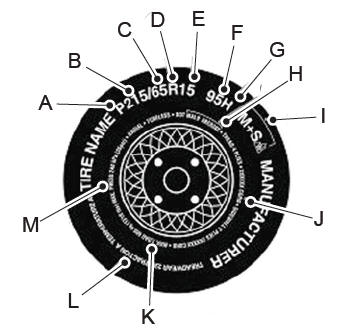
P215/65R15 95H is an example of a tire size, load index and speed rating. The definitions of these items are listed below. (Note that the tire size, load index and speed rating for your vehicle may be different from this example.)
P: Indicates a tire, designated by the Tire and Rim Association, that may be used for service on cars, sport utility vehicles, minivans and light trucks. Note: If your tire size does not begin with a letter this may mean it is designated by either the European Tire and Rim Technical Organization or the Japan Tire Manufacturing Association. 215: Indicates the nominal width of the tire in millimeters from sidewall edge to sidewall edge. In general, the larger the number, the wider the tire. 65: Indicates the aspect ratio which gives the tire's ratio of height to width. R: Indicates a radial type tire. 15: Indicates the wheel or rim diameter in inches. If you change your wheel size, you will have to purchase new tires to match the new wheel diameter. 95: Indicates the tire's load index. It is an index that relates to how much weight a tire can carry. You may find this information in your owner’s manual. If not, contact a local tire dealer.Copyright © 2026 www.licorsair.com