Lincoln Corsair: Front Seats / General Procedures - Seat Heater Mat Removal
Repair
.jpg) WARNING:
To minimize the risk of injury, always wear protective
gloves when working with a steamer. Failure to follow these instructions
may result in serious personal injury.
WARNING:
To minimize the risk of injury, always wear protective
gloves when working with a steamer. Failure to follow these instructions
may result in serious personal injury.
NOTE: Click here to view a video version of the seat heater mat removal and installation.
View
.jpg)
NOTE: During installation, it is allowable to adhere a new heater mat to any adhesive left behind on the foam.
NOTE: Typical seat cushion foam and heater mat shown, other seat cushion/backrest foam and heater mats are similar.
-
Acquire an automotive upholstery steamer with the following specifications.
1 Minimum 1 liter capacity 2 1300 – 1500 watts 3 Wide, T-Shaped, high durability plastic or metal (aluminum) steamer head
-
Remove the seat cushion or backrest cover. Refer to the
appropriate procedure in this or one of the other 501-10 sections.
-
Set up the commercially available steamer following the instruction sheet provided with the equipment.
-
Purge any water out of the steamer line and head before placing the steamer head on the heater mat.
-
NOTE: Only the areas with adhesive need to be steamed. Look at the back of the new heater mat or place a finger between the heater mat and foam to find the locations.
To soften the adhesive, locate 1 adhesive strip in a section of the foam, place the steamer head at one end of the heater mat and apply steam to that area for approximately 15 seconds before pulling on the heater mat.
.jpg) |
-
NOTICE: Peel the heater mat off the foam slowly as to not damage the foam and to remove the most amount of adhesive as possible.
Slowly pull the heater mat down the length of the adhesive strip, allowing the steamer head to follow and continue to soften the adhesive until the heater mat is detached from that portion of foam.
.jpg) |
-
Position the steamer head on the other side of the foam
section. Apply steam to that area for approximately 15 seconds and
slowly pull the heater mat down the length of the adhesive strip,
allowing the steamer head to follow and continue to soften the adhesive
until the heater mat is detached.
.jpg) |
-
Remove the heater mat.
-
Repeat steps 5 through 7 for each adhesive strip in each section of the foam.
-
Working from one end to the other, continue applying
steam and peeling the heater mat off the foam until the heater mat is
completely removed.
-
If required, route out the heater mat wiring harness from the foam.
-
Repeat steps 5 through 7 for each adhesive strip in each section of the foam.
.jpg) |
-
NOTE: Allow enough time for the moisture/water to dry or the new heater mat will not stick to the foam.
Let the foam stand for 5 minutes to allow any residual moisture to evaporate.
.jpg) |
-
Install a new heater mat.
Refer to: Seat Heater Mat Installation (501-10A Front Seats, General Procedures).
 General Procedures - Seat Heater Mat Installation
Repair
NOTE:
Click here to view a video version of the seat heater mat removal and installation. View
NOTE:
Always install a new heater mat...
 Removal and Installation - Driver Front Seat Module (DSM)
Removal
NOTE:
DSM (driver front seat module) shown, SCMB (front passenger seat control module) is similar.
NOTE:
Removal steps in this procedure may contain installation details...
Other information:
Lincoln Corsair 2020-2026 Service Manual: Description and Operation - Parking Brake - System Operation and Component Description
System Operation System Diagram Item Description 1 ABS module 2 LH parking brake actuator motor 3 GWM 4 RCM 5 PCM 6 BCM 7 IPC 8 Parking brake control switch 9 RH parking brake actuator motor Network Message Chart ABS Module Electronic Parking Brake Network Input Me..
Lincoln Corsair 2020-2026 Service Manual: Removal and Installation - Windshield Washer Reservoir
Special Tool(s) / General Equipment Fluid Suction Gun Materials Name Specification Motorcraft® Premium Windshield Wash Concentrate with BitterantZC-32-B2 WSS-M14P19-A Removal NOTE: Removal steps in this procedure may contain installation details. Remove the retainers and the RH fill cowl side panel. Siphon the wind..
Categories
- Manuals Home
- 1st Generation Lincoln Corsair Owners Manual
- 1st Generation Lincoln Corsair Service Manual
- Memory Function
- Normal Scheduled Maintenance
- Automatic Transmission - 8-Speed Automatic Transmission – 8F35/8F40
- New on site
- Most important about car
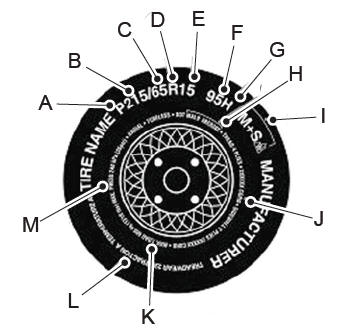
Information on P Type Tires

P215/65R15 95H is an example of a tire size, load index and speed rating. The definitions of these items are listed below. (Note that the tire size, load index and speed rating for your vehicle may be different from this example.)
P: Indicates a tire, designated by the Tire and Rim Association, that may be used for service on cars, sport utility vehicles, minivans and light trucks. Note: If your tire size does not begin with a letter this may mean it is designated by either the European Tire and Rim Technical Organization or the Japan Tire Manufacturing Association. 215: Indicates the nominal width of the tire in millimeters from sidewall edge to sidewall edge. In general, the larger the number, the wider the tire. 65: Indicates the aspect ratio which gives the tire's ratio of height to width. R: Indicates a radial type tire. 15: Indicates the wheel or rim diameter in inches. If you change your wheel size, you will have to purchase new tires to match the new wheel diameter. 95: Indicates the tire's load index. It is an index that relates to how much weight a tire can carry. You may find this information in your owner’s manual. If not, contact a local tire dealer.