Lincoln Corsair: Rear Disc Brake / Removal and Installation - Rear Brake Flexible Hose
Removal
 WARNING:
Service actions on vehicles equipped with electronic brake
booster and electronic parking brakes may cause unexpected brake
application, which could result in injury to hands or fingers. Put the
brake system into service mode prior to servicing or removing any brake
components. Failure to follow this instruction may result in serious
personal injury.
WARNING:
Service actions on vehicles equipped with electronic brake
booster and electronic parking brakes may cause unexpected brake
application, which could result in injury to hands or fingers. Put the
brake system into service mode prior to servicing or removing any brake
components. Failure to follow this instruction may result in serious
personal injury.
NOTICE: Do not allow the brake fluid to come in contact with the adhesive backing on the brake pads. This may prevent the brake pad adhesive surface from bonding with the brake caliper. If brake fluid is spilled onto the brake pads, install new pads.
NOTICE: Make sure that all openings are sealed.
NOTICE: If the fluid is spilled on the paintwork, the affected area must be immediately washed down with cold water.
NOTE: Removal steps in this procedure may contain installation details.
-
Activate the brake service mode.
Refer to: Brake Service Mode Activation and Deactivation (206-00 Brake System - General Information, General Procedures).
-
Remove the wheel and tire.
Refer to: Wheel and Tire (204-04A Wheels and Tires, Removal and Installation).
-
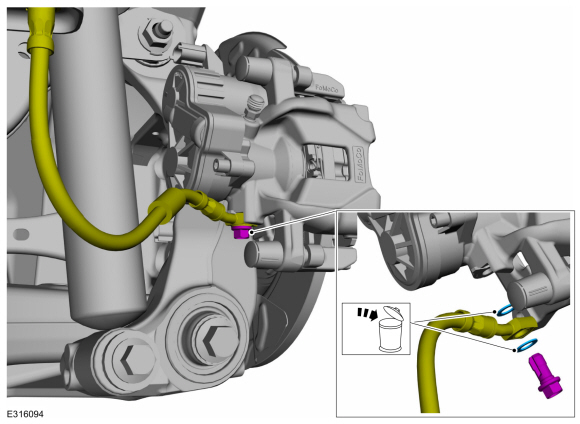
Remove the flow bolt and detach the brake hose. Discard the washers.
Torque: 30 lb.ft (40 Nm)
 |
-
Remove the brake flexible hose.
-
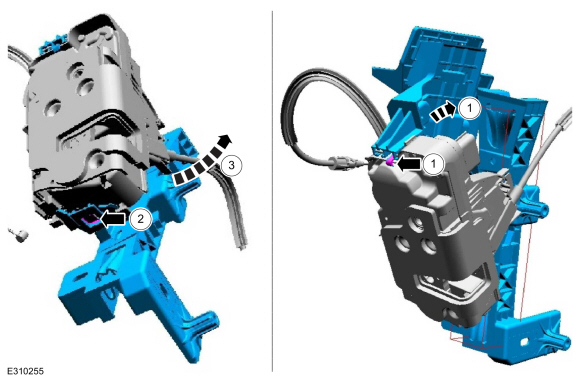
Disconnect the brake tube.
Torque: 159 lb.in (18 Nm)
-
Remove the clip and the brake flexible hose.
-
Disconnect the brake tube.
 |
Installation
-
To install, reverse the removal procedure.
-
Deactivate the brake service mode.
Refer to: Brake Service Mode Activation and Deactivation (206-00 Brake System - General Information, General Procedures).
-
Bleed the brake system.
Refer to: Brake System Pressure Bleeding (206-00 Brake System - General Information, General Procedures).


Other information:
Lincoln Corsair 2020-2026 Service Manual: Description and Operation - Engine Emission Control - System Operation and Component Description
System Operation Exhaust Gas Recirculation (EGR) Systems The EGR system controls the NOX emissions. Small amounts of exhaust gases are recirculated back into the combustion chamber to mix with the air to fuel charge. The combustion chamber temperature is reduced, lowering NOX emissions Exhaust Gas Recirculation (EGR) System — Differential Pressure Feedback The EGR system consists o..
Lincoln Corsair 2020-2026 Service Manual: Removal and Installation - Driver Door Window Control Switch
Special Tool(s) / General Equipment Interior Trim Remover Removal Remove the driver door window control switch and bezel as an assembly. Release the clips. Use the General Equipment: Interior Trim Remover Disconnect the driver door window control switch electrical connector. Disconnect the door lock control switch electrical connector and remove..
Categories
- Manuals Home
- 1st Generation Lincoln Corsair Owners Manual
- 1st Generation Lincoln Corsair Service Manual
- Programming the Garage Door Opener to Your Hand-Held Transmitter
- Memory Function
- Automatic Transmission - 8-Speed Automatic Transmission – 8F35/8F40
- New on site
- Most important about car
360 Degree Camera Cameras
Locating the Rear View Camera

The rear view camera is on the tailgate.
Locating the Front View Camera