Lincoln Corsair: Evaporative Emissions - 2.0L EcoBoost (177kW/240PS) – MI4 / Removal and Installation - Fuel Tank Pressure Sensor and Tube
Removal
 WARNING:
Do not smoke, carry lighted tobacco or have an open flame of
any type when working on or near any fuel-related component. Highly
flammable mixtures may be present and may be ignited. Failure to follow
these instructions may result in serious personal injury.
WARNING:
Do not smoke, carry lighted tobacco or have an open flame of
any type when working on or near any fuel-related component. Highly
flammable mixtures may be present and may be ignited. Failure to follow
these instructions may result in serious personal injury.
WARNING:
Do not carry personal electronic devices such as cell
phones, pagers or audio equipment of any type when working on or near
any fuel-related component. Highly flammable mixtures may be present and
may be ignited. Failure to follow these instructions may result in
serious personal injury.
WARNING:
Always disconnect the battery ground cable at the battery
when working on an evaporative emission (EVAP) system or fuel-related
component. Highly flammable mixtures may be present and may be ignited.
Failure to follow these instructions may result in serious personal
injury.
NOTE: Removal steps in this procedure may contain installation details.
-
With the vehicle in NEUTRAL, position it on a hoist.
Refer to: Jacking and Lifting (100-02 Jacking and Lifting - 2.0L EcoBoost (177kW/240PS) - MI4) .
-
Disconnect the negative battery cable.
Refer to: Battery Disconnect and Connect (414-01 Battery, Mounting and Cables - 2.0L EcoBoost (177kW/240PS) - MI4) .
-
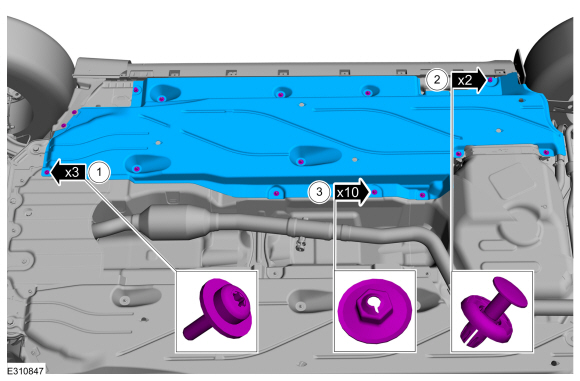
Remove the fasteners and the LH deflector shield.
 |
-
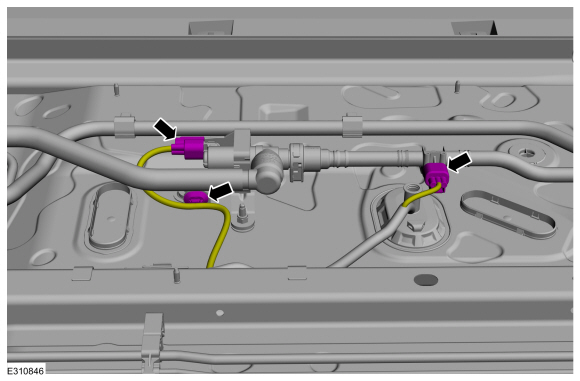
Disconnect the electrical connectors and the wiring harness retainer.
 |
-
-
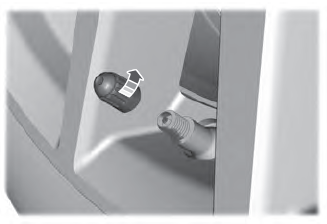
Disconnect the canister quick release couplings.
Refer to: Quick Release Coupling (310-00 Fuel System - General Information - 2.0L EcoBoost (177kW/240PS) - MI4) .
-
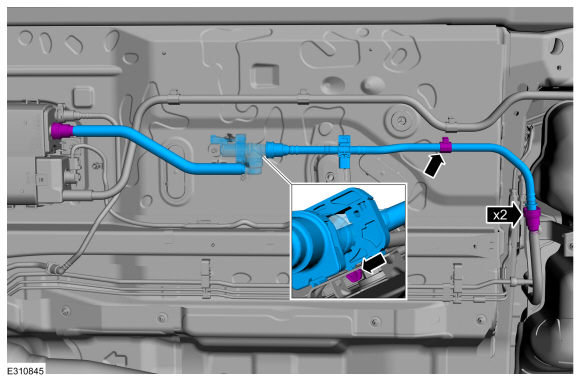
Release the hose routing clip.
-
Remove the EVAP blocking valve from the retainer bracket by releasing the clip.
-
Disconnect the canister quick release couplings.
 |
Installation
-
To install, reverse the removal procedure.
 Removal and Installation - Evaporative Emission Canister Vent Solenoid
Removal
WARNING:
Do not smoke, carry lighted tobacco or have an open flame of
any type when working on or near any fuel-related component...

Other information:
Lincoln Corsair 2020-2024 Owners Manual: Interior Air Quality
What Is the Cabin Air Filter The cabin air filter improves the quality of air in your vehicle by trapping dust, pollen and other particles. Locating the Cabin Air Filter You can locate the cabin air filter behind the glove box. Replacing the Cabin Air Filter Replace the filter at regular intervals. Note: Make sure you have a cabin air filter installed at all times. This prevents foreign objec..
Lincoln Corsair 2020-2024 Service Manual: Specifications
General Specifications Item Specification Tire Inflation Tires See Safety Certification Label on driver door jamb Wheel Weights Wheel weight type Use a wheel weight manufacturer's rim gauge to determine the correct wheel weight application Torque Specifications ..
Categories
- Manuals Home
- 1st Generation Lincoln Corsair Owners Manual
- 1st Generation Lincoln Corsair Service Manual
- Refueling - Gasoline
- Auto Hold (IF EQUIPPED)
- Exterior Mirrors
- New on site
- Most important about car
Second Stage: Checking Tire Pressure
WARNING: If the tire does not inflate to the recommended tire pressure within 15 minutes, stop and call roadside assistance.
WARNING: The power plug may get hot after use and should be handled carefully when unplugging.
Check the air pressure of your tires as follows: