Lincoln Corsair: Front Disc Brake / Removal and Installation - Brake Caliper
Materials
| Name | Specification |
|---|---|
| Motorcraft® Silicone Brake Caliper Grease and Dielectric Compound XG-3-A |
ESA-M1C200-A ESE-M1C171-A |
| Motorcraft® Metal Brake Parts Cleaner PM-4-A, PM-4-B, APM-4-C |
- |
Removal
 WARNING:
Service actions on vehicles equipped with electronic brake
booster and electronic parking brakes may cause unexpected brake
application, which could result in injury to hands or fingers. Put the
brake system into service mode prior to servicing or removing any brake
components. Failure to follow this instruction may result in serious
personal injury.
WARNING:
Service actions on vehicles equipped with electronic brake
booster and electronic parking brakes may cause unexpected brake
application, which could result in injury to hands or fingers. Put the
brake system into service mode prior to servicing or removing any brake
components. Failure to follow this instruction may result in serious
personal injury.
NOTICE: Make sure that all openings are sealed.
NOTICE: If the brake fluid is spilled on any component, the affected area must be immediately washed down with cold water.
NOTE: Removal steps in this procedure may contain installation details.
-
Activate the brake service mode.
Refer to: Brake Service Mode Activation and Deactivation (206-00 Brake System - General Information, General Procedures).
-
Remove the wheel and tire.
Refer to: Wheel and Tire (204-04A Wheels and Tires, Removal and Installation).
-
Remove the brake caliper spring.
 |
-
NOTICE: Make sure that all openings are sealed.
NOTICE: Take extra care not to damage the mating faces.
NOTICE: Make sure that the brake hose is not twisted and is correctly located.
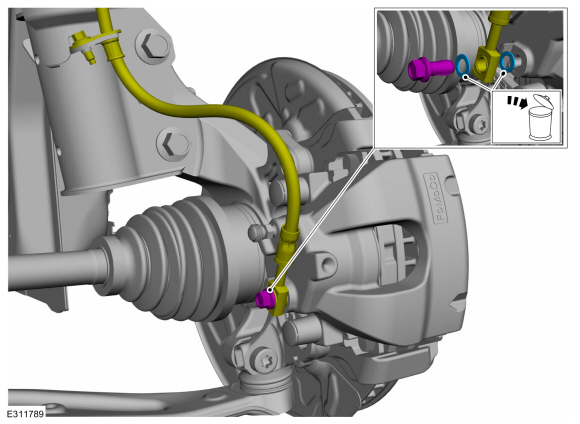
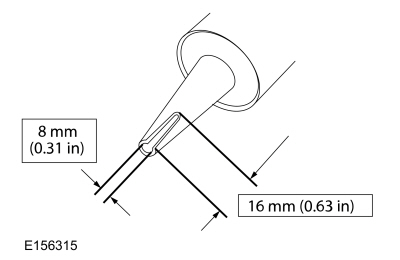
Remove the bolt and disconnect the brake hose. Discard the washers.
Torque: 30 lb.ft (40 Nm)
 |
-
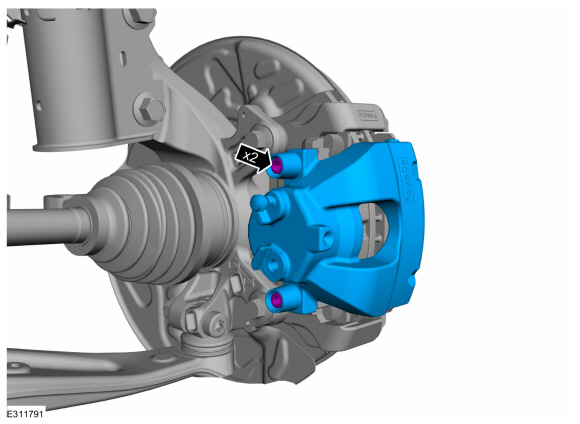
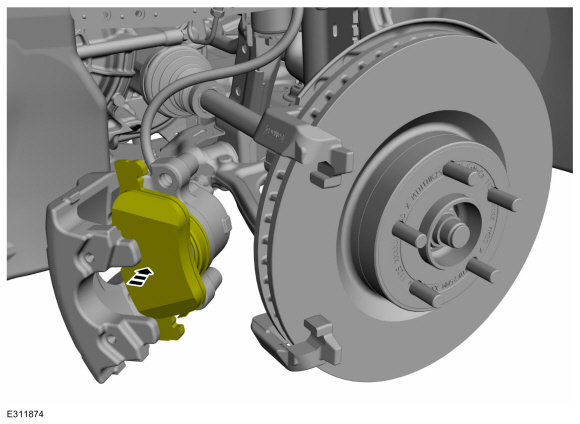
Remove the caps.
 |
-
NOTICE: Do not pry in the caliper sight hole to retract the pistons as this can damage the pistons and boots.
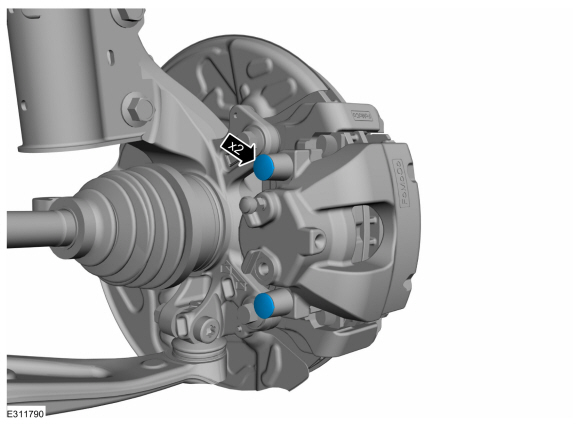
Remove the brake caliper guide pin bolts and the brake caliper.
Torque: 21 lb.ft (28 Nm)
 |
Vehicles without adhesive on brake pad insulator
-
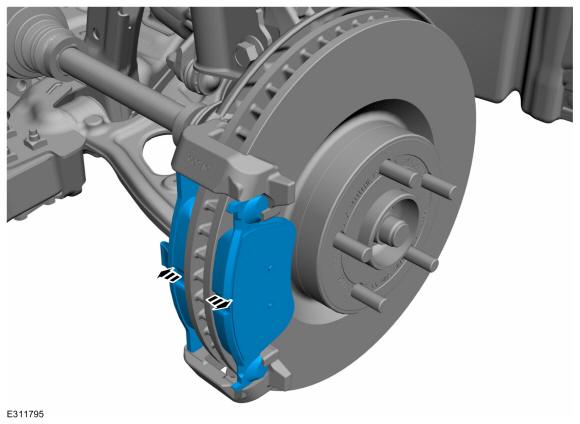
Remove the brake pads.
 |
Vehicles with adhesive on brake pad insulator
-
NOTICE: Brake pads with adhesive on the insulator are one-time use only. When the brake pads are separated from the brake caliper, new brake pads must be installed to prevent brake noise and shudder.
NOTICE: When installing the new brake pads make sure to remove the foil backing from the outboard brake pads. Once the foil backing is removed from the brake pads do not touch the adhesive on the backing.
Separate the outboard brake pad from the brake caliper. Discard the brake pad.
 |
-
NOTICE: Brake pads with adhesive on the insulator are one-time use only. When the brake pads are separated from the brake caliper, new brake pads must be installed to prevent brake noise and shudder.
NOTICE: When installing the new brake pads make sure to remove the foil backing from the outboard brake pads. Once the foil backing is removed from the brake pads do not touch the adhesive on the backing.
Separate the inboard brake pad from the brake caliper. Discard the brake pad.
 |
All vehicles
-
NOTICE: Protect the caliper pistons and boots when pushing the caliper piston into the caliper piston bores or damage to components may occur.
Use a C-clamp and a worn brake pad to compress the disc brake caliper pistons into the brake caliper bore.
 |
Installation
-
To install, reverse the removal procedure.
-
Apply the specified grease.
Material: Motorcraft® Silicone Brake Caliper Grease and Dielectric Compound / XG-3-A (ESA-M1C200-A) (ESE-M1C171-A)
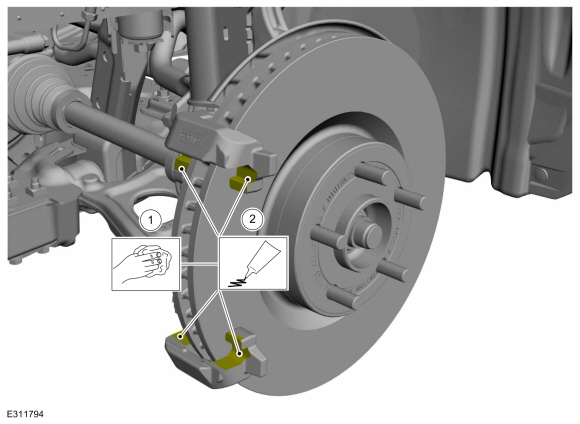 |
Vehicles with adhesive on brake pad insulator
NOTICE: When installing the new brake pads make sure to remove the foil backing from the outboard brake pads. Once the foil backing is removed from the brake pads do not touch the adhesive on the backing.
-
Clean all residual pad adhesive from the finger area
of the brake caliper. Make sure the finger area is free of grease and
foreign material.
Material: Motorcraft® Metal Brake Parts Cleaner / PM-4-A, PM-4-B, APM-4-C
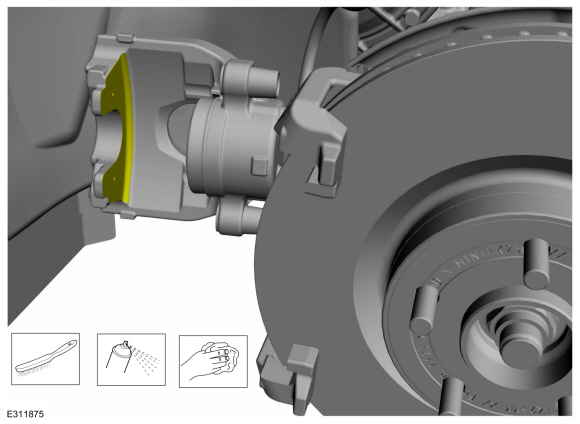 |
-
Clean all residual pad adhesive from the piston area
of the brake caliper. Make sure the piston area is free of grease and
foreign material.
Material: Motorcraft® Metal Brake Parts Cleaner / PM-4-A, PM-4-B, APM-4-C
 |
All vehicles
-
Deactivate the brake service mode.
Refer to: Brake Service Mode Activation and Deactivation (206-00 Brake System - General Information, General Procedures).
-
Bleed the brake system.
Refer to: Brake System Pressure Bleeding (206-00 Brake System - General Information, General Procedures).
-
Start the engine and apply the brake pedal firmly 5
times to assure the outboard brake pads are bonded to the caliper.

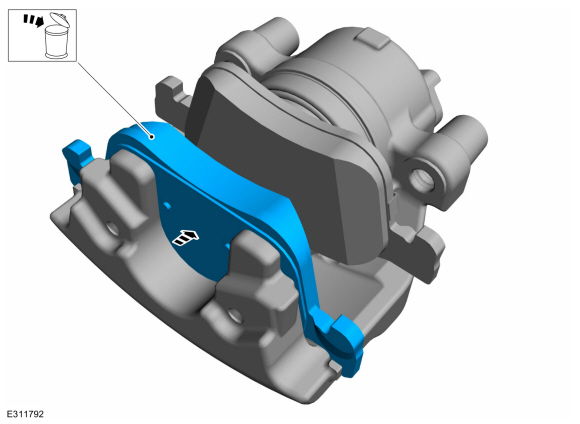
 Removal and Installation - Brake Caliper Anchor Plate
Removal
WARNING:
Service actions on vehicles equipped with electronic brake
booster and electronic parking brakes may cause unexpected brake
application, which could result in injury to hands or fingers...
Other information:
Lincoln Corsair 2020-2026 Service Manual: Diagnosis and Testing - Body System
Global Customer Symptom Code (GCSC) Chart Diagnostics in this manual assume a certain skill level and knowledge of Ford-specific diagnostic practices.REFER to: Diagnostic Methods (100-00 General Information, Description and Operation). Symptom Action Fit/Finish/Body > Water Leak > Passenger Area > Appearance GO to Pinpoint Test A Fit/Finish/Body > Water Leak >..
Lincoln Corsair 2020-2026 Owners Manual: Autowipers (IF EQUIPPED)
Wet or winter driving conditions with ice, snow or salty road mist can cause inconsistent and unexpected wiping or smearing. Autowipers On. High sensitivity. Low sensitivity. Use the rotary control to adjust the sensitivity of the autowipers. When you select low sensitivity, the wipers operate when the sensor detects a large amount of water on the windshield. When you select high se..
Categories
- Manuals Home
- 1st Generation Lincoln Corsair Owners Manual
- 1st Generation Lincoln Corsair Service Manual
- Capacities and Specifications - 2.0L
- Fuel Quality - Gasoline
- Normal Scheduled Maintenance
- New on site
- Most important about car
Information on P Type Tires
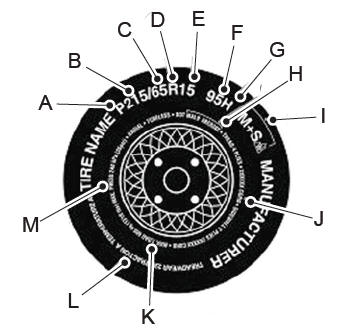
P215/65R15 95H is an example of a tire size, load index and speed rating. The definitions of these items are listed below. (Note that the tire size, load index and speed rating for your vehicle may be different from this example.)
P: Indicates a tire, designated by the Tire and Rim Association, that may be used for service on cars, sport utility vehicles, minivans and light trucks. Note: If your tire size does not begin with a letter this may mean it is designated by either the European Tire and Rim Technical Organization or the Japan Tire Manufacturing Association. 215: Indicates the nominal width of the tire in millimeters from sidewall edge to sidewall edge. In general, the larger the number, the wider the tire. 65: Indicates the aspect ratio which gives the tire's ratio of height to width. R: Indicates a radial type tire. 15: Indicates the wheel or rim diameter in inches. If you change your wheel size, you will have to purchase new tires to match the new wheel diameter. 95: Indicates the tire's load index. It is an index that relates to how much weight a tire can carry. You may find this information in your owner’s manual. If not, contact a local tire dealer.