Lincoln Corsair: Intake Air Distribution and Filtering - 2.0L EcoBoost (177kW/240PS) – MI4 / Removal and Installation - Air Cleaner Outlet Pipe
Special Tool(s) / General Equipment
| Side Cutter Pliers | |
| Hose Clamp Remover/Installer |
Materials
| Name | Specification |
|---|---|
| Motorcraft® Silicone Brake Caliper Grease and Dielectric Compound XG-3-A |
ESA-M1C200-A ESE-M1C171-A |
Removal
NOTICE: The turbocharger compressor vanes can be damaged by even the smallest particles. When removing any turbocharger or engine air intake system component, ensure that no debris enters the system. Failure to do so may result in damage to the turbocharger.
-
NOTICE: Do not pull the engine appearance cover forward or sideways to remove. Failure to press straight upward on the underside of the cover at the attachment points may result in damage to the cover or engine components.
-
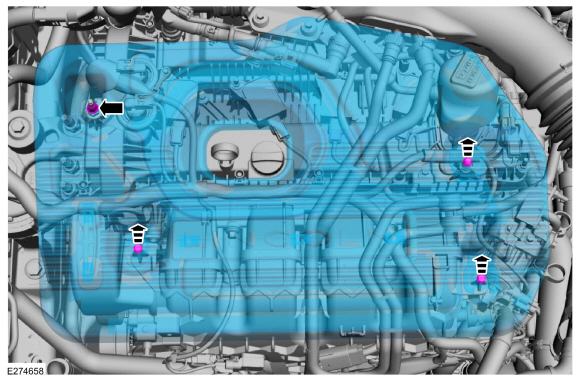
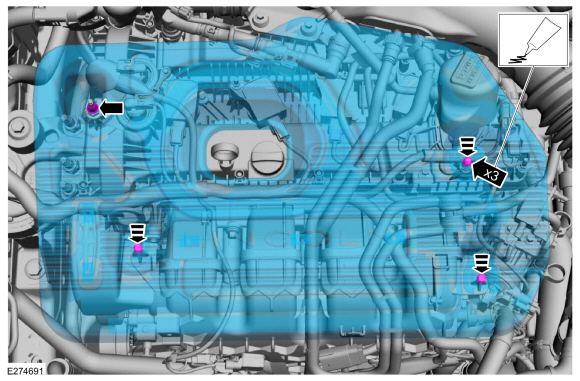
Remove the engine appearance cover nut.
-
Place your hand under the engine appearance cover at
each grommet location and push straight up to release each grommet from
the studs.
-
After all of the grommets have been released from the studs, remove the appearance cover from the engine.
-
Remove the engine appearance cover nut.
 |
-
-
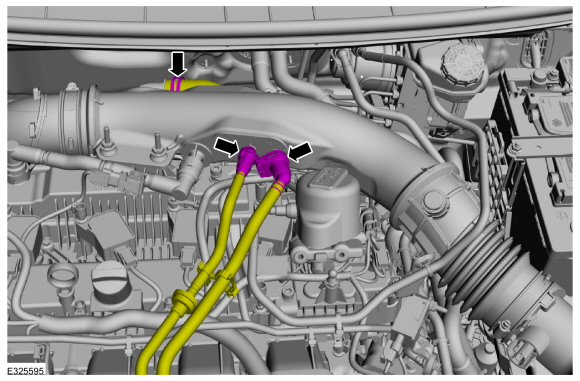
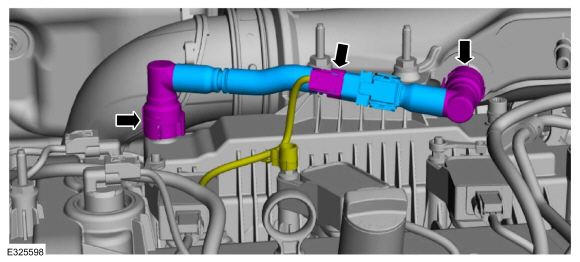
Disconnect the quick release couplings and position aside the fuel vapor hoses.
Refer to: Quick Release Coupling (310-00A Fuel System - General Information - 2.0L EcoBoost (177kW/240PS) – MI4, General Procedures).
-
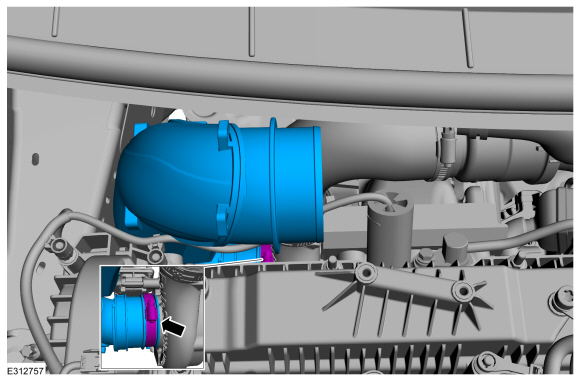
Loosen the clamp and position aside the air bypass hose.
Use the General Equipment: Hose Clamp Remover/Installer
-
Disconnect the quick release couplings and position aside the fuel vapor hoses.
 |
-
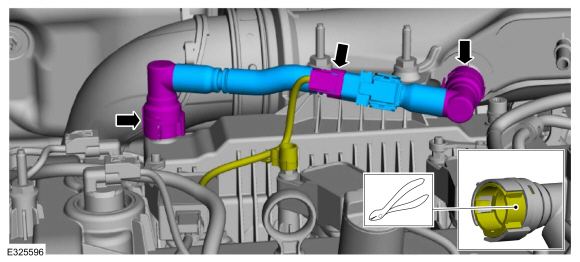
NOTE: The crankcase vent tube may have either a permanent or quick connect connector at one or both ends. If the tube needs to be removed for any reason, the permanent connector(s) must be cut to remove the tube. The tube will then need to be replaced.
NOTE: If the crankcase vent tube is replaced, the replacement part may not come with a crankcase pressure sensor. If so, the PCM will need to be reprogrammed.
-
If equipped, disconnect the wiring harness electrical connector.
-
If necessary, cut the lock tab.
Use the General Equipment: Side Cutter Pliers
-
Remove the crankcase vent tube.
-
If either crankcase vent tube connector was cut, discard the crankcase vent tube.
-
If equipped, disconnect the wiring harness electrical connector.
 |
-
-
Remove the fasteners.
-
Loosen the clamps and remove the air cleaner outlet pipe.
-
Remove the fasteners.
 |
-
-
Loosen the clamp and remove the air cleaner outlet pipe.
-
Loosen the clamp and remove the air cleaner outlet pipe.
 |
Installation
-
Inspect the turbocharger or engine air intake system components and clean, if necessary.
-
-
Install the air cleaner outlet pipe and tighten the clamp.
Torque: 48 lb.in (5.4 Nm)
-
Install the air cleaner outlet pipe and tighten the clamp.
|
-
-
Install the air cleaner outlet pipe and tighten the clamps.
Torque: 42 lb.in (4.8 Nm)
-
Install the fasteners.
Torque: 80 lb.in (9 Nm)
-
Install the air cleaner outlet pipe and tighten the clamps.
|
-
-
Install the crankcase vent tube. If the crankcase
vent tube was previously discarded, install a new crankcase vent tube.
-
If the replacement crankcase vent tube part comes with no crankcase pressure sensor, reprogram the PCM .
Refer to: Module Programming (418-01 Module Configuration, General Procedures).
-
If the replacement crankcase vent tube came without a
crankcase pressure sensor, tape the wiring harness electrical connector
back to the wiring harness.
-
If the replacement crankcase vent tube comes with a
crankcase pressure sensor, connect the wiring harness electrical
connector.
-
Install the crankcase vent tube. If the crankcase
vent tube was previously discarded, install a new crankcase vent tube.
 |
-
-
Position the air bypass hose and install the clamp.
Use the General Equipment: Hose Clamp Remover/Installer
-
Position the fuel vapor hoses and connect the quick release couplings.
Refer to: Quick Release Coupling (310-00A Fuel System - General Information - 2.0L EcoBoost (177kW/240PS) – MI4, General Procedures).
-
Position the air bypass hose and install the clamp.
|
-
-
NOTE: Lubricating the grommets with silicone grease aids in the installation of the engine appearance cover, and any future removal and installation of the cover.
Lubricate each grommet with silicone grease.
Material: Motorcraft® Silicone Brake Caliper Grease and Dielectric Compound / XG-3-A (ESA-M1C200-A) (ESE-M1C171-A)
-
If the engine appearance cover stud bolt is loosened
or removed, it must be installed/tightened into the valve cover.
Torque: 62 lb.in (7 Nm)
-
Position the engine appearance cover onto the engine with the grommets aligned with the studs.
-
Press down on the engine appearance cover at each grommet location to attach the grommets onto the studs.
-
Install the engine appearance cover nut.
Torque: 44 lb.in (5 Nm)
-
 |
 Removal and Installation - Air Cleaner
Removal
NOTICE:
The turbocharger compressor vanes can be damaged by even the
smallest particles. When removing any turbocharger or engine air intake
system component, ensure that no debris enters the system...
 Removal and Installation - Charge Air Cooler (CAC)
Removal
Refer to: Radiator (303-03B Engine Cooling - 2.3L EcoBoost (199kW/270PS), Removal and Installation).
Installation
Refer to: Radiator (303-03B Engine Cooling - 2...
Other information:
Lincoln Corsair 2020-2026 Service Manual: Removal and Installation - Door Lock Cylinder
Removal NOTE: LH (left-hand) side shown, RH (right-hand) side similar. NOTE: Repair individual door lock cylinders by discarding the inoperative door lock cylinder and building a new door lock cylinder using the appropriate lock repair service kit...
Lincoln Corsair 2020-2026 Service Manual: Description and Operation - Engine Component View
Engine — External Components Item Part Number Description 1 85018501 Coolant pump 2 85098509 Coolant pump pulley 3 9G4389G438 Turbocharger 4 9G4799G479 Turbocharger heat shield 5 94489448 Turbocharger gasket 6 8B5358B535 Coolant outlet tube 7 9C3749C374 High-pressure fuel pump cover 8 9D3769D376 Hi..
Categories
- Manuals Home
- 1st Generation Lincoln Corsair Owners Manual
- 1st Generation Lincoln Corsair Service Manual
- General Procedures - Brake Service Mode Activation and Deactivation
- Memory Function
- Opening and Closing the Hood
- New on site
- Most important about car
Selecting a Drive Mode. DRIVE MODES
Selecting a Drive Mode
Note: Drive mode changes may not be available when the ignition is off.