Lincoln Corsair: Automatic Transmission - 8-Speed Automatic Transmission – 8F35/8F40 / General Procedures - Transmission Case Reseal
Special Tool(s) / General Equipment
 |
205-153
(T80T-4000-W)
Handle |
 |
205-199
(T83T-3132-A1)
Installer, Spindle/Axle Shaft T83-4000-A TKIT-1983-F TKIT-1983-FLM TKIT-1983-FX |
 |
307-003
(T57L-500-B)
Holding Fixture, Transmission |
 |
307-091 Handle, Torque Converter TKIT-2009TC-F |
 |
307-566 Retainer, Torque Converter TKIT-2006C-FFMFLM TKIT-2006C-LM TKIT-2006C-ROW |
 |
307-758 Installer, Axle Seal -FWD |
 |
307-760 Installer, Converter Seal |
 |
307-761 Installer,Turbine Seal |
 |
307-762 Staking Tool, Turbine Seal |
 |
307-763 Tool, Turbine Seal Deburring |
 |
307-764 Installer/Sizer, Stator Teflon Seal |
 |
307-765 Protector, Turbine Seal |
 |
307-769 Fixture, Bench Mount |
| Flat Headed Screw Driver | |
Materials
| Name | Specification |
|---|---|
| Motorcraft® MERCON® ULV Automatic Transmission Fluid XT-12-QULV |
WSS-M2C949-A, MERCON® ULV |
| Motorcraft® Ultra Silicone Sealant TA-29 |
WSS-M4G323-A8 |
Repair
-
Remove the transmission.
-
For information on component views and base part numbers.
Refer to: Transmission Description (307-01A Automatic Transmission - 8-Speed Automatic Transmission – 8F35/8F40, Description and Operation).
-
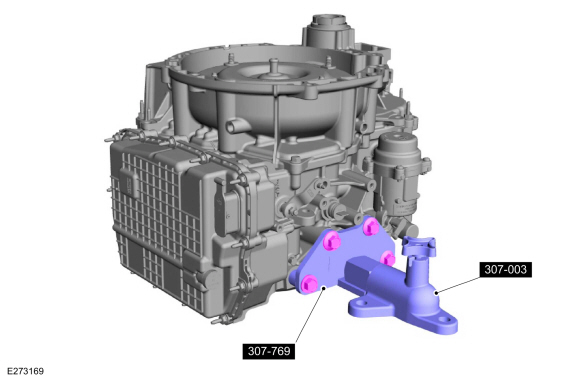
Install the special tool and secure the transmission to the bench mounted fixture.
Use Special Service Tool: 307-769 Fixture, Bench Mount. , 307-003 (T57L-500-B) Holding Fixture, Transmission.
 |
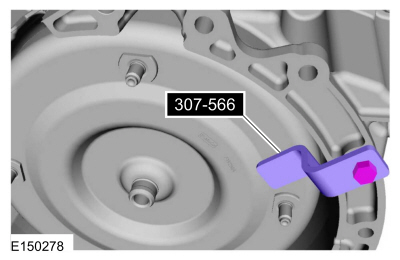
-
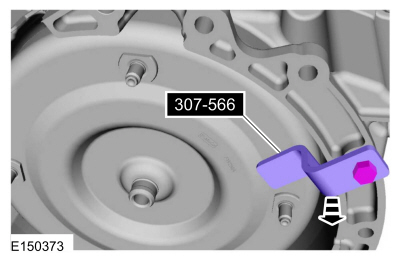
Remove the special tool.
Use Special Service Tool: 307-566 Retainer, Torque Converter.
 |
-
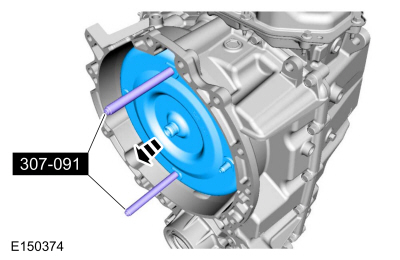
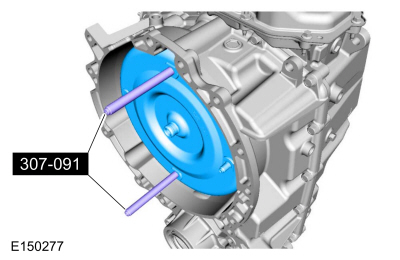
NOTICE: The torque converter is heavy. Be careful not to drop it or damage will result.
Using the special tools, remove the torque converter from the transmission.
Use Special Service Tool: 307-091 Handle, Torque Converter.
 |
-
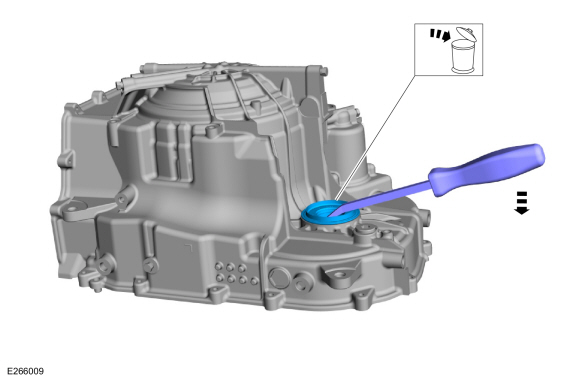
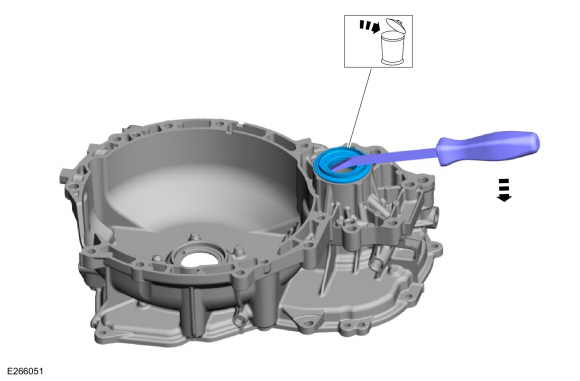
Remove and discard the LH halfshaft seal.
Use the General Equipment: Flat Headed Screw Driver
 |
-
Remove and discard the RH halfshaft seal.
Use the General Equipment: Flat Headed Screw Driver
 |
-
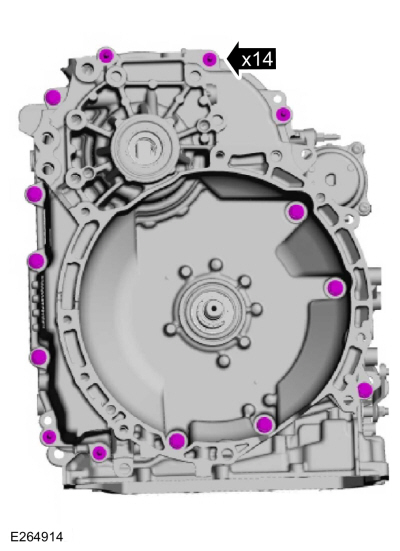
NOTE: Note the location of the stud bolts for assembly.
Remove the torque converter housing bolts.
 |
-
Pry the torque converter housing loose from the transmission case.
Use the General Equipment: Flat Headed Screw Driver
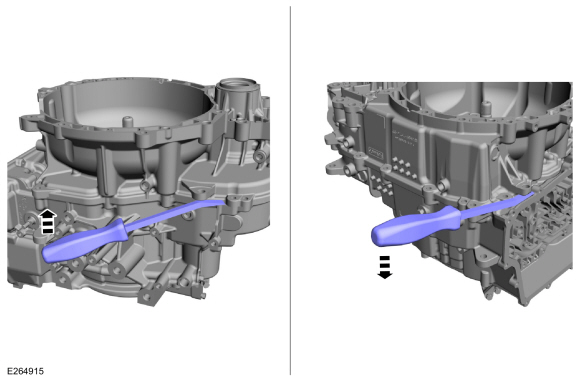 |
-
Remove the torque converter housing from the transmission case.
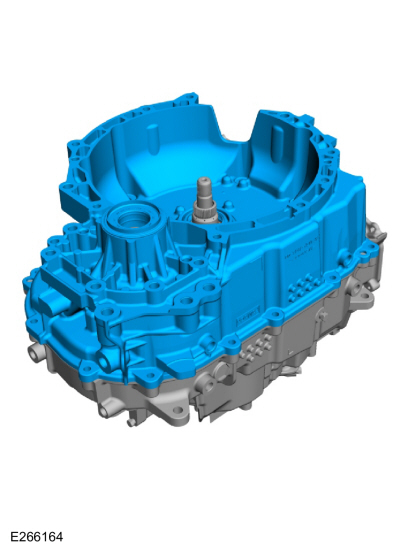 |
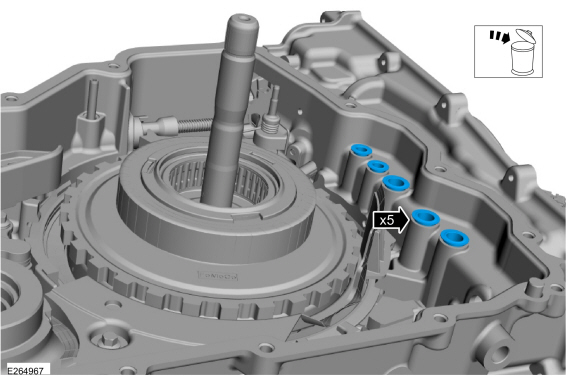
-
Remove and discard the clutch feed seals.
 |
-
-
NOTE: If the LH transmission case bushing or the LH halfshaft bushing surface shows signs of excessive wear or damage, a new LH transmission case bushing and a new LH halfshaft must be installed, or excessive noise or transmission failure can occur.
Clean and inspect the LH transmission case bushing and the bushing surface on the LH halfshaft for damage or excessive wear. If the LH transmission case bushing or the LH halfshaft shows signs of excessive wear or damage, install new components.
Refer to: Transmission (307-01A Automatic Transmission - 8-Speed Automatic Transmission – 8F35/8F40, Overhaul).
-
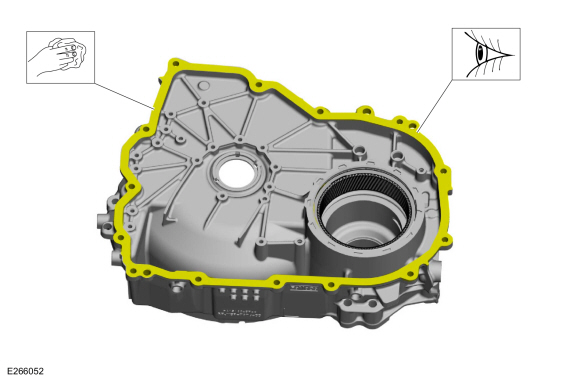
NOTICE: Do not use metal scrapers, wire brushes, power abrasive discs, or other abrasive means to clean sealing surfaces. These tools cause scratches and gouges which make leak paths.
Make sure that the mating faces are clean and free of foreign material.
Refer to: RTV Sealing Surface Cleaning and Preparation (303-00 Engine System - General Information, General Procedures).
-
 |
-
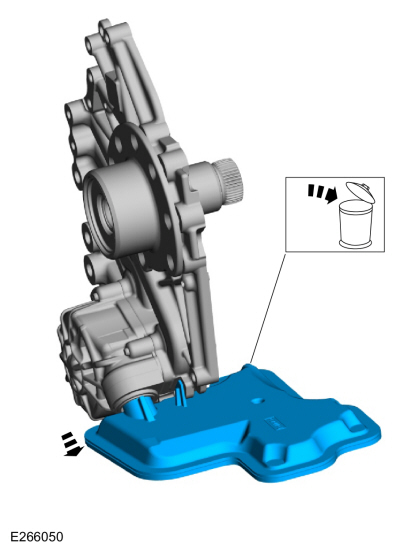
Remove the bolts and the transmission fluid baffle.
 |
-
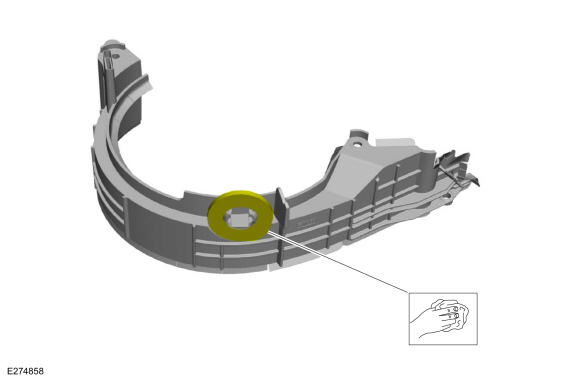
Clean the magnet on the bottom of the transmission fluid baffle.
 |
-
Remove the bolts and the transmission fluid pump assembly.
 |
-
Remove, clean and inspect the following items for the torque converter housing.
-
Plastic thrust washer
-
Chain snubber assembly lubrication seal
-
No. 17 thrust bearing
-
Plastic thrust washer
 |
-
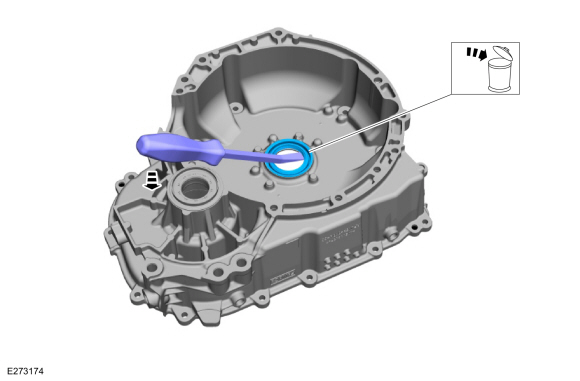
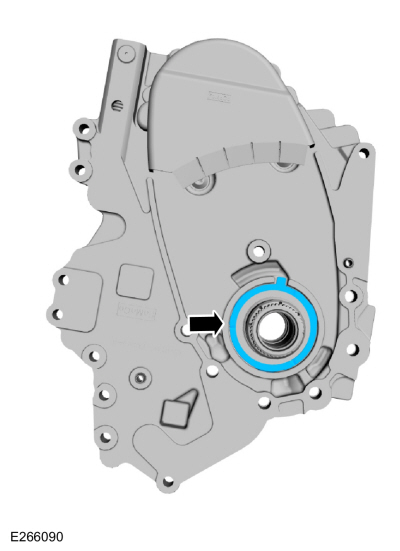
Remove and discard the torque converter hub seal.
 |
-
-
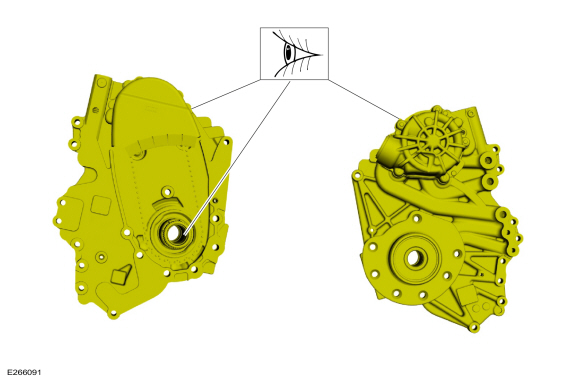
Inspect the torque converter housing and the
differential ring gear for damage or excessive wear. If the differential
ring gear shows signs of excessive wear or damage replace the
differential ring gear.
Refer to: Transmission (307-01A Automatic Transmission - 8-Speed Automatic Transmission – 8F35/8F40, Overhaul).
-
NOTICE: Do not use metal scrapers, wire brushes, power abrasive discs, or other abrasive means to clean sealing surfaces. These tools cause scratches and gouges which make leak paths.
Make sure that the mating faces are clean and free of foreign material.
Refer to: RTV Sealing Surface Cleaning and Preparation (303-00 Engine System - General Information, General Procedures).
-
Inspect the torque converter housing and the
differential ring gear for damage or excessive wear. If the differential
ring gear shows signs of excessive wear or damage replace the
differential ring gear.
 |
-
NOTE: Note the orientation of the transmission fluid filter to the transmission fluid pump assembly.
Remove and discard the transmission fluid filter from the transmission fluid pump assembly.
 |
-
NOTE: Do not disassemble the transmission fluid pump assembly.
Inspect the transmission fluid pump assembly and the input shaft bushing for damage or excessive wear, install new if necessary.
 |
-
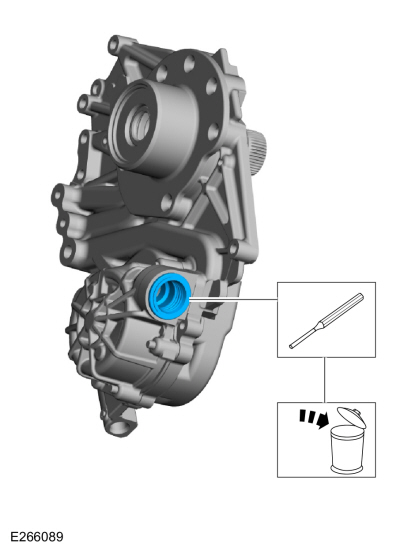
Remove and discard the transmission fluid filter seal.
Use the General Equipment: Flat Headed Screw Driver
 |
-
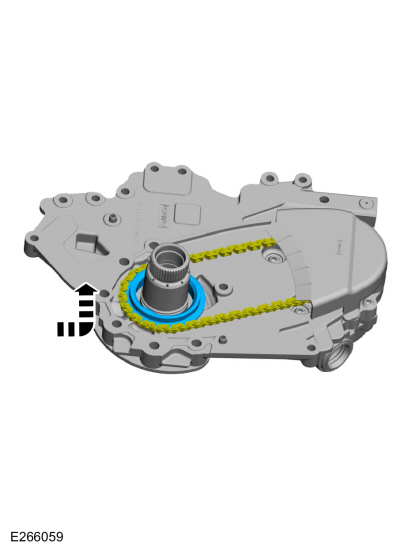
Remove the transmission fluid pump drive sprocket.
 |
-
NOTE: Note position of locating tab on thrust washer.
Remove the transmission fluid pump drive sprocket thrust washer.
 |
-
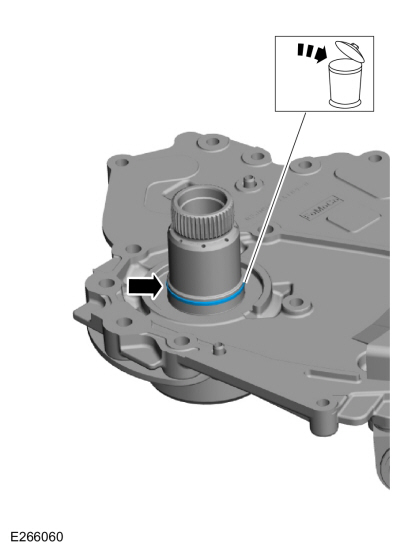
Remove and discard the stator seal.
 |
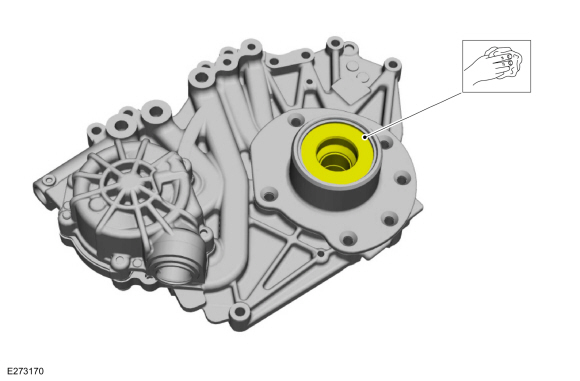
-
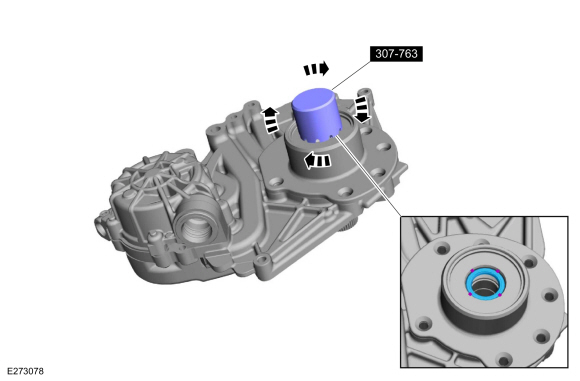
Using the special tool, debur the turbine shaft seal bore opening.
Use Special Service Tool: 307-763 Tool, Turbine Seal Deburring.
 |
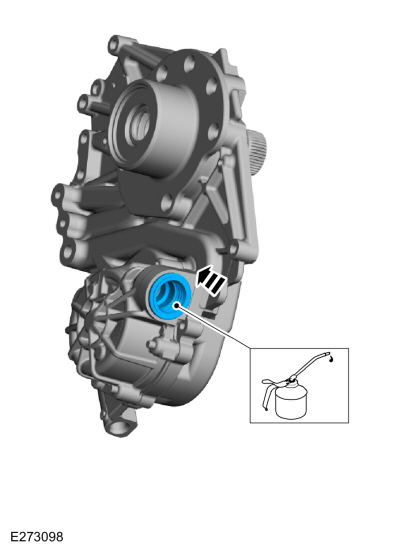
-
Remove and discard the turbine shaft seal.
Use the General Equipment: Flat Headed Screw Driver
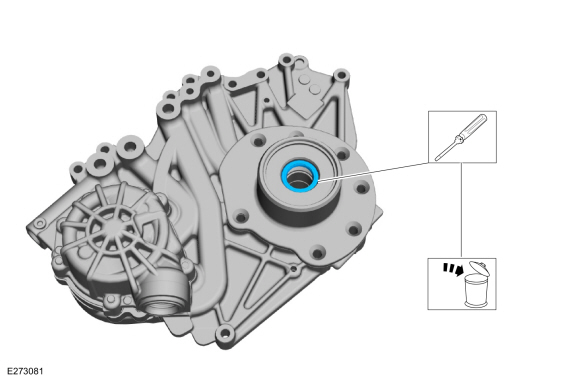 |
-
Clean the turbine shaft seal bore.
 |
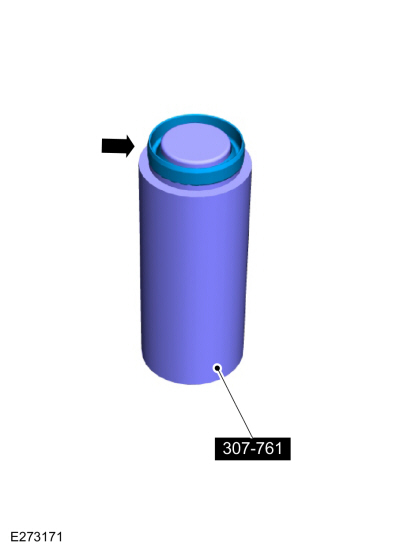
-
Place a new turbine shaft seal on the special tool.
Use Special Service Tool: 307-761 Installer,Turbine Seal.
 |
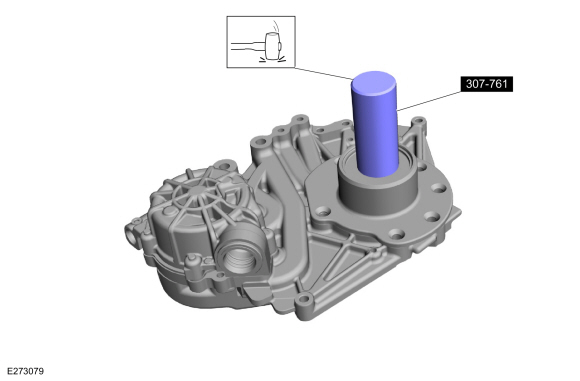
-
Using the special tool, install the turbine shaft seal.
Use Special Service Tool: 307-761 Installer,Turbine Seal.
 |
-
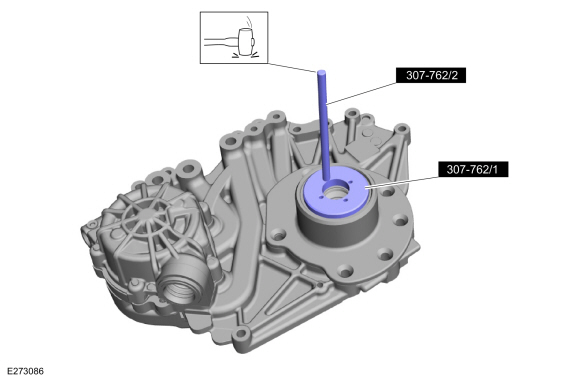
Using the special tool, stake the turbine shaft seal in the transmission fluid pump housing in four locations.
Use Special Service Tool: 307-762 Staking Tool, Turbine Seal.
 |
-
Install a new transmission fluid filter seal. Lubricate
the transmission fluid filter seal with clean transmission fluid.
Material: Motorcraft® MERCON® ULV Automatic Transmission Fluid / XT-12-QULV (WSS-M2C949-A, ) (MERCON® ULV)
 |
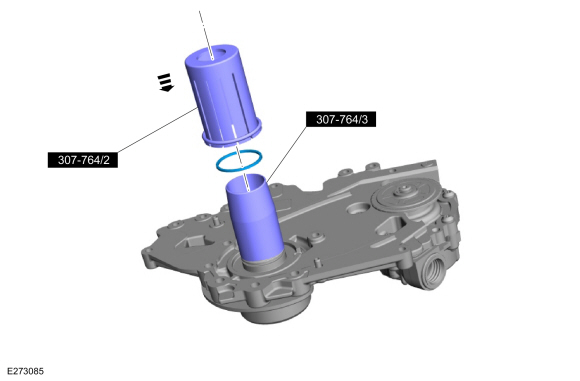
-
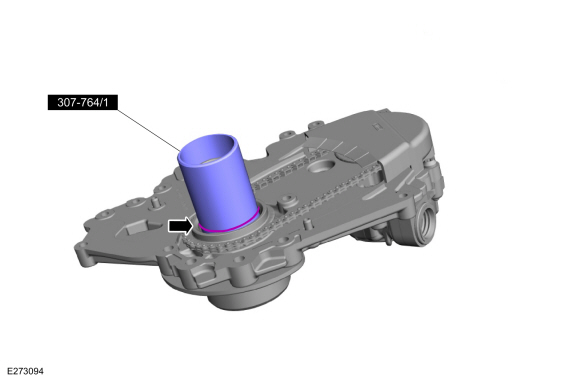
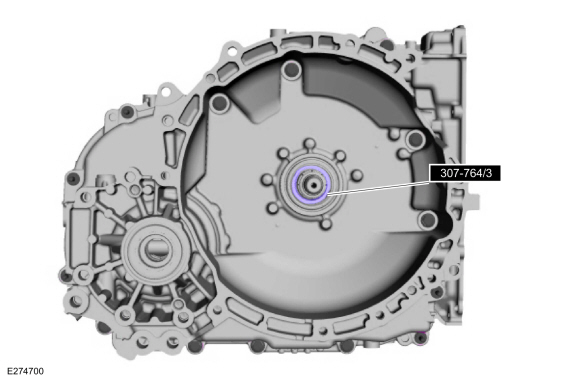
Using the special tools, install the stator seal.
Use Special Service Tool: 307-764 Installer/Sizer, Stator Teflon Seal.
 |
-
NOTE: Note position of locating tab on thrust washer.
Install the transmission fluid pump drive sprocket plastic thrust washer.
|
-
Position the transmission fluid pump drive chain and install the transmission fluid pump drive gear.
 |
-
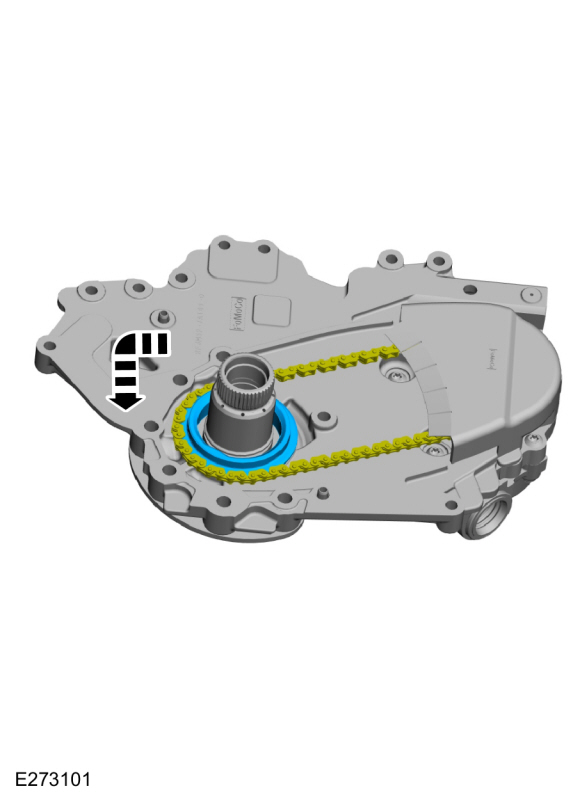
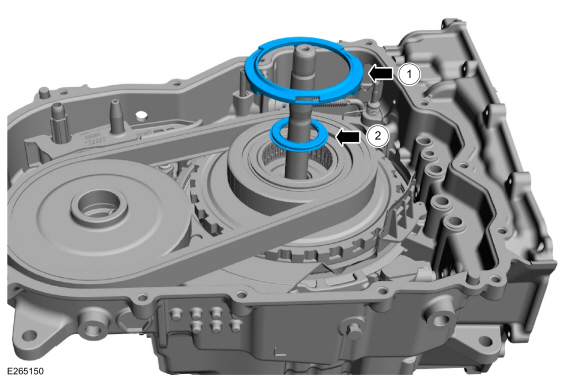
NOTE: The special tool is removed just prior to torque converter installation.
Install the special tool to size the Teflon® seal. Install the O-ring seal around the special tool to hold the transmission fluid pump drive sprocket in place during assembly.
Use Special Service Tool: 307-764 Installer/Sizer, Stator Teflon Seal.
 |
-
Install a new transmission fluid filter.
 |
-
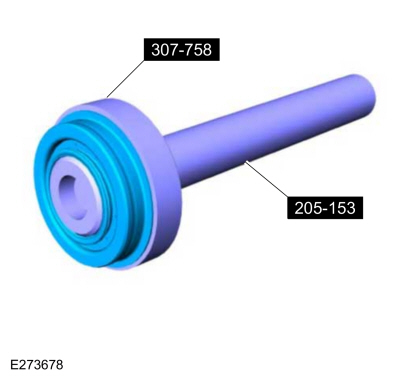
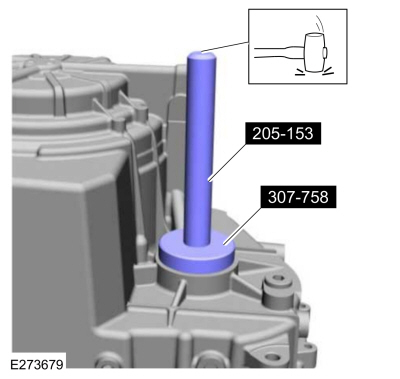
Assemble the special tools and install a new RH halfshaft seal on the special tool.
Use Special Service Tool: 307-758 Installer, Axle Seal -FWD. , 205-153 (T80T-4000-W) Handle.
 |
-
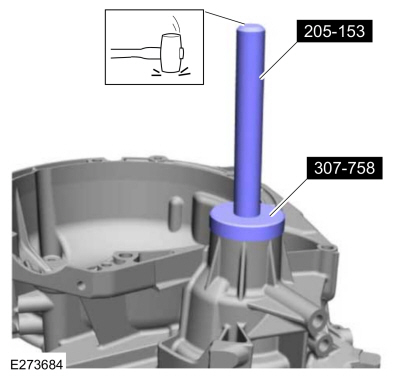
Using the special tools, install the new RH halfshaft seal.
Use Special Service Tool: 205-153 (T80T-4000-W) Handle. , 307-758 Installer, Axle Seal -FWD.
 |
-
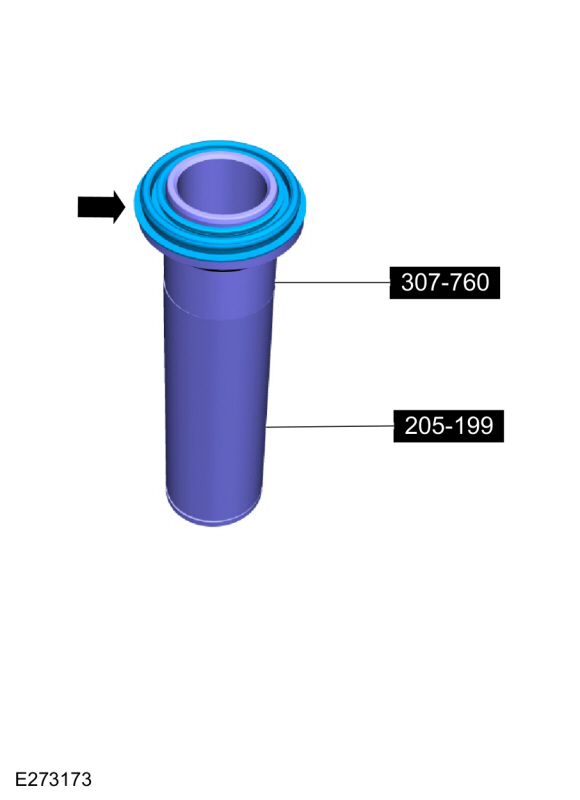
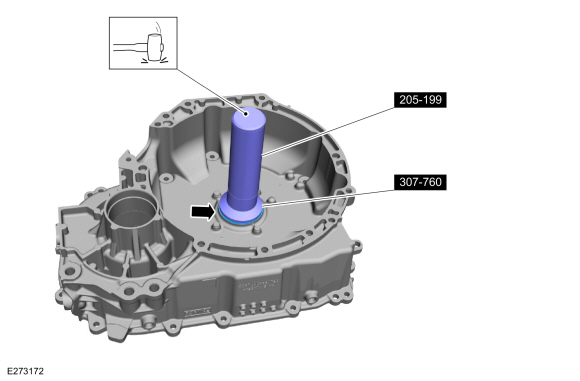
Place a new torque converter hub seal on the special tool.
Use Special Service Tool: 307-760 Installer, Converter Seal. , 205-199 (T83T-3132-A1) Installer, Spindle/Axle Shaft.
 |
-
Using the special tools, install the torque converter hub seal.
Use Special Service Tool: 307-760 Installer, Converter Seal. , 205-199 (T83T-3132-A1) Installer, Spindle/Axle Shaft.
 |
-
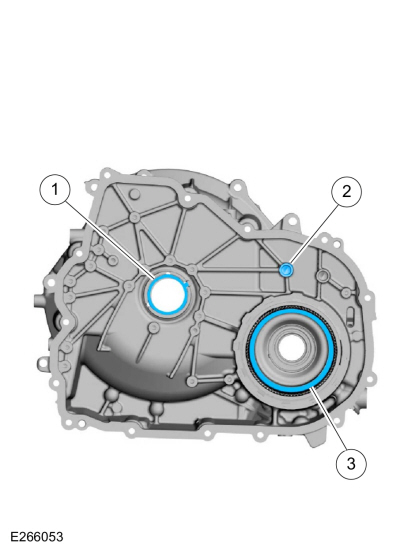
Install the following items into the torque converter housing.
-
Plastic thrust washer
-
Chain snubber assembly lubrication seal
-
No. 17 thrust bearing
-
Plastic thrust washer
|
-
Install the transmission fluid pump assembly and the bolts to the torque converter housing.
Torque: 97 lb.in (11 Nm)
|
-
Install the transmission fluid baffle and the bolts.
Torque: 97 lb.in (11 Nm)
|
-
Install the 5 new clutch feed seals.
 |
-
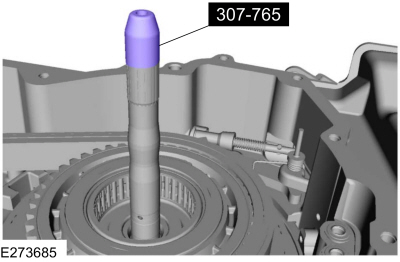
Install the special tool on the input shaft.
Use Special Service Tool: 307-765 Protector, Turbine Seal.
 |
-
Verify the thrust washer and thrust bearing are correctly installed.
-
Drive sprocket thrust washer
-
No. 13 thrust washer
-
Drive sprocket thrust washer
 |
-
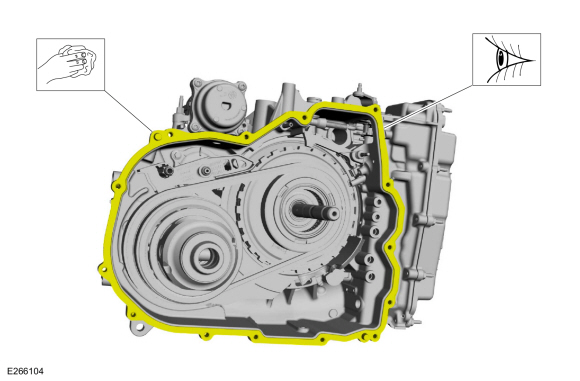
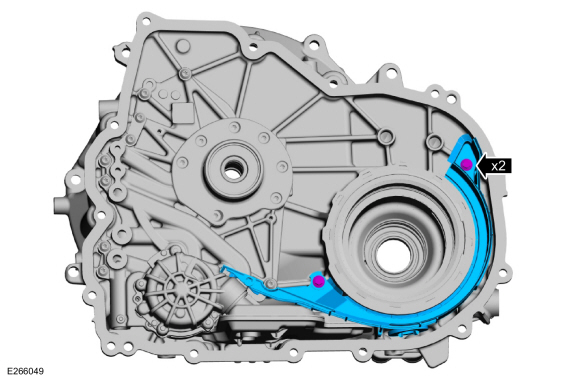
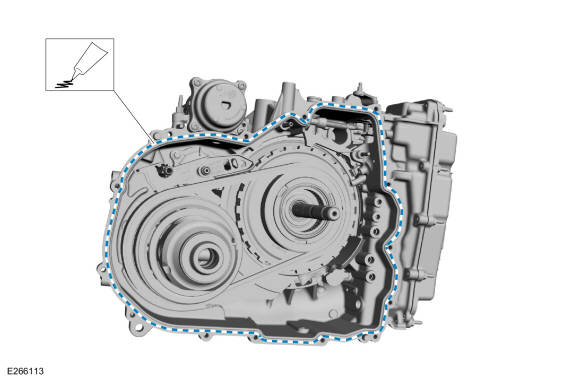
NOTE: Be sure the sealing surfaces of the torque converter housing and the transmission housing are free of transmission fluid before applying silicone.
Apply silicone to the sealing surface of the transmission case.
Material: Motorcraft® Ultra Silicone Sealant / TA-29 (WSS-M4G323-A8)
 |
-
Install the torque converter housing on the transmission case.
|
-
NOTE: Be sure the torque converter housing stud bolt is in the correct location as noted during disassembly.
Install the torque converter housing bolts and the torque converter housing stud bolt.
Torque: 18 lb.ft (25 Nm)
|
-
Remove the special tool from the input shaft.
Use Special Service Tool: 307-765 Protector, Turbine Seal.
 |
-
Assemble the special tools. Install a new LH halfshaft seal on the special tool.
Use Special Service Tool: 205-153 (T80T-4000-W) Handle. , 307-758 Installer, Axle Seal -FWD.
|
-
Using the special tools, install the new LH halfshaft seal in the transmission case.
Use Special Service Tool: 205-153 (T80T-4000-W) Handle. , 307-758 Installer, Axle Seal -FWD.
 |
-
NOTE: The stator seal sizing tool must remain installed until the torque converter is installed.
Remove the stator seal sizing tool.
Use Special Service Tool: 307-764 Installer/Sizer, Stator Teflon Seal.
 |
-
NOTICE: The torque converter is heavy. Be careful not to drop it or damage will result.
Using the special tools, install the torque converter.
Use Special Service Tool: 307-091 Handle, Torque Converter.
 |
-
Install the special tool.
Use Special Service Tool: 307-566 Retainer, Torque Converter.
 |
-
Remove the transmission from the bench-mounted holding fixture and the special tool.
Remove Special Service Tool: 307-003 (T57L-500-B) Holding Fixture, Transmission.
Use Special Service Tool: 307-769 Fixture, Bench Mount.
|
-
Install the transmission.
 General Procedures - Adaptive Learning Drive Cycle
Configuration
NOTE:
The engine and transmission must be at normal operating temperature.
Using the scan tool, clear the DTC and Transmission Adaptive Tables...
 General Procedures - Transmission Fluid Drain and Refill
Special Tool(s) /
General Equipment
Funnel
Materials
Name
Specification
Motorcraft® MERCON® ULV Automatic Transmission FluidXT-12-QULV
WSS-M2C949-A, MERCON® ULV
Draining
With the vehicle in NEUTRAL, position the vehicle on a hoist...
Other information:
Lincoln Corsair 2020-2026 Service Manual: Removal and Installation - Halfshaft Seal RH
Special Tool(s) / General Equipment 205-153 (T80T-4000-W) Handle 307-758Installer, Axle Seal -FWD Flat Headed Screw Driver Removal With the vehicle in NEUTRAL, position it on a hoist. Refer to: Jacking and Lifting - Overview (100-02 Jacking and Lifting, Description and Operation)...
Lincoln Corsair 2020-2026 Owners Manual: Engine Block Heater
WARNING: Failure to follow engine block heater instructions could result in property damage or serious personal injury. WARNING: Do not use your heater with ungrounded electrical systems or two-pronged adapters. There is a risk of electrical shock...
Categories
- Manuals Home
- 1st Generation Lincoln Corsair Owners Manual
- 1st Generation Lincoln Corsair Service Manual
- Exterior Mirrors
- Child Safety Locks
- Opening and Closing the Hood
- New on site
- Most important about car
Second Stage: Checking Tire Pressure
WARNING: If the tire does not inflate to the recommended tire pressure within 15 minutes, stop and call roadside assistance.
WARNING: The power plug may get hot after use and should be handled carefully when unplugging.
Check the air pressure of your tires as follows: