Lincoln Corsair: Engine Ignition - 2.0L EcoBoost (177kW/240PS) – MI4/2.0L EcoBoost (184kW/250PS) – MI4 / Removal and Installation - Ignition Coil-On-Plug
Lincoln Corsair 2020-2026 Service Manual / Powertrain / Engine / Engine Ignition - 2.0L EcoBoost (177kW/240PS) – MI4/2.0L EcoBoost (184kW/250PS) – MI4 / Removal and Installation - Ignition Coil-On-Plug
Removal
-
Remove the Air Cleaner Outlet Pipe.
Refer to: Air Cleaner Outlet Pipe (303-12B Intake Air Distribution and Filtering - 2.3L EcoBoost (199kW/270PS), Removal and Installation).
-
-
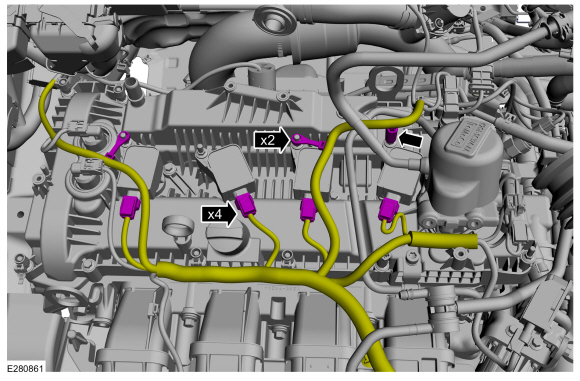
Release the wiring harness retainers from the ignition coil-on-plug studbolts.
-
Slide the red locking tab (CPA) back away from the
ignition coil-on-plug, depress the latch and then remove the connector
from the ignition coil-on-plug.
-
Release the wiring harness retainers from the ignition coil-on-plug studbolts.
 |
- Use compressed air to remove any foreign material from the ignition coil-on-plugs and surrounding area before removing the ignition coil-on-plugs.
-
-
NOTE: When removing the ignition coil-on-plugs, a slight twisting motion will break the seal and ease removal.
Remove the ignition coil-on-plug retainers,
-
Remove the ignition coils from cylinders 1, 2 and 3.
-
When removing the ignition coil from cylinder 4,
carefully rotate the coil clockwise 90° and lift it out of the cylinder
head.
-
 |
-
Inspect the ignition coil-on-plug assembly for cracks,
rips or tears. Replace any damaged coil-on-plug assemblies.
 |
Installation
-
NOTE: When installing cylinder 4 ignition coil, lower coil assembly between the fuel lines. Then rotate counter-clockwise 90-degrees and lower into position making sure boot engages spark plug properly.
Install the ignition coil-on-plug assemblies, then install and tighten the ignition coil-on-plug retainers.
Torque: 71 lb.in (8 Nm)
|
-
-
Attach the wiring harness retainers to the ignition coil-on-plug studbolts.
-
Push the wire harness side connector onto the
ignition coil-on-plug connector until locked. A clicking sound will be
heard when fully seated. Slide the red locking tab (CPA) toward the
ignition coil-on-plug until a second clicking sound is heard.
-
Attach the wiring harness retainers to the ignition coil-on-plug studbolts.
|
-
Install the Air Cleaner Outlet Pipe.
Refer to: Air Cleaner Outlet Pipe (303-12B Intake Air Distribution and Filtering - 2.3L EcoBoost (199kW/270PS), Removal and Installation).
 Diagnosis and Testing - Engine Ignition
Diagnostic Trouble Code (DTC) Chart
Diagnostics in this manual assume a certain skill level and knowledge of Ford-specific diagnostic practices. REFER to: Diagnostic Methods (100-00 General Information, Description and Operation)...
 Removal and Installation - Spark Plugs
Removal
NOTE:
Removal steps in this procedure may contain installation details.
Remove the ignition coil-on-plugs.
Refer to: Ignition Coil-On-Plug (303-07A Engine Ignition - 2...
Other information:
Lincoln Corsair 2020-2026 Service Manual: Removal and Installation - Crankshaft Pulley
Special Tool(s) / General Equipment 303-1521Alignment Tool, Crankshaft Position SensorTKIT-2010C-FLM 303-1686Holding Tool, Camshaft 303-1689Holding Tool, Crank Damper 303-507Timing Peg, Crankshaft TDCTKIT-2001N-FLMTKIT-2001N-ROW Removal LHD AWD/LHD FWD ..
Lincoln Corsair 2020-2026 Service Manual: Removal and Installation - Keyless Entry Keypad
Removal NOTE: The keyless entry keypad is serviced as an assembly with the front door upper moulding. Remove the front door upper moulding. Refer to: Front Door Upper Moulding (501-08 Exterior Trim and Ornamentation, Removal and Installation). Installation To install, reverse the removal procedure. Carry out the power door window initialization. Refer to:..
Categories
- Manuals Home
- 1st Generation Lincoln Corsair Owners Manual
- 1st Generation Lincoln Corsair Service Manual
- Capacities and Specifications - 2.0L
- Memory Function
- Opening and Closing the Hood
- New on site
- Most important about car
Information on P Type Tires
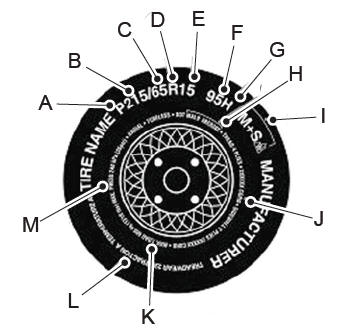
P215/65R15 95H is an example of a tire size, load index and speed rating. The definitions of these items are listed below. (Note that the tire size, load index and speed rating for your vehicle may be different from this example.)
P: Indicates a tire, designated by the Tire and Rim Association, that may be used for service on cars, sport utility vehicles, minivans and light trucks. Note: If your tire size does not begin with a letter this may mean it is designated by either the European Tire and Rim Technical Organization or the Japan Tire Manufacturing Association. 215: Indicates the nominal width of the tire in millimeters from sidewall edge to sidewall edge. In general, the larger the number, the wider the tire. 65: Indicates the aspect ratio which gives the tire's ratio of height to width. R: Indicates a radial type tire. 15: Indicates the wheel or rim diameter in inches. If you change your wheel size, you will have to purchase new tires to match the new wheel diameter. 95: Indicates the tire's load index. It is an index that relates to how much weight a tire can carry. You may find this information in your owner’s manual. If not, contact a local tire dealer.Copyright © 2026 www.licorsair.com