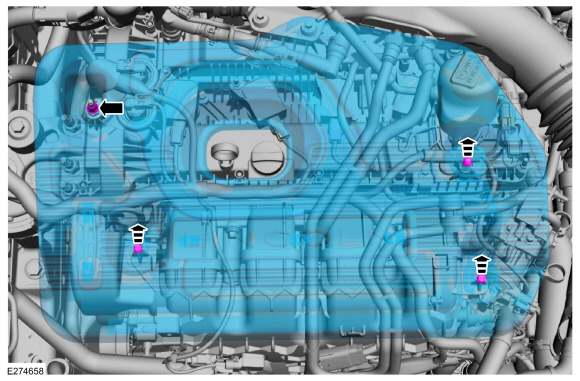
Lincoln Corsair: Engine Emission Control - 2.0L EcoBoost (177kW/240PS) – MI4 / Removal and Installation - Differential Pressure Feedback Exhaust Gas Recirculation (EGR) Sensor
Lincoln Corsair 2020-2024 Service Manual / Powertrain / Engine / Engine Emission Control - 2.0L EcoBoost (177kW/240PS) – MI4 / Removal and Installation - Differential Pressure Feedback Exhaust Gas Recirculation (EGR) Sensor
Materials
| Name | Specification |
|---|---|
| Motorcraft® Silicone Brake Caliper Grease and Dielectric Compound XG-3-A |
ESA-M1C200-A ESE-M1C171-A |
Removal
NOTE: Removal steps in this procedure may contain installation details.
-
NOTE: Do not pull the engine appearance cover forward or sideways to remove. Failure to press straight upward on the underside of the cover at the attachment points may result in damage to the cover or engine components.
-
Remove the engine appearance cover nut.
-
Place your hand under the engine appearance cover at
each grommet location and push straight up to release each grommet from
the studs.
-
After all of the grommets have been released from the studs, remove the appearance cover from the engine.
-
Remove the engine appearance cover nut.
 |
-
-
Disconnect the electrical connector.
-
Disconnect the differential pressure sensor hose.
-
Loosen the clamps and disconnect the differential pressure sensor hoses.
-
Remove the fasteners and remove the differential pressure feedback EGR sensor and hose assembly.
Torque:
Stud bolt: 44 lb.in (5 Nm)
Nut: 31 lb.in (3.5 Nm)
-
Disconnect the electrical connector.
 |
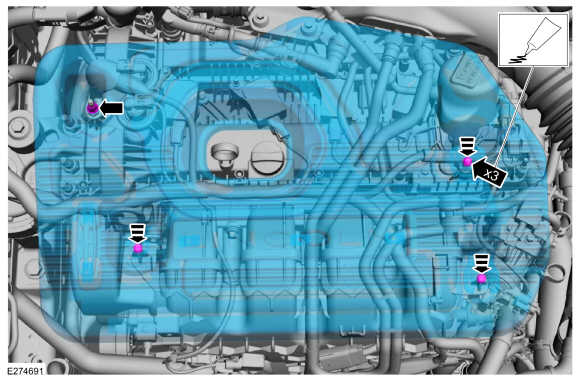
Installation
-
To install, reverse the removal procedure.
-
-
NOTE: Lubricating the grommets with silicone grease aids in the installation of the engine appearance cover, and any future removal and installation of the cover.
Lubricate each grommet with silicone grease.
Material: Motorcraft® Silicone Brake Caliper Grease and Dielectric Compound / XG-3-A (ESA-M1C200-A) (ESE-M1C171-A)
-
If the engine appearance cover stud bolt is loosened
or removed, it must be installed/tightened into the valve cover.
Torque: 62 lb.in (7 Nm)
-
Position the engine appearance cover onto the engine with the grommets aligned with the studs.
-
Press down on the engine appearance cover at each grommet location to attach the grommets onto the studs.
-
Install the engine appearance cover nut.
Torque: 44 lb.in (5 Nm)
-
 |
 Removal and Installation - Crankcase Vent Oil Separator
Removal
NOTE:
Removal steps in this procedure may contain installation details.
Remove the intake manifold.
Refer to: Intake Manifold (303-01A Engine - 2...
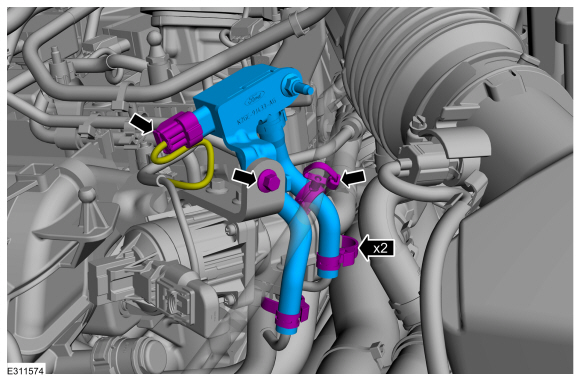
 Removal and Installation - Exhaust Gas Recirculation (EGR) Back Pressure Sensor
Materials
Name
Specification
Motorcraft® Silicone Brake Caliper Grease and Dielectric CompoundXG-3-A
ESA-M1C200-AESE-M1C171-A
Removal
NOTE:
Removal steps in this procedure may contain installation details...
Other information:
Lincoln Corsair 2020-2024 Service Manual: Removal and Installation - Battery Energy Control Module B (BECMB)
Removal WARNING: The following procedure prescribes critical repair steps required for correct restraint system operation during a crash. Follow all notes and steps carefully. Failure to follow step instructions may result in incorrect operation of the restraint system and increases the risk of serious personal injury or death in a crash...
Lincoln Corsair 2020-2024 Service Manual: Diagnosis and Testing - Power Steering
Diagnostic Trouble Code (DTC) Chart Diagnostics in this manual assume a certain skill level and knowledge of Ford-specific diagnostic practices. REFER to: Diagnostic Methods (100-00 General Information, Description and Operation). Module DTC Description Action ABS C0051:23 Steering Wheel Position Sensor: Signal Stuck Low GO to Pinpoint Test AG ABS C0051:27 Steering Wheel ..
Categories
- Manuals Home
- 1st Generation Lincoln Corsair Owners Manual
- 1st Generation Lincoln Corsair Service Manual
- Normal Scheduled Maintenance
- Warning Lamps and Indicators
- Auto-Start-Stop
- New on site
- Most important about car
Information on P Type Tires
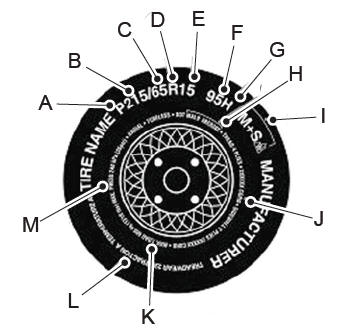
P215/65R15 95H is an example of a tire size, load index and speed rating. The definitions of these items are listed below. (Note that the tire size, load index and speed rating for your vehicle may be different from this example.)
P: Indicates a tire, designated by the Tire and Rim Association, that may be used for service on cars, sport utility vehicles, minivans and light trucks. Note: If your tire size does not begin with a letter this may mean it is designated by either the European Tire and Rim Technical Organization or the Japan Tire Manufacturing Association. 215: Indicates the nominal width of the tire in millimeters from sidewall edge to sidewall edge. In general, the larger the number, the wider the tire. 65: Indicates the aspect ratio which gives the tire's ratio of height to width. R: Indicates a radial type tire. 15: Indicates the wheel or rim diameter in inches. If you change your wheel size, you will have to purchase new tires to match the new wheel diameter. 95: Indicates the tire's load index. It is an index that relates to how much weight a tire can carry. You may find this information in your owner’s manual. If not, contact a local tire dealer.Copyright © 2024 www.licorsair.com